Wednesday, December 11, 2013

Dig deep

La caldereta
I've felt lately that I've been letting the days get away from me. While I've been researching and thinking, thinking and baking, things have been piling up, bit by bit. Cookbooks and philosophy texts sit in haphazard stacks all over the apartment. Some sort of upset is imminent, I'm sure. I've taken to writing at our little dining table, pesky breadcrumbs and all. There's also a canvas bag in the kitchen I keep tripping over. I used it to lug things back from the garden all summer, and it is still slumped where I left it well over a month ago. It's mud-caked from a hurried last beet-greens harvest and full of half-empty seed packets I still need to sort through. And earlier this week, my remaining bottle of elderflower syrup exploded in the refrigerator! I was not home at the time, but I'm sure that it made a spectacular commotion. (I'm a bit sorry to have missed it!) There was glass and syrup everywhere. It should have occurred to me to pop the top off every now and then. Fermentation gases, friends--these are not to be underestimated!
But it hasn't all been mayhem around here. My dissertation research is finally starting to take shape. And the baguettes I pulled out of the oven this week were decidedly less woeful-looking. Also, there was this lamb shoulder, slow-roasted in a lavish puddle of wine, smoked paprika, onion, and whole garlic cloves.
When there is snow on the ground, this is the sort of cooking I like doing best--slow, deliberate, decidedly leisurely. Once you've rubbed salt, rosemary, and thyme into the lamb and cooked down some onion and garlic, there is not much else to do. The lamb joins the onion and garlic in the pan, along with the wine and paprika. Then it all goes into the oven. You just need to look in on it once in a while and do a little basting. Towards the end, you crank the heat and drop in some quartered potatoes to finish with the roast.
By the time evening closes in, then, you'll have something marvellous on your hands. The lamb will be gleaming, falling off the bone, crackling at the edges. Its gaminess will have been tamed just enough by the wine and herbs. And what it didn't drink up the potatoes will have. You should dig deep with this one. Pull that silken onion, those sweet, slumped garlic cloves from the bottom of the pan and add them to your plate. You won't regret it.
I intended with this roast to have a little less of the days get away from me. I had a few days' worth of sandwiches in mind. But I should have known--lamb only gets gamier with time. I have been countering that with sharp dijon mustard and roasted red peppers. But really, what you should do if you make this roast is gather some friends 'round and remind them of just how much they matter to you.
With the potatoes

Roasted Lamb Shoulder in White Wine and Herbs
Adapted, just a little, from Moro East

1 lamb shoulder, bone-in, about 4.5 lb
3 teaspoons fine sea salt
1 tablespoon fresh thyme leaves
1 tablespoon finely chopped fresh rosemary
5 tablespoons olive oil
1 large onion, roughly sliced
18 garlic cloves, peeled
2 bay leaves, preferably fresh
1/2 teaspoon fennel seeds
1/2 teaspoon smoked sweet paprika
1 1/2 cups good white wine
3 tablespoons brandy (optional)
2 lb small waxy potatoes, peeled and quartered

Rub the shoulder with the fine sea salt and half the thyme and rosemary and let it stand for an hour.
Preheat the oven to 350 degrees F.
Meanwhile, put the olive oil, onion, garlic, and a pinch of salt in a large roasting pan. Fry for about 10 minutes over medium heat until the onion softens and starts to colour. Stir in the bay leaves, fennel seeds, paprika, and remaining thyme and rosemary, followed by the wine and brandy, if using. Place the shoulder in the pan, skin-side up, and put the pan in the oven. Roast for 2 1/2 hours, basting the shoulder at least 4 times (be careful not to leave any onion on top of the shoulder - it may burn).
Toss the potatoes in the juices in the roasting pan. Turn up the oven to 425 degrees F and cook for a further 40 minutes, adding a splash of water to the pan if the juices have totally dried up. Taste for seasoning and leave to rest for at least 10 minutes before serving.
Serves 4-6.

Wednesday, December 4, 2013

Hello, again

Thumbprints
It's been awhile. I hope you've all been well. I didn't mean to be away for this long. I'd intended at least to have a pie or two for you ready by Thanksgiving, but none really worked out quite the way I'd been hoping. Grainy custards, sloppy fruit, scorched pastry--it wasn't pretty. I hope you understand.
But have a thumbprint cookie. These are from the second batch I've made this week. I know--thumbprints are nothing new, nothing you haven't seen before. But, you know, there's something to be said for the classics. Besides, I adore these thumbprints--their delicate butteriness, their deep jammy wells, their faint sugary crackle. And if you happen to have some homemade preserves around, crack open a jar, show them off. A good, tart homemade preserve will shine here. (I used cherry-plum and strawberry-balsamic from my reserves. I especially like that they're a little chunkier. Biting into half a cherry or a bit of strawberry in the middle of a cookie is quite nice.)
And by all means, take this recipe as a guideline. Swap out a few tablespoons of the all-purpose flour for rye or buckwheat, maybe. Tumble your cookies through a mound of coconut instead of chopped almonds. Replace the vanilla with a few drops of rosewater. It would be hard to go wrong.
Wells of jam

Thumbprint Cookies
Adapted from Martha Stewart
NOTE: With this second batch, for a little more depth, I swapped out 1/4 cup of the all-purpose for rye, and a few tablespoons more wouldn't have hurt, I think. At first, I wasn't sure about quite how much of a difference the rye made, but Octavian, who ate quite a few thumbprints from the first batch, remarked that the new ones were even better, and this was before I'd told him that I'd made any changes. So, go rye!

4 oz unsalted butter, at room temperature 
1/2 cup granulated sugar
1 1/2 tablespoons demerara sugar 
1 large egg, separated 
3/4 teaspoon vanilla paste or extract 
1 1/4 cups all-purpose flour (see note above)
1/4 teaspoon kosher salt 
1/2 cup blanched almonds, coarsely chopped
1/4 cup good-quality preserves (raspberry, apricot, or something else tart)

Preheat oven to 350 degrees. In a medium bowl, cream the butter and granulated sugar until light and fluffy. Add the egg yolk and vanilla paste and mix well. Add the flour and salt and mix until combined.
Put the egg white in a small bowl and whisk to break it up. Combine the almonds and demerara sugar in a wide dish. 
Form the dough into 1-inch balls. Dip in the egg white, then in the almond mixture. Place on a parchment-lined baking sheet, a couple of inches apart. Make a deep well in the centre of each ball with the end of a thick-handled wooden spoon. Bake for 10 minutes, then remove from the oven and press down the centres again. Fill each cookie with about a 1/2 teaspoon of preserves. Bake for another 10-12 minutes. Remove from the oven and place on a wire rack to cool.
Makes about 18 cookies.

Wednesday, November 13, 2013

Retreat to the kitchen

Delicata hummus
Starting to write a dissertation is no straightforward thing. You can be lost for weeks and not know it. And the advice you tend to get, while sometimes painfully obvious, is still hard to follow. I've been feeling shrunken, scared, and incapable lately. I've been wondering whether in fact I really belong here. And though I've been told that this phase of grad school is like this for lots of people, trying to push through it all, to actually believe in myself, has been hard. Sometimes, it's just been easier to retreat to the kitchen.
Still, I haven't allowed myself to take on anything too consuming. Spending time on something extravagant--a layer cake, another batch of preserves--would at this point, I think, just leave me guilt-stricken. So, I've stuck mostly to simple things, things to help keep me humming through the day, like this sunny delicata-squash hummus.
Ready for poaching Roasted squash Dark edges
Though I spend most mornings at my desk--typing, cursing, thumbing through books--I usually find myself desperately hungry a couple of hours after breakfast, no matter what I eat. So, almost inevitably, I drop what I'm doing, tear through the cupboards, and find a bag of something salty and satisfying to mindlessly crunch my way through. I am never at my best when hungry.
Having a jar of delicata hummus around has helped. Its mellow, nutty sweetness, which gives way to a lingering serrano-kissed heat, is worth slowing down for, worth savouring. So it at least makes for more mindful snacking. I often spread it just as it is on crackers or toasted baguette. But it takes well to being gussied up too. A dab of Greek yogurt tames its heat and adds welcome acidity. A drizzle of maple syrup brings out the delicata's sweetness. Pomegranate and sesame seeds add some nice pop. And though I haven't tried this yet, I get the feeling that something smoky would really make this hummus sing. Smoked sea salt? Crumbled bacon and chives? I don't know, but I can't wait to try.
On baguette
This recipe, by the way comes from Modern Farmer, a new-ish quarterly magazine that I've enjoyed paging through recently. It isn't exactly a food magazine in the expected sense (the hummus recipe is the only recipe in this issue), but unsurprisingly, it touches on issues we should all take some interest in (food waste, breeding heat-resistant strains of lettuce).

Delicata Hummus
Adapted from Karen Lebovitz in Modern Farmer, Fall 2013

2 pounds delicata squash (or of another variety of your choosing)
1 cup plus 2 tablespoons extra-virgin olive oil
Salt and pepper
2 heads garlic, separated into cloves and peeled (about 1/2 cup of cloves)
2 or 3 serrano peppers, sliced in half, stems and seeds removed
1/4 cup tahini
3 tablespoons lemon juice

GARNISHES
Greek yogurt, maple syrup, pomegranate seeds, and toasted sesame seeds

Preheat the oven to 350 degrees F. Cut the squash in half and remove the seeds and string. Rub the flesh with 2 tablespoons of olive oil and 2 generous pinches of salt. Place the squash cut side down on a half-sheet and bake until very soft, about 1 hour.
While the squash is baking, place the garlic, serranos, and remaining olive oil in a small saucepan over low heat. Poach the garlic and peppers in the oil until completely soft, 30-40 minutes. The garlic should be very lightly browned.
Scoop out the flesh from the roasted squash and place in a food processor. Add the poaching oil, garlic, serranos, tahini, and lemon juice. Puree until smooth, about 1 minute. Season to taste with salt and pepper.
The texture of the hummus will vary with the squash. Add up to 1/2 cup of water and blend until the desired consistency is reached. Refrigerate at least 3 hours or up to a week. The hummus also keeps well frozen in an airtight container.
Makes 5-6 cups.

Sunday, October 13, 2013

A kitchen garden

Fava beans
Two springs ago, when I put my first seeds in the ground, I had no idea just how much this little patch would come to mean to me. These were the beginning days of my modest kitchen garden, set to sprout from one of the three 10-x-4-foot raised beds my more capable neighbours had constructed behind our building. Back then, I thought of the space and the work to come only as something that might lead to better eating, to more varied and vibrant plates at our table. I didn't give much thought to the growing itself. A row of collards, at the time, seemed an unlikely place to cultivate affections.
But I've since changed my mind--because once you've put those seeds in the ground, I've found, it's hard not to get drawn into the lives of your plants, to be utterly captivated by them. Your heart leaps when you see the first seedlings poking out from the soil. Sometimes you catch them mid-stretch, just as they're emerging--still pale, partly curled, their first leaves yet to completely unfurl. They look a little sleepy. You are struck by their vulnerability. You want to do whatever you can to see that they thrive. So you find yourself in the midst of an unfolding drama. Your plants are the unlikely heroines, weathering the assault of pests, the elements. You do what you can to help them.
Making the filling Fava bean filling Pinched Agnolotti
And, of course, the plants you grow most attached to are the ones that really struggle, the ones that seem to need you most. For me, this year, it was my fava beans. Favas aren't really meant to be cultivated here in the Midwest. They are slow to grow. It takes them 70-90 days to go from seed to filling their fat pods, and the cool, damp weather that they love is too short-lived here. By the time they flower and begin to set pods, the first of summer's scorching days have already arrived, and so they struggle to produce. Mine also happened to attract the attention of hungry aphids. So for awhile I was afraid they wouldn't produce at all.
But they did. Pathetically, but they did. After a month's worth of harvesting, de-podding, blanching, and freezing--usually just a handful of pods at a time--I was just shy of half a pound of beans. Thinking back on it now, I wonder if it would have been better just to have eaten them as they came in and not worried so much about how few they were. The ones I tried straight from the blanching pot were, after all, incredible--delicate, sweet, vegetal--by far the best tasting thing I've been able to grow. But after all the trouble they'd given me, I wanted to do something special with them. So I ended up making Thomas Keller's fava bean agnolotti.
To be cut Cutting agnolotti Agnolotti
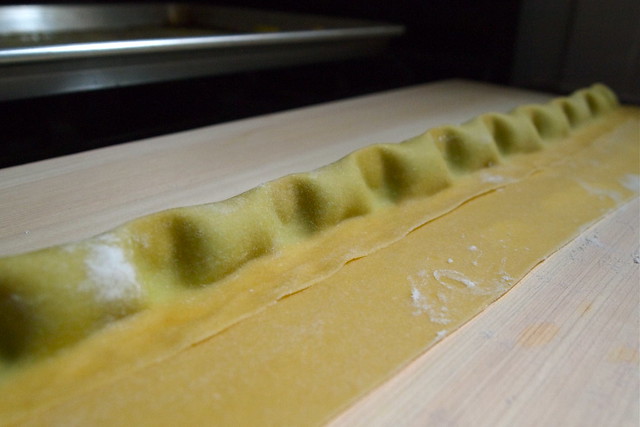
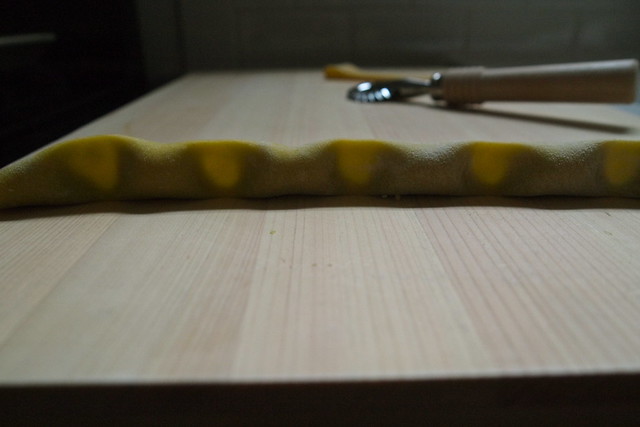
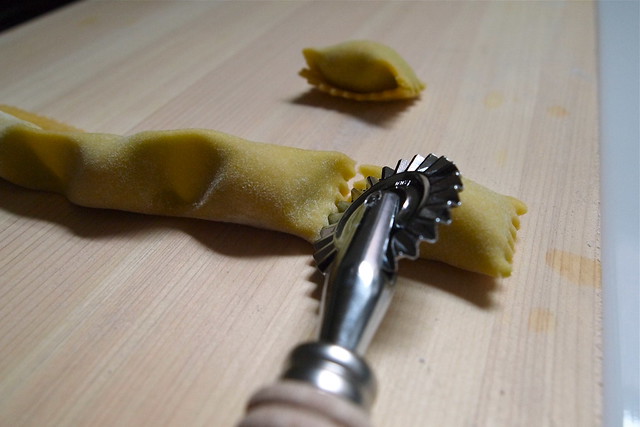
Making any sort of filled pasta takes a bit of time and practice. But it feels rewarding to get your hands dirty and tackle something new. You make agnolotti from long, narrow sheets of pasta. You pipe a single line of filling along each sheet and then bring bottom of the sheet over the filling, folding and pressing to form a tube. Then, using both your thumbs and forefingers, you work your way down the tube, pinching out individual agnolotti. There is something especially satisfying about this part, seeing an agnolotto plump up between your fingers, feeling the filling squish. And once you've cut them apart from each other, what you end up with are gorgeously plump little dumplings. They are so darling that you just want to pinch their cheeks.
Agnolotti Fava bean agnolotti
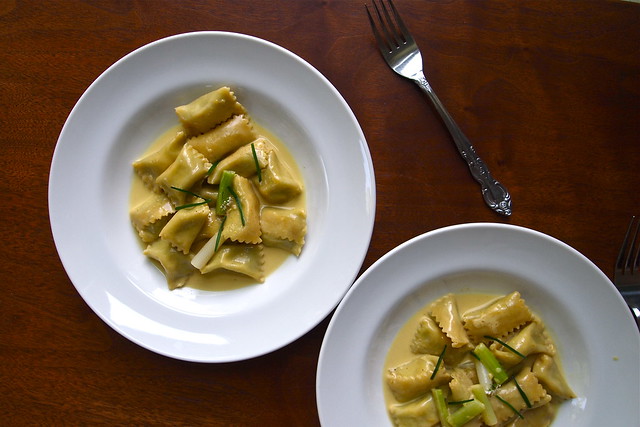
Fat with a filling of fava bean purée, mascarpone, and breadcrumbs, these particular agnolotti were especially lovely--luxuriously textured and delicately vegetal. The puddle of warm spices, butter, stock, and cream in which they sat only helped. On a whim, I garnished each serving with a cluster or two of tiny cilantro flowers snipped from my neighbours' plot. These added a brazen citrusy pop to some bites, which I quite liked. Though the season for fava beans stretches from late spring into early summer, I feel as though these agnolotti are what I'd want to throw together on one of the chilly days just about to creep up on us. They have a soothing, velvety warmth to them that would perfect to cozy up with. And I would do just that, if there were anymore agnolotti in the freezer. But my plants weathered a lot, and I barely had beans enough for this one batch. But maybe favas fare better wherever you are.

Fava Bean Agnolotti with Curry Emulsion
Adapted from Thomas Keller's The French Laundry Cookbook
NOTE: This recipe is a long one, but don't be intimidated. You can break up this recipe over weeks if you want (which is in fact what I did). You can shell and blanch the fava beans one day and then just tuck them into the freezer. Then, when you have more time on your hands, you can make the pasta dough and the filling (thaw your favas first). Shortly after that, or on the same day, you can fill and shape your agnolotti. Finally, when you want to enjoy your agnolotti, all you have to do is cook them and put together the curry emulsion. Shaping agnolotti. It took me a few tries to really understand how to get the shape right (which is not to say that my agnolotti are at all perfect). I think that written instructions can only help so much. At some point, things just clicked for me. But you might want to take a look at the Kitchn's step-by-step agnolotti-making tutorial. Curry emulsion. If, like me, you happen to find yourself with more emulsion than the agnolotti look like they can really handle, just pour off what remains in the pan and stick it in the fridge. Drizzle some on your scrambled eggs or some roasted asparagus the next day. Trust me. Portioning. Keller intends these agnolotti as a starter for six. In my case, they made a modest lunch for three.

PASTA
200 g / 1 2/3 cup all-purpose flour
6 large egg yolks
1 large egg
1 1/2 teaspoons olive oil
1 tablespoon milk

FAVA BEAN FILLING
2-3 lb fava beans (225 g / 1/2 cups shelled)
65 g / 3/4 cup fresh bread crumbs
55 g / 1/4 cup + 1/2 tablespoon mascarpone
Salt to taste

CURRY EMULSION
2 teaspoons curry powder
2 tablespoons chopped scallions
3/4 cup + 2 tablespoons vegetable stock or water
1/4 cup heavy cream
1/4 cup crème fraîche
8 tablespoons unsalted butter, cut into chunks
Salt and fresh ground pepper to taste
18 one-inch-long pieces ramps or scallions, blanched for 1 minute, then chilled and pat dry

TO SERVE
18 one-inch-long pieces garlic sprouts or garlic chives
6 sprigs cilantro flowers (optional)

TO MAKE THE PASTA DOUGH
Mound the flour on a clean work surface and make a well in the centre, pushing the flour to all sides to make a ring with sides about 1-inch wide. Make sure that the well is wide enough to hold all the eggs without spilling.
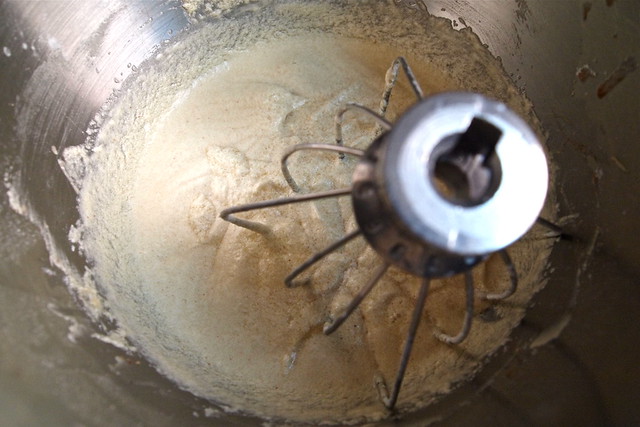
Pour the egg yolks, egg, oil, and milk into the well. Use your fingers to break the eggs up. Still using your fingers, begin turning the eggs in a circular motion, keeping them within the well and not allowing them to spill over the sides. This circular motion allows the eggs to gradually pull in flour from the sides of the well: it is important that the flour not be incorporated too rapidly, or your dough will be lumpy. Keep moving the eggs while slowly incorporating the flour. Using a pastry scraper, occasionally push the flour towards the eggs; the flour should be moved only enough to maintain the gradual incorporation of the flour, and the eggs should continue to be contained in the well. The mixture will thicken and eventually get too tight to keep turning with your fingers.
When the dough begins thickening and starts lifting itself up from the work surface, begin incorporating the remaining flour with the pastry scraper by lifting the flour up and over the dough that's beginning to form and cutting it into the dough. When the remaining flour from the sides of the well has been cut into the dough, the dough will still look shaggy. Bring the dough together in the palms of your hands and form it into a ball. It will look flaky but hold together.
Knead the dough by pressing it, bit by bit, in a forward motion with the hells of your hands rather than folding it over on itself as you would with a bread dough. Re-form the dough into a ball and repeat the process several times. The dough should feel moist but not sticky. Let the dough rest for a few minutes while you clean the work surface.
Dust the clean work surface with a little flour. Knead the dough by pushing against it in a forward motion with the heels of your hands. Form the dough into a ball again and knead it again. Keep kneading in this forward motion until the dough becomes silky smooth. The dough is ready when you can pull your finger through it and the dough wants to snap back into place. The kneading process can take anywhere from 10 to 15 minutes. It is important to work the dough long enough to pass the pull test; otherwise when it rests, it will collapse.
Double wrap the dough in plastic wrap to ensure that it does not dry out. Let the dough rest for at least 30 minutes and up to 1 hour before rolling it through a pasta machine. The dough can be made ahead, wrapped, and refrigerated: bring to room temperature before proceeding.

TO MAKE THE FAVA BEAN FILLING
Shell the fava beans and then peel the skins from the beans. Starting a small slit in the skin with a sharp paring knife makes the peeling easier. Remove the small germ at the side of each bean. You need 1 1/2 cups of beans for the filling; reserve any extra beans for another use. Blanch the beans in generously salted water for 5 minutes, or until tender, and immediately transfer to ice water to chill. When they are cold, drain the beans and spread on paper towels to drain thoroughly.
Place the beans in a food processor with the bread crumbs. Blend until they come together and form a ball. Add the mascarpone and process again until the mixture is smooth. Season to taste with salt. You will have 1-1 1/4 cups of filling. Refrigerate the mixture until it is cool, or for up to 2 days.

TO FORM THE PASTA SHEETS
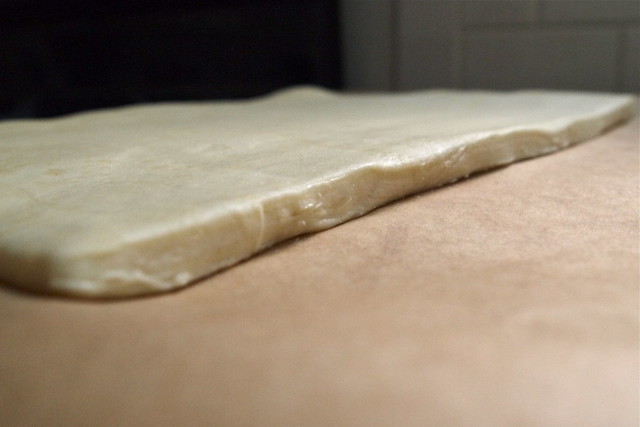
Divide the dough into three or four pieces (you will have a little extra that you can cut into spaghetti or fettuccine and freeze for later use). Work with one piece at a time and keep the others covered so that they don't dry out. Set the rollers of your pasta machine to the widest setting. Flatten the first piece out with your hands into a long rectangle and feed it through the machine. Fold it over onto itself as you would a letter and flatten it with your hands again. Rotate it a quarter turn and feed it through the machine. Repeat this procedure 2 or 3 more times. Use flour as necessary to keep the pasta from sticking. You shouldn't need to use much at all.
Set the rollers down one notch and feed the pasta through. Do not fold it over. Run the sheet through on the same setting 2 more times. Then, adjust the rollers again and repeat this procedure, adjusting the rollers as you go, until the pasta is thin enough to see your fingers through it but not so thin that it's translucent. (On my machine, this means rolling it multiple times through the second-last setting.) Repeat with the remaining pieces of dough.

TO FILL THE AGNOLOTTI
Work with one sheet of pasta at a time, keeping the others covered. Lay the sheet on a lightly-floured work surface with the long side facing you. Trim the edges so that they are straight. Place the agnolotti filling in a pastry bag fitted with a 1/2-inch plain tip. Pipe a line of filling across the bottom of the sheet, leaving a 3/4 inch border of pasta along the left, right, and bottom edges.
Pull the bottom edge of the pasta up and over the filling. Seal the agnolotti by carefully molding the pasta over the filling and pressing lightly with your index finger to seal the edge of the dough to the pasta sheet; don't drag your finger along the dough to seal, or your risk ripping the dough. When it it sealed, there should be about a 1/2-inch of excess dough visible above the tube of filling (where you sealed it). Be certain that you are sealing tightly while pressing out any pockets of air. Seal the left and right ends of the dough.

TO SHAPE THE AGNOLOTTI
Starting at one end, place the thumb and forefinger of each hand together as if you were going to pinch something, and leaving about 1 inch of space between your hands and holding your fingers vertically, pinch the filling firmly in 1-inch increments, making about 3/4 inch of pinched area between each pocket of filling. It is important to leave this much pinched area between the agnolotti, or when the agnolotti are separated, they may come unsealed.
Run a crimped pastry wheel along the top edge of the folded-over dough, separating the strip of filling pockets from the remainder of the pasta sheet. Don't cut too close to the filling, or you risk breaking the seal. Separate the individual agnolotti by cutting through the center of each pinched area, rolling the pastry wheel away from your and leaning the tube of filling away from you and into the work surface as you cut. The leaning helps form the agnolotti's characteristic pocket-shape. Working quickly, place the agnolotti on a baking sheet dusted with a thin layer of cornmeal, which will prevent sticking. Don't let the agnolotti touch sac other, or they may stick together. Repeat the same procedure with the remaining pasta sheets.
At this point, you can either cook the agnolotti in boiling water immediately or freeze them on the baking sheet. Once the agnolotti are frozen, place them in airtight freezer bags and keep them frozen for up to several weeks. Cook the agnolotti while still frozen.

TO COMPLETE
For the curry emulsion, toast the curry powder in a small saucepan over medium heat until it is fragrant. Stir in the scallions and heat for another minute. Add the 3/4 cup stock, the cream, and the crème fraîche, bring to a simmer, and cook until the liquid is reduced to a half cup. Swirl in the butter. When the butter is melted, add the remaining 2 tablespoons of stock and blend for 30 seconds with an immersion blender to emulsify the mixture (alternatively, transfer to a conventional blender and emulsify). Season the mixture with salt and pepper and strain into a wide pan.
Meanwhile, cook the agnolotti in a large pot of lightly salted boiling water until cooked through, 4-5 minutes.
Drain the agnolotti, add the agnolotti and ramps to the curry emulsion, and toss over low heat to coat with sauce. Divide the agnolotti and ramps among three serving dishes and garnish the top of each with 6 garlic sprouts and 2 flower sprigs, if using. Serve immediately.
Makes 48 agnolotti.

Monday, September 23, 2013

On cultural identities

Cooking from Every Grain of Rice
Exciting news! Today, a couple of other home cooks and I will be video-chatting live with Fuchsia Dunlop as a part of this month's New York Times' Recipe Lab. Dunlop is an expert on a number of China's regional cuisines and author of a fantastic travel memoir and three cookbooks, including Every Grain of Rice. We'll be talking with her about Chinese cooking and a dish from EGR we all made, Gong Bao Chicken. Tune in to Recipe Lab at 3 pm Eastern. It's going to be great! If you're a bit confused about why I'm participating in this chat (when, after all, was the last time that you saw anything Chinese around here?), see below for some background.

Cultural identity can be a funny thing. My mother is Cantonese. I grew up crunching my way through bok choy slicked in oyster sauce, wrinkling my nose at bitter melon, sneaking bits of crispy pork skin when I didn't think anyone was looking. But you wouldn't know it from the way that I cook and eat now, at least not in a way that I can see. Sure, I'm not half-bad at picking clean a small pile of spicy chicken feet, and I can appreciate the gelatinousness of vinegar-braised pork hocks. But I couldn't tell you much about the ingredients and methods. In fact, I don't really know how to cook any of the food I ate growing up. I just wasn't all that interested in learning to back then, and this part of my heritage is something I've always had a bit of a hard time with. I still don't really know how it fits in with who I am.
But lately, I've been trying to get a better handle on Chinese cooking (which is not to say that there's really one thing you could call that). See, at some point next year, I'm going to be travelling with my mother in China for a few weeks. This won't be the first time that I've visited, but I feel as though I've done quite a bit of growing up since my last couple of trips, and I want this one to be different. On past trips, I've left most of the planning up to my mother and her sister, and while we've seen some really amazing things together, the food, at least when travelling outside of Guandong, the province my family is from, has never been particularly good. But this, I'm pretty sure, has only been because we've relied on packaged tours when far away from Guandong. The meals are pre-arranged and totally unremarkable. My mother would probably argue that this is convenient, that it leaves us with time to see and do more, but I of course think that stumbling on a good place to eat just is a part of the seeing and doing. So this time around, I've decided to take charge, and the first step has just been learning more about some of the regional cuisines.
Deep-fried eggplant Mise en place Fish-fragrant eggplant
My starting place has been Fuchsia Dunlop's memoir, Shark's Fin and Sichuan Pepper. Dunlop, though British, has spent a great deal of time in China since her early twenties. She was in Chengdu (the capital of Sichuan province) initially with a year-long British Council research grant and was supposed to be studying the government's policy on ethnic minorities. But when that didn't go very far (people, unsurprisingly, were reluctant to talk), she found herself drawn to the activity in Sichuanese kitchens and to the often strange but splendid food that came out of them. She talked to everyone she could about Sichuanese food, begged her way into restaurant kitchens to observe and take notes, and eventually trained as a chef at the Sichuan Institute of Higher Cuisine, the first Westerner ever to have done so. She had found her calling. 
The memoir details Dunlop's experiences in China over the years. It's a compelling blend of sharp observation, personal narrative, and reflection on the cultural differences she has run up against. And food, unsurprisingly, is often at the centre of all this. Dunlop, for example, is struck one evening by how much her time in China has changed her appreciation of texture when she realizes that her parents are politely struggling with the items she's ordered for their hotpot--goose intestines, ox tripe and throat cartilage, rabbits' ears, and small bony catfish, all unpleasantly rubbery, squeaky, crunchy things in the average Westerner's mouth. But for her now, there's a distinct pleasure to these textures. Chinese gastronomy isn't just about flavour but the subtle play of temperature and texture. It takes time, experience, and a lot of polite crunching, to really appreciate this (which is not to say, of course, that all Chinese food is this challenging). Dunlop often connects coming to eat like the Chinese with coming to think like them too, and there definitely is truth to this. It's what, I think, makes her memoir so illuminating when it comes to Chinese culture and what has led me to the kitchen in preparation for this trip.
A couple of weeks ago, with all these thoughts about identity, food, and travel were simmering away in my head, I noticed that Fuchsia Dunlop was the cookbook author who was going to be featured in the New York Times' Recipe Lab this month. Recipe Lab is the Times' monthly feature in which readers are invited to cook a recipe from one of the featured author's books and a few home cooks take part in a live video chat with the author. Seeing this, I applied to participate in the chat and thought that I probably wouldn't hear back. But I did! And it's happening today! So, tune in live to Recipe Lab to see me and a couple of other home cooks chatting with Ms. Dunlop about Chinese cooking today at 3 pm Eastern.
For the video chat, we all cooked the Gong Bao (a.k.a. Kung Pao) Chicken from Dunlop's latest cookbook, Every Grain of Rice. (The cookbook, by the way, is gorgeous. I've been pouring over it obsessively.) If you want to hear more about that, you'll have to tune in today (or stream it later at your convenience). But the day I made the chicken, I was feeling ambitious, so I also made another of Dunlop's dishes to go along with it, Fish-Fragrant Eggplant. This eggplant is crazy good. I'm already planning on making it again later this week. It isn't the quickest dish to put together, but it's worth your time. You first fry slices of eggplant to a gleaming gold. Then, you sizzle Sichuanese chilli bean paste (a savoury paste made from fermented fava beans) in hot oil and add to that lots of minced garlic and ginger. This forms the fragrant base for the sauce into which you'll slip the eggplant. Stock, soy sauce, and a little sugar come next, then the eggplant, followed by cornstarch to add some body to the sauce, and Chinkiang vinegar (a dark, heady rice vinegar) and chopped scallions to finish. (There's no fish in this dish. Fish-fragrant refers to the seasonings in the sauce, which are traditionally used for fish in Sichuanese cooking.) The resulting dish is incredible. The eggplant has a silky, luxurious feel to it in your mouth, and the sauce is somehow tangy, bright, and deeply savoury all at once.
I still haven't attempted anything like the dishes I grew up with. Sichuanese cooking is spicier, punchier, than the cooking you find in Guandong. But I think I might just wait until the next time I see my mother for that. I'll ask her to show me what she does (finally), and I'll cook this eggplant for her.

Fish-Fragrant Eggplant
From Fuchsia Dunlop's Shark's Fin and Sichuan Pepper (reprinted in Every Grain of Rice)
NOTE: Dunlop says that you can also bake or shallow-fry the eggplant for this dish. But instead of then adding the eggplant to the sauce, she recommends that you pour the finished sauce onto the eggplant--otherwise, it might disintegrate. I chose to deep-fry. However, I used a heavy-bottomed 4-quart stock pot instead of a wok for both the deep-frying and the sauce. I also used homemade vegetable stock instead of chicken stock, just because it was what I had around. You should be able to find Chinkiang vinegar and Sichuanese chilli bean paste at your local Chinese grocery store. Lee Kum Kee is a common brand that sells the latter. As Dunlop says, the brand is Cantonese and their version of the paste has some ingredients you wouldn't find in a traditional Sichuanese paste. Pixian brand is a better choice, but Lee Kum Kee will do.

TO FRY THE EGGPLANT
600-700 g eggplant
Salt
Peanut oil for deep-frying

FOR THE SAUCE
1 1/2 tablespoons Sichuanese chilli paste (dou ban jiang)
1 tablespoon finely chopped fresh ginger
1 tablespoon chopped garlic
2/3 cup chicken stock
1 1/2 teaspoons sugar
1/2 teaspoon light soy sauce or tamari
3/4 teaspoon cornstarch, mixed with 1 tablespoon cold water
1 1/2 teaspoons Chinkiang vinegar
4 scallions, green parts only, sliced into fine rings
1 teaspoon sesame oil

Cut the eggplant in half lengthwise and then crosswise. Chop each quarter lengthwise into three or four evenly sized chunks. Sprinkle generously with salt and leave for at least 30 minutes to drain.
In a wok, the oil for deep-frying to 356-392 degrees F. Add the eggplant in batches and deep-fry for 3-4 minutes until lightly golden on the outside and soft and buttery within. Remove and drain on paper towel.
Drain off the deep-frying oil, rinse the wok if necessary, and then return it to a medium flame with 2-3 tablespoons of oil. Add the chilli bean paste and stir-fry until the oil is red and fragrant, then add the ginger and garlic and continue to stir-fry for another 20-30 seconds, until they too are fragrant.
Add the stock, sugar, and soy sauce and mix well. Season with salt to taste, if necessary.
Add the fried eggplant to the sauce, bring to a boil, then let let them simmer gently for a few minutes to absorb some of the flavours. Then sprinkle the cornstarch mixture over the eggplant and stir in gently to thicken the sauce. Next, stir in the vinegar and spring onions and leave for a few seconds until the onions have lost their rawness. Finally, remove the pan from heat, stir in the sesame oil and serve.

Tuesday, September 10, 2013

High summer at the market, in the kitchen

Galettes!
In the days of high summer, there are few places in Chicago I'd rather be than Green City Market. It is the real deal--small-scale midwestern farmers committed to their land, astonishingly good produce in abundance. Even early on a Wednesday morning, the market hums with quiet excitement. Rounding the corner to the next stretch of stalls, I, anyway, am always buoyed by the prospect of discovering something beautiful and unusual, something I've never seen before.
And I'm glad that Sandra Holl seems to share my feelings about the place. A few weeks ago, I was invited to tag along with her on a market trip. Sandra is chef and owner of Floriole, and I've long been an admirer of hers. Her bakery is incomparable in this city. It turns out such gorgeous stuff--canelés with custard-like centres, mahogany sourdough boules, the flakiest croissants. When I'm in the neighbourhood, I always try and stop in.
Peaches, blackberries, plums Brown butter custard Homemade puff pastry
We met that morning at Floriole's market stall--it's where the bakery got its start--and then made the rounds. Sandra had already put in orders with some of the farms (peaches and green beans from Mick Klug, arugula from Green Acres), so we visited the stalls to collect them. (If you take your eyes off all the produce for a moment and peer behind the stalls at Green City Market, you'll see tall stacks of cardboard boxes scrawled with some very familiar names--these are all the restaurant orders from around the city awaiting pick-up.) But in between pick-ups and afterwards, we also spent some time looking at what else there was available that day. If something catches her eye, Sandra explained, even if it doesn't fit in with anything she has planned, she'll take it back to the bakery for her chefs to do with it whatever happens to inspire them. On this day, it was the indigo-rose tomatoes at Growing Home that stood out--small and inky purple with just a bit of a blush to them. (Sandra tries to source as much as she can locally for Floriole. And in the days of high summer, between Green City Market, her mother's garden just outside the city, and the bakery's own rooftop setup, that isn't particularly hard. But even staples like flour, eggs, and butter at the bakery come from producers in the Midwest.)
On our way out, we picked up a flat of fat blackberries from Ellis Family Farms and chatted with the Ellises about their teenage daughter Mary, who's in charge of the farm's laying operation. They showed us a recent photo of Mary scrubbing a hen with a toothbrush in preparation for a show. It was pretty clear that over the years Sandra's developed some lasting ties to the people at this market.
Back at the bakery, I was also invited to try my hand at some pastry-making in the kitchen. It was a bit of a dream come true, being there in the midst of that bustle, even if only for half an hour. There was a lot going on around us--challah being tested, tart shells being unmoulded, gougères coming out of the oven, sourdough loaves being sliced by hand. Our plan was to make some galettes with the fruit we'd picked up. The kitchen made it simple for us. There were already rounds of house-made puff pastry  dough ready at hand. All we had to do was slice some peaches for the filling (tasting as we sliced, of course--Sandra emphasized the importance of this) and assemble the galettes. So we spread the pastry-dough rounds with a thin layer of brown-butter custard, mounded each with a big handful of sliced peaches and blackberries, crimped up the edges over the fruit, and then slid them into the oven to bake. And, of course, they were phenomenal. How couldn't they be? Impossibly flaky pastry. Caramel-edged fruit. Nothing better together.
Spreading custard Galettes assembled Galettes ready to bake
Sandra was kind enough to allow me to share these galettes with you (thanks, Sandra!). How involved you want the process to be is kind of up to you. I took this as an opportunity to make puff pastry from scratch for the very first time. And though I found the work really rewarding and totally worth the effort, I suspect that most of you won't have the time and/or inclination. It can be a two- or three-day process, just because the butter needs to be cold when you're working with it and the gluten in the dough needs a couple of hours to relax after it gets rolled out each time. Instead, you could try making Gourmet's "rough" puff pastry, which is not as demanding and has been my go-to for a long time, or you could buy good-quality ready-made puff pastry (Sandra and lots of others recommend Dufour). The brown-butter custard, as Sandra says, is also optional. It adds extra sweetness and nuttiness to the galettes and prevents the pastry from sopping up too much of the fruit's juices during baking. What's important is that you use the best fruit available to you. It matters here--these galettes are really all about the fruit. Speaking of which--in the time that it's taken me to try out these galettes at home, high summer has come and gone, which means you won't be seeing peaches and blackberries at the market for much longer. But the galettes are very adaptable--you could probably work just about any fruit into them. I made two kinds this past weekend, some peach-blackberry, some plum-rosemary. You should be able to find plums at the market for a good long while still.
The homemade galettes turned out really well. In fact, they might be the best thing I've made all year. Seriously. They were so good. Octavian and I greedily demolished the two we kept for ourselves in seconds and then almost, almost, regretted having given the others away.
Plum and rosemary galette Hanging out with Sandra
When people ask, I always tell them that the best thing about running this blog has been the people I've gotten to know through it. It's always gratifying to find people who think and care even more than I do about good food, people who are completely dedicated to what they do. I feel lucky to have met the people I have. It's affirming and inspiring. And there's always so much to learn from them. Sandra is definitely one of those people. She is serious about good pastry--I've seen it. So, walking around the market with her that morning, it was heartening to see that a good blackberry could still excite her as much as it does me.

Summer Fruit Galettes
An at-home take on Floriole's sweet galettes
NOTE: While in Floriole's kitchen, we didn't do a whole lot of measuring, and afterwards, Sandra only gave me exact quantities for the brown-butter custard, so the quantities below are based on my observations while baking with Sandra and what I did at home. Floriole's galettes, I think, are in fact a bit bigger than the ones I made, but mine still make for nice individual portions. About the fruit. The galettes that I made actually had less fruit than I've called for below (I used about 225 g all in all), but I think they really could have used more. The fruit does reduce a lot during baking. Feel free, of course, to use only peaches and blackberries or only plums. About the temperature. If you have a convection oven, by all means, use the convection option. Just bake the galettes at 350 degrees F instead and for about 30 minutes. About the brown-butter custard. At Floriole, the kitchen goes through a lot of brown-butter custard. This is reflected in the quantities that Sandra gave me. For my batch of custard at home, I converted most of the measurements to grams and divided by eight. And still, I had way more custard than needed for these galettes. I put my remaining custard in the freezer for the time being. Unless you have ideas for what you might do with more than a pound of remaining custard (you could just make a ton of galettes), you might want to try scaling down the recipe more or just skipping it all together. Almond cream would also be a good substitute, if you happen to have any of that lying around. About chilling. It's really important that you chill the pastries after assembling them. This will help them keep their shape as they bake. I rushed mine a little, and they don't quite have the nice star-like shape they're supposed to.

650 g puff pastry dough, chilled
All-purpose flour, for dusting
4 tablespoons brown butter custard (optional - recipe below)

FRUIT FILLING
150 g blackberries and sliced peaches
150 g sliced Italian prune plums
1/4 teaspoon finely chopped rosemary
2 tablespoons sugar, divided
1 tablespoon all-purpose flour, divided

EGGWASH
1 egg yolk
2 teaspoons heavy cream

Coarse sugar, like turbinado sugar, for finishing

Lightly flour your work surface and rolling pin. Place the block of dough on the work surface and dust lightly with flour. Gently but firmly roll it out into a 12-inch square, about 1/4 inch thick, using only as much flour as necessary to prevent the dough from sticking. Using a 6-inch cake ring or an equivalently sized plate as a guide and a sharp knife (you want the cuts to be as clean as possible, so as not to disturb the layers of butter in the dough), cut 4 6-inch circles from the dough. Place the circles on a parchment-lined baking sheet, cover loosely with plastic wrap, and chill in the fridge for at least an hour.
Put the peaches and blackberries in one small mixing bowl, the plums and rosemary in another. Add 1 tablespoon sugar and 1/2 tablespoon flour to each bowl and gently toss to combine.
Whisk together the egg yolk and heavy cream for the eggwash.
Spread 1 tablespoon brown butter custard, if using, in a thin layer over one of the 6-inch circles, leaving a 1-inch border around the edge. Mound a quarter of the fruit in its centre. Then crimp the pastry in the following way. Start by folding up part of the edge about 3/4 inch over the fruit, then while keeping the fold in place, take another part of the edge, an inch or so to the right, and fold it up over the fruit so that it overlaps the first folded part of the edge. Now, where the two folds overlap, press down firmly with one finger so that the folds hold--you should be able to an indent from your finger. Continue folding and pressing until the crimp goes around the entire pastry. It should take about seven folds. (You may have trouble crimping the pastry with all the fruit mounded in the centre. If that's the case, remove some to make the crimping easier and tuck it back in afterwards. It may seem like too much fruit right now, but it will reduce significantly during baking.) Repeat with the remaining pastries. Brush with eggwash and chill in the fridge for 30-60 minutes. Meanwhile, preheat the oven to 375 degrees F.
Sprinkle the pastries with coarse sugar and bake for 30-35 minutes, until puffed and deeply golden. The galettes are best eaten warm from the oven.
Makes 4 individual galettes.

Brown Butter Custard
From Floriole Cafe and Bakery

170 g unsalted butter, cut into chunks
Juice of a medium lemon
3 eggs
220 g sugar
1/2 tablespoon brandy
1/2 teaspoon vanilla
Kosher salt, a big pinch
33 g all-purpose flour
45 g heavy cream

Melt the butter in a small saucepan over medium heat. When the butter has melted, bring it to a boil, still over medium heat and whisking constantly to prevent it from separating. Continue cooking the butter, whisking occasionally to prevent milk solids from sticking to the bottom of the pan, about 5 minutes. The butter is ready when it is the colour of caramel. Check its colour by lifting some up in a spoon. Pour into a heatproof container, preferably something with a spout. Add the lemon juice and let cool.
Meanwhile, in a stand mixer fitted with the wire whip attachment, beat the eggs and sugar on medium, until pale and thick, about 3 minutes. Gradually incorporate the browned butter. Then add the brandy, salt, flour, cream, and vanilla and mix just until combined. If the custard starts to look grainy at any point, that's fine. Use immediately or store refrigerated in an airtight container for up to 1 week.
Makes about 585 g.

Tuesday, August 27, 2013

Setting aside spades and worries

Pepper and Eggplant Coca
It's been a quiet summer for the two of us. We stuck pretty close to home, busy tending to ideas and vegetable beds, hoping that in time they'd flourish. But summer is fast fading, which means that many of our good friends, who've spent the summer away, will be back in town. I'm thinking that it's time that we set aside our spades and worries for a little and think about breaking the quiet, about maybe having a party.
When we do, this flatbread is sure to be a part of it. (If you want to get fancy, this flatbread is technically a Catalan coca of sorts.) It is perfect late-summer party fare--just red pepper, onion, and eggplant cooked down into a luxurious mess, spread out on thin stretches of dough, and then slipped into a hot oven for a scant few minutes. There, the onion especially melts and chars, while the dough blisters and bakes up shatteringly crisp. Cut into squares, it is ready to be passed around.
In a row
This flatbread is decidedly unfussy. The dough, though yeasted, is forgiving. I have let it sit out an hour or two longer than it really should have and then stuck extra in the fridge for later use. It held up just fine. You could definitely cook down the vegetables a few hours, maybe a day even, in advance. And with everything prepped, you could easily keep turning out flatbreads with a party in full swing.

Onion, Red Pepper, and Eggplant Coca
Adapted from Sam and Sam Clark's Moro East

DOUGH
112 g / 1 cup bread flour, plus extra for dusting
1/3 teaspoon fine sea salt
1/4 teaspoon instant yeast
75 ml / scant 1/3 cup water
1/2 tablespoon olive oil

VEGETABLES
1 medium eggplant, cut into half-inch cubes
1 teaspoon fine sea salt
6 tablespoons olive oil, plus more as needed
2 medium Spanish onions, roughly chopped
2 red peppers, cut in half lengthwise, seeded, and thinly sliced
1 heaped tablespoon finely chopped rosemary

To make the flatbread dough, place the flour, salt, and yeast in a medium bowl and mix thoroughly. Stir together the oil and water in a cup. Make a well in the flour and then pour in the water mixture a little at a time, mixing constantly with your hands. When all the yeast mixture has been incorporated, transfer the dough to a floured surface and knead well for at least 5 minutes. If the dough is still stick, add a little more flour; if it is too stiff, a little more water. It is ready when no longer tacky but soft, elastic, and smooth. Put the dough in a clean, oiled  bowl and leave to rise until doubled in bulk, 1-2 hours. After proofing, it can be chilled until needed. Give it some time to come back to room temperature, about an hour.
For the topping, first toss the eggplant with the salt in a colander and set aside. Heat the olive oil in a heavy, 10-inch sauté pan and, when hot but not smoking, add the onions with a pinch of salt. Give them a good stir and cook for 5 minutes. Add the peppers and cook for 15-20 minutes more, until the onions are golden and sweet and the peppers soft. Be sure to stir them often so they cook evenly and do not stick to the bottom of the pan. Blot the eggplant dry with a towel, add to the pan along with the rosemary, and cook for a final 15 minutes, stirring often, until the eggplant is soft all the way through. Remove from heat and rain off any excess oil. Check the seasoning and set aside to cool.
When ready to bake the flatbread, preheat the oven to 525 degrees F (with a baking stone, if you have one). Divide the dough into two and roll out half very thinly to make a 12-inch by 8-inch oblong. If it's being stubborn, cover and let rest for a few minutes for the gluten to relax and then try again. Place it on a peel, if using a baking stone, or on a baking sheet, if not. Spread half the vegetables over the surface, right up to the edges of the dough. Bake for 8-15 minutes (flatbread baked on a stone will take significantly less time), until browned and crispy underneath. While the first flatbread is in the oven, start rolling and topping the next one. They are great served piping hot from the oven or at room temperature.
Serves 6-8 as an appetizer.

Thursday, August 15, 2013

Pie season

Peach and raspberry pie!
I'm kind of crazy about fruit pies. They are pretty much everything I want in something sweet--just rich, flaky pastry spilling over with bright, luscious fruit. But I hardly ever make pies. I know, I know. A terrible shame. But you know how it is. Fruit pies are a finicky thing. Between pulling together the pastry, piling in the fruit, and letting it all bubble and bake, there can be a lot of heartbreak. So as much as I love them, I don't bake pies nearly enough.
But I'm hoping that will change, starting with this pie--peach-raspberry with pecan crumble. It is so, so good. It starts out with peaches--blanched and peeled, then roasted until silken and slumped. Then, come the raspberries, stirred into the still-hot peaches. These, once piled into a buttery shell, get mounded with pecan crumble, which bakes up golden and craggy. It's a bit involved, I know. A pie that will likely keep you in the kitchen all afternoon and leave you with a sink full of dishes. There's no hiding that. But this pie is also spectacular, quite possibly the best I've had. The peaches are intense, concentrated, deeply floral from their roasting. And the raspberries scattered throughout are so perfect with them, little pockets of jammy, puckery brightness. The pecan crumble too is spot on--it delivers needed crunch, with all that slumped, soft fruit. All in all, swoon-worthy.
Frozen pie shell, raspberries, peaches Peeling peaches Roasted peaches
The pie comes from the new Hoosier Mama Book of Pie. Hoosier Mama is local pie shop here in Chicago--an impressive sliver of a storefront and bakery that turns out wonderful pies all year long. They are very serious about their pie there. They are all about buttery, flaky pastry, all about intense, swoon-worthy fillings. It is my kind of shop. So I'm really glad that they've decided to share some of their pie wisdom in this book. Paula Haney and Allison Scott offer encouraging instruction. They recognise that pie-making is something that has mostly fallen out of favour at home and that the wisdom that went with it is largely lost to us. So they explain their process in detail and illustrate with lots of step-by-step photos. These definitely help with potential heartbreak. I am particularly thrilled to have picked up their crimping technique. The crusts at Hoosier Mama always have the most gorgeous, defined crimp. And now mine aren't so bad looking either.
I really would like to make more than one or two pies every year. Pie is just too good to not have around more often. And from here on out, I don't think it's going to be too much of a problem. The peach-raspberry pie is a bit demanding--one to keep in mind for when you want to make someone feel really special--but there are plenty of easier pies in the book. I'm already thinking about my next pie,  likely Lemon Chess with Sticky Blueberries. The gooey filling comes together in five minutes, and the blueberries should be a snap too. And then there's the pie after that. The first apples have already started showing up at the markets, and this book gives apples a lot of love. Classic apple, caramel-apple cider, apple and quince, dutch apple with sour cream custard, etc., etc. I can't wait! This, friends, is the start of pie season.
Fruit in the shell Pecan crumble Baked pie
One final note. As you can probably see, my pie filling is a little runnier than it should be. I wasn't very diligent in following the roasting directions for the peaches. I didn't have an appropriate-sized baking pan and thought my peaches were cooking too quickly, so I pulled them out at the 25-minute mark. It didn't occur to me at the time just how important the long roast was. But this pie's crumble topping mounds over the entire surface. That means none of the water remaining in the peaches evaporates in the final bake. Those peaches need to roast for at least 40 minutes. My mistake.
Slumpy slice

Peach-Raspberry Pie with Pecan Crumble
From Paula Haney and Allison Scott's Hoosier Mama Book of Pie
NOTE: To peel peaches, bring a wide pot of water to a boil. Using a paring knife, make an X in the bottom of each peach. Blanch the peaches for 45 second or so, in batches if need be. Remove the peaches with a slotted spoon and immediately transfer them to a bowl of ice-water. Peel the peaches, starting from the X. If a peach is being stubborn, try repeating the blanching process. If this doesn't work, take your vegetable peeler to it.

1 single-crust, blind-baked All-Butter Pie Dough shell (available as a PDF here)
125 g / 1 cup raspberries
1230 g / 8 cups peeled peach slices (see note above)
15 g / 1 tablespoon fresh lemon juice
.5 g / 1/4 teaspoon almond extract
200 g / 1 cup granulated sugar
31 g / 3 tablespoons potato starch
Pinch of kosher salt
1 recipe Pecan Crumble (see below)

Preheat the oven to 400 degrees F.
Pick through the raspberries, discarding any stems, leaves, or shrivelled berries. Set aside. (There's no need to wash them--the berries grow way off the ground.)
Place the peeled peach slices in a large bowl. Add the lemon juice and almond extract and toss until the peaches are well coated.
Place the sugar, potato starch, and salt in a small bowl and whisk until thoroughly combined. Pour the dry ingredients over the peaches and gently toss until most of the dry ingredients cling to the peaches.
Spray a 9 x 13-inch non-reactive baking pan with cooking spray. (I used butter without much issue.) Transfer the peaches to the baking pan and bake for 20 minutes. 
Remove the pan from the oven and stir the peaches, making sure to scrape out any ingredients that stick to the sides of the baking dish. Return the pan to the oven and bake for 20 more minutes. 
Repeat this step until the peach juices are thickened and translucent. The peach slices should be tender but still hold their shape. Stir the raspberries directly into the hot peaches and cool to room temperature.
Once cooled, spoon the fruit into the pie shell and top with 1/2 of the Pecan Crumble. Bake for 25-30 minutes, until the crumble is lightly toasted. (I'd recommend setting your pie plate on a baking sheet--you might get a few drips over the side.) Top the pie with remaining crumble and bake 20-25 minutes more, until the top is crispy.
Cool for at least 1 hour before slicing. The pie can be stored at room temperature for up to 2 days and in the refrigerator for up to 3 days.

Pecan Crumble
From Paula Haney and Allison Scott's Hoosier Mama Book of Pie
NOTE: To toast the pecans, spread them out on a baking sheet and bake at 300 degrees F for 10 minutes.

148 g / 1 cup all-purpose flour
100 g / 1/2 cup granulated sugar
30 g / 2 tablespoons dark brown sugar
50 g / 1/2 cup toasted pecans
84 g / 6 tablespoons unsalted butter, cut into 1-inch cubes
Pinch of kosher salt

Combine all of the ingredients in the bowl of a stand mixer fitted with the paddle attachment.
Mix on low until the mixture resembles fine crumbs. Increase the speed to medium and mix until gravel-sized pieces form.
Chill in the refrigerator for at least 30 minutes before using to top a pie. The crumble can be stored in the refrigerator for up to a week.

Friday, July 26, 2013

Something enduring

Cherry Preserves with Plums
I know, I know, another batch of preserves--what gives? I've been asking that of myself a lot lately, and I still don't have much of an answer. I've just found myself this summer making jam feverishly--and not only that but thinking a lot about it (also feverishly)--about what went well and what didn't with past batches, about how to squeeze in another session soon, about what to make next. It's all gotten, I admit, just a little bit obsessive. And before this, if you can believe it, jam wasn't something that really held my interest. Butter, I thought, is all a girl really needs. Why complicate matters?
Plums and cherries Macerating fruit Ready to cook
Why, indeed, complicate matters? That was, for a long time, my attitude towards summer fruit. Berries, peaches, and plums--why fuss with them when they're good as they are? On a sticky July day, you can't do much better for yourself than eating a cold plum over the kitchen sink, juices running down your arms. So why trouble yourself with more? But then twice last week I found myself in the kitchen sweating it out over a pot of bubbling fruit and sugar, glass jars close at hand waiting to be filled. So obviously, at some point, I'd undergone a change of mind.
It had a lot to do with the process, I think. Making preserves is very physical, very absorbing--pulling apart cherries one by one and plucking out their pits or slicing up a mound of plums. You give more attention to the fruit than you might just sticking it in your mouth, and it feels good. And the transformation that takes place, because it happens in an open pan, and because you're there the whole time, stirring, stirring, stirring, is one you get to see all the way through. You get to see the fruit slump and soften. You get to see the sugar disappear into the juices, and the juices bubble up wildly and thicken. It's dramatic and beautiful. You get a different appreciation of the fruit. And you feel like you're tapping into something old, elemental, deeply human.
This, anyway, is the feeling I'm left with, having recently read and swooned over much of Kevin West's Saving the Season. The book is a bit unusual for a cookbook. West provides plenty of clear instruction and assurance on pickles, jams, jellies, and the like. But he also contextualizes preservation as a practice. Between recipes, he draws on a mixture of history, literature, and personal narrative to give us a better sense of the fruits, vegetables, and processes to follow. You get the feeling reading it that you're being given an heirloom, something enduring to hold on to. I'm pretty sure that I'll be turning to the book season after season, year after year, for a long time. (Before the book, West wrote a blog by the same name. I suggest you check on his post on quince, if you want to get the flavour of his work. It's heady.)
Preserves on toast
This latest batch is from the book, a mixture of early plums and sweet cherries, finished with a splash of bourbon. I didn't make it quite as intended. I was supposed to use inky-dark Bing cherries, but in a moment of absentmindedness at the market, I ended up with a brighter, less assertive variety. So my preserves don't quite have the depth and colour they're supposed to. But I don't really mind. Instead, they have a sort of all-round, stone-fruit sunniness to them, something I know I'll appreciate come January. My favourite spoonfuls are the ones that include a slice of plum. The fruit is velvety, yielding in the best way. And with the bourbon, it is made luxurious, buttery even.

Cherry Preserves with Plums
From Kevin West's Saving the Season
NOTE: Fruit obviously varies in sweetness. The measurements provided for both sugar and lemon juice are therefore guidelines only. West encourages you to taste your fruit at every stage of the process--out of hand, once macerated, and during reduction (after a minute on one of those chilled plates). Adjust with more sugar or lemon juice as you see fit. West also advises starting out with a little less (up to a 1/2 cup less) sugar, depending on the plum varieties available to you. You can always add more sugar towards the end, if you don't think the preserves are sweet enough.

2 pounds black cherries, such as Bing
2 pounds firm, yellow-fleshed plums, such as Red Beauty (the tarter, the better)
2 tablespoons freshly squeezed lemon juice
3 cups sugar
1/4 cup bourbon or brandy

Wash and drain the fruit. Pit the cherries. (West isn't one for cherry-pitters. His method is to grab each cherry, one thumb on either side of the stem, and pull it apart. It should split lengthwise along its seam. Then you can just dig out the pit. This works best, I've found, with soft, ripe cherries. It makes less of a mess than a pitter.) Slice the plums away from their pits in sections. Stir together the fruit, lemon juice, and sugar. Set aside to macerate for at least 15 minutes. (If you plan to macerate for longer, e.g. overnight, press a piece of parchment paper or plastic wrap close to the fruit to prevent oxidation.)
Set a few small plates in the freezer. Warm 5 clean half-pint jars and lids in the oven set at 200 degrees F.
Turn the fruit-sugar mixture into a preserving pan or other large, wide, heavy-bottomed pot. Reduce over high heat, stirring frequently. Once it comes to a full rolling boil, it should take 10-12 more minutes to fully reduce. Test the preserves. Turn off the heat and spoon about a teaspoon's worth onto one of the chilled plates. Return it to the freezer for 1 minute. If the surface wrinkles when you push your finger through it, it's ready. If not, continue reducing for a couple minutes more and test the consistency again. Once fully reduced, add the brandy or bourbon and continue to cook, stirring well, for 1 minute longer.
Ladle the hot preserves into the five half-pint jars, leaving 1/4-inch headspace. Wipe the jars' rims clean and put on their lids and bands (screwed only finger-tight).
Process in a boiling-water bath for 10 minutes (count 10 minutes from when the water returns to a boil). Remove the jars from the water and let cool. Check to see if a proper seal has formed by removing each jar's band and holding the jar by its lid. The lid should hold firm. If it doesn't, store the jar in the fridge and eat its contents promptly.
Makes about 5 1/2-pint jars

Tuesday, July 16, 2013

So I'll just say this

Heat here in the Midwest is a sticky, unrelenting thing. It hangs heavy in the air and clings to you. It leaves you feeling muddled and slow, thick as the air around you. On some days, by early afternoon, it is hard to string together sentences. You are reduced to a hot, sticky puddle of yourself. Kind of like today.
Pitted Stewed
So I'll just say this. I am glad, so glad, that I churned out this batch of sour cherry frozen yogurt a few days ago (a rare moment of foresight on my part). A few spoons (or more!) snuck from the freezer at midday--clean, bright, and cold sliding down your throat--are utterly restorative. And best of all, the taste vividly recalls forkfuls of leftover sour cherry pie, eaten cold from the fridge for breakfast (an indulgent breakfast of the best kind, if you ask me).
And even if this finds you already a hot, sticky, muddled mess, not to worry. This frozen yogurt only calls for three ingredients, really--sour cherries, sugar, and yogurt. And the cherries, once pitted, need only a scant few minutes' cooking, just until they yield. Then, all you have to do is blend the cherries and yogurt together and get them a-churnin'. Relief--cold, sour, and electrically pink--is not far off.
Sour cherry frozen yogurt

Sour Cherry Frozen Yogurt
Adapted, just a little, from David Lebovitz's The Perfect Scoop
Note: This frozen yogurt's consistency is best the day it's made, but that shouldn't stop you from having it around for a little longer.

450 g / 1 pound fresh sour cherries (about 3 cups before pitting)
150 g / 3/4 cup sugar
240 g / 1 cup plain whole-milk yogurt (Greek-style, if you'd like)
A splash of brandy or 2 drops almond extract (optional)

Stem and pit the cherries. Put them in a medium saucepan with the sugar and brandy, if using. Cover, bring to a boil, and then lower the heat and simmer for about 5 minutes, stirring frequently to encourage the juices to flow. The cherries are ready when tender and cooked through. Remove from heat and let cool to room temperature.
Purée the cooked cherries and any liquid with the yogurt and almond extract, if using, in a blender or food processor until smooth. 
Chill for 2 hours, then freeze in your ice cream maker according to the manufacturer's instructions.
Makes about 3 cups.

Tuesday, July 9, 2013

What was missing

Elderflowers
Awhile ago, I finally picked up Luisa Weiss' memoir, My Berlin Kitchen. And, friends, if you don't already know firsthand, it is lovely through and through. Most of us at some point, I think, find ourselves struggling to figure out where it is we really belong, and Luisa gives clear and heartfelt expression to this in telling her story--the pull of your roots, your history can be hard, but it takes serious courage to leave one life for another, to really listen to yourself for once. 
The bits of the book that I like best are by far the ones that take place in Berlin. These for the most part are little vignettes of everyday life--birthday parties, dinners with old friends, summer picnics--but they sparkle in a certain way. You can really tell that this is where Luisa feels most at home. And you get glimpses of Berlin that you can't just by visiting. I was there for a bit last summer and tried to take in as much as I could. I walked and walked and ate and ate, and though I loved almost every bit of it, I never really felt as though I quite got what Berlin was about. And maybe it's just that I wasn't there for long enough, that I didn't see quite enough of it, but my guess now is that what was missing from it all was a kitchen to cook in. You really get the sense from Luisa that Berlin's soul is in its kitchens, with its women and men tending to bubbling pots and deep bowls. How better, after all, could you get to know a city than by taking a trip to an overgrown orchard at its outskirts--probably given up during the Cold War--and picking plums for Pflaumenmus? Or by gathering up bunches of white asparagus at its markets and making sharp, bright salads? Or by snipping the sprays of elderflowers that bloom in its parks and bringing them home to make syrup? I can't really think of any.
Snipped elderflowers Flowers steeping Elderflower cordial
In Chicago, you definitely can't expect to find elderflowers just anywhere. (And even if you do happen upon some in the city, I wouldn't advise cooking with them. Some of the soil around here is pretty seriously lead-laced. This NPR article on lead and urban gardening advises against eating roots and greens growing in contaminated soil but suggests that fruit and flowers might be safe to eat. Maybe you can just harvest elderflowers if you find them in your neighbourhood after all? I don't know. I'd have to do more research.) But Luisa's description of her first drink of elderflower syrup--a couple of fingers' worth poured in a glass filled with cold water, evocative of Berlin's spring and all that was missing in her life at the time--was enough to send me looking for some blooms around here. And I happened to be in luck. Elderflowers' short season in the Midwest falls between late June and early July. So, I was able to arrange with Seedling Farm to have some sprays ready for pick-up at the market. (The blooms are too delicate to survive much shuttling back and forth, so you have to contact the farm ahead of time.) Finding elderflowers is definitely the most troublesome part of making this syrup. The rest is just a matter of snipping the blooms from their stems and steeping them in a sugar syrup, along with a little lemon and citric acid. In a few days' time, the golden syrup is ready for bottling and drinking.
So far, my friends and I have been enjoying it mixed with sparkling water and lemon, sometimes a little good gin too. Yesterday, I tried adding a bit of muddled basil, which I quite liked. Luisa recommends a mix of Prosecco, muddled mint, sparkling water, and lemon. She also says that elderflower, while refreshing in the summer, is an entirely different thing in the dark of winter, that it really tastes of spring and even joy then. I am doing my best to save a little, but I can already tell that it's going to be hard.

Elderflower Syrup
From Luisa Weiss' My Berlin Kitchen
NOTE: You can find citric acid at Indian grocery stores, where it is labelled as "lemon salt" or "sour salt." As usual, I found mine at the Spice House.
UPDATE, 2013-12-09: A couple of months in, I noticed that my syrup had started fermenting a little. When I opened the bottle, there was a noticeable pop. I am not sure what to attribute this to. Perhaps I was not as thorough as I could have been with cleaning out my bottles. In any case, I didn't think too much of it until today when I opened my fridge to find that the fermentation had caused the glass bottle to explode (I hadn't opened it for awhile, and the bottle was stoppered with a wire-bail mechanism, so it was too secure to let any gas escape). Anyway, take this as a lesson--mind your fermentation.

20 to 25 large elderflower sprays
3 to 4 organic lemons, washed and sliced paper-thin, seeds removed
3 1/2 tablespoons citric acid
3 pounds and 6 ounces sugar

Clean and dry an opaque vessel large enough to hold about 5 quarts.
Hold each elderflower spray over the vessel and snip the tiny blossoms away from the stem and let them fall into the crock, taking care not to lose any of the pale yellow pollen. (Keep an eye out for tiny insects in among the blossoms. One or two are probably unavoidable. I found an itty bitty caterpillar. Shake them out or nudge them along towards the stem so that they don't end up in your syrup.) Add the sliced lemons to the vessel and sprinkle in the citric acid.
In a medium pot over medium heat, combine the sugar and 1 1/2 quarts of water. Stirring occasionally, melt the sugar and bring the mixture to a boil. Then remove it from heat and let the syrup sit until lukewarm.
Pour the syrup over the lemon and elderflowers and mix well. Cover the vessel with plastic wrap and let it stand in a cool corner of your home for 3 days, stirring once a day.
On the final day, uncover the crock and pour the liquid through a fine-mesh strainer into clean glass bottles. Discard the lemon slices and elderflowers. Store in the refrigerator or in a cool, dark cellar for up to a year.
Makes about 2 litres.