There are the things that you outgrow, and then there are the things you know you never will. The former, for me, include wild hair colours, teenage crushes, the (over)use of twenty-dollar words, and cookies-and-cream anything; the latter, wooly scarves, long road trips made in the right company, French philosophy, and honey crullers.
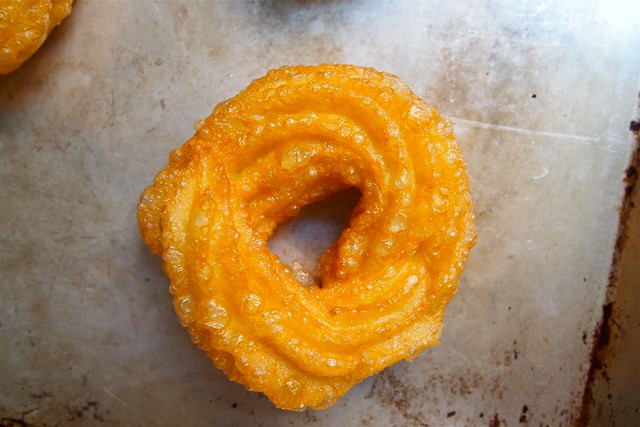
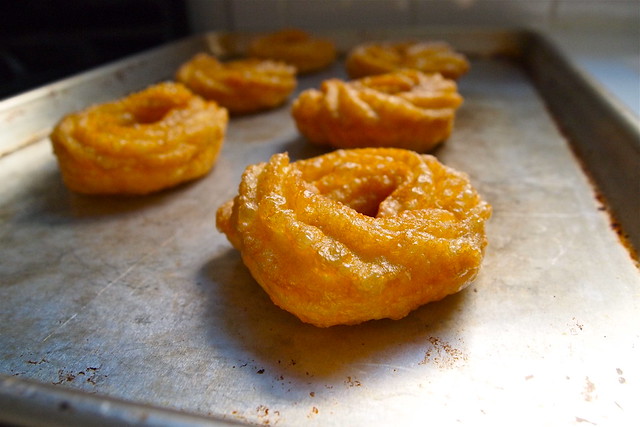
The cruller has always been my favourite doughnut. I love its delicate egginess, its impossible airiness, the crackly glaze that clings to its winding, golden ridges. It, for me, is doughnut perfection. So, naturally, I was excited to see that it was among the doughnuts featured in this month's Saveur (for those of you haven't seen it yet, it is a veritable doughnut extravaganza). Before this, it hadn't occurred to me to even try making crullers at home. How, after all, would you be able to reproduce those distinctive ridges, that airy structure, in your own kitchen? Saveur had answers. A star piping tip! Pâte à choux! Actually, now that I think about it, it seems kind of obvious. Pâte à choux is the egg-rich pastry dough out of which éclairs, gougères, and gnocchi parisienne are made. You start, typically, with water, butter, sugar, and salt over the stove and add to that flour and then eggs to pull together a pretty soft, unassuming dough. But when that dough hits heat it puffs, airy, golden, ethereal. So, really, it should have come as no surprise that crullers are made out of pâte à choux. They have that same magical quality about them.
So I was all set to make my first crullers until I looked at the ingredients list. Vodka? Instant potato flakes? Now, I'm not one to baulk at an unusual pâte à choux, but I at least want an explanation. The head notes, however, said nothing, and I just wasn't feeling that adventurous. But I still wanted crullers, so I took this as an excuse to get a book I've wanted for some time, Lara Ferroni's Doughnuts.
Leafing through the book, I almost got sidetracked. There are so many doughnuts in it that I'd like to make. Apple-cider doughnuts made with graham flour, picarones, which are Peruvian winter-squash fritters, crème brûlée doughnuts--they all sounded fantastically good. But in the end, the thought of those swirled ridges, that pâte à choux magic, it got to me.
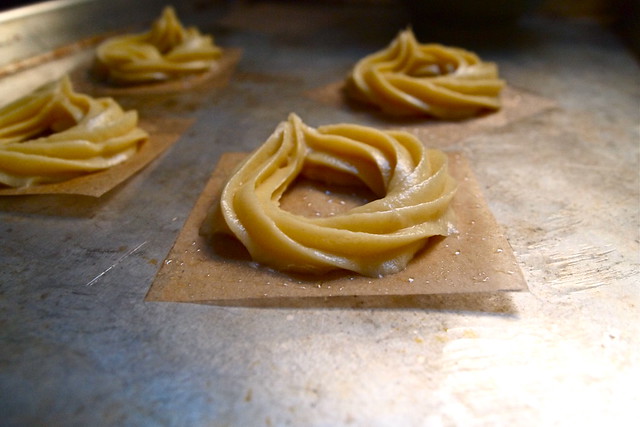
Deep-frying, admittedly, can be intimidating. That oil, after all, gets very, very hot. But common sense, a deep, heavy-bottomed pot, a deep-fry thermometer, and a spider skimmer are all you really need to keep things safe. And besides, making doughnuts is fun, especially with a friend in the kitchen to help out. For these crullers, one of you can pipe rings of pâte à choux onto squares of greased parchment, while the other takes care of the frying. It's pretty straightforward. Really, there isn't much at all standing between you and a dozen fine and lofty crullers.
Deep-frying, admittedly, can be intimidating. That oil, after all, gets very, very hot. But common sense, a deep, heavy-bottomed pot, a deep-fry thermometer, and a spider skimmer are all you really need to keep things safe. And besides, making doughnuts is fun, especially with a friend in the kitchen to help out. For these crullers, one of you can pipe rings of pâte à choux onto squares of greased parchment, while the other takes care of the frying. It's pretty straightforward. Really, there isn't much at all standing between you and a dozen fine and lofty crullers.

And now that I've made these crullers, I'm really curious about the recipe printed in Saveur. Has anyone tried it out? Can anyone tell me what the vodka and potato flakes do?
Honey Crullers
Adapted, ever so slightly, from Lara Ferroni's Doughnuts
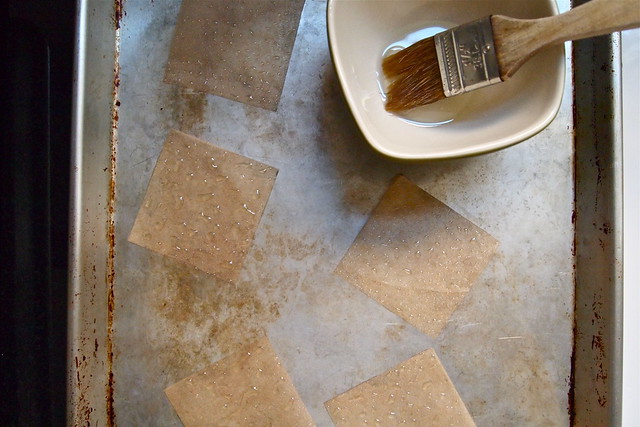
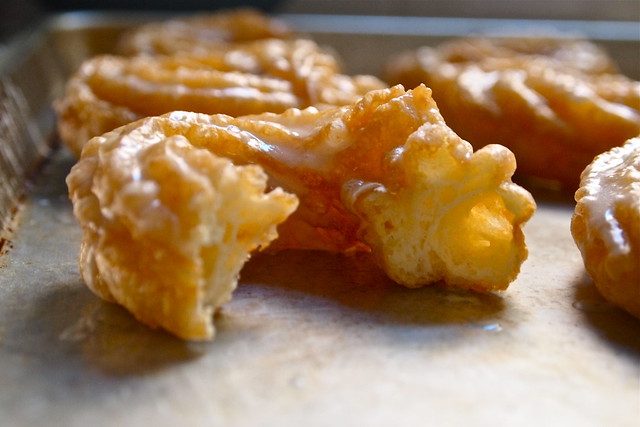
Note: About the piping tip. I used an Ateco no. 846, which is actually a closed-star piping tip. The equivalent open-star tip is the Ateco no. 826, but I couldn't find one of these in time. The only difference between the two, as far as I can tell, is that the closed-star tip produces more pronounced ridges in the pastry, which isn't a bad thing at all in this case. About the frying oil. I used canola oil, but I'm not sure that I would again. Though canola is a fine frying oil for some things, it isn't all that neutral, and with these doughnuts at least, its flavour was more noticeable than I'd have liked it to be. Ferroni recommends safflower oil, and I second that. About the parchment squares. If you end up with enough pâte à choux to make more than 12 crullers like I did, you might find yourself short on parchment squares. I reused a few. They were a little crinkly from the hot oil, but that didn't really pose much of a problem for piping.
1 cup water
85 g / 6 tablespoons butter
2 teaspoons sugar
generous 1/4 teaspoon salt
135 g / 1 cup all-purpose flour, sifted
3 large eggs, at room temperature
1-2 large egg whites, at room temperature and slightly beaten
Vegetable oil for frying
Honey glaze (see below)
Place the water, butter, sugar, and salt in a small heavy-bottomed saucepan and bring to a brisk boil over medium-high heat. Add the flour and stir with a wooden spoon until the flour is completely incorporated. Continue to cook and stir for 3 to 4 minutes to steam away as much water as possible. The more moisture you can remove, the more eggs you can add later and the lighter your pastry will be. The mixture is ready when a thin film coats the bottom of the pan.
Move the mixture to the bowl of a stand mixer fitted with the paddle attachment. Although you can mix the pâte à choux by hand, this can be rather arduous, so use a mixer if you have one. Stir the mixture for about 1 minute to allow it to cool. Then mix on medium speed and add the first egg. Let it mix in completely and then scrape down the sides of the bowl. Add the remaining eggs, one at a time, and mix in completely. Add the egg whites, a little at a time, until the paste becomes smooth and glossy and will hold a slight peak when pinched with your fingers. Be careful not to add too much egg white or your crullers will become heavy. Transfer the batter to a pastry bag fitted with a 1/2-inch star piping tip.
To fry the crullers, heat at least 2 inches of oil in a heavy-bottomed pot until a deep-fry thermometer registers 370 degrees F. While the oil is heating, cut out twelve 3-inch-by-3-inch squares of parchment paper and lightly grease them. Pipe a generous ring onto each square. When the oil is hot, gently place one cruller at a time in the oil, paper side up. Remove the paper with tongs. Fry on each side until golden brown, 2-3 minutes. (Undercooked crullers will collapse while cooling, so observe the first one, and if this happens, increase your frying time and check the oil temperature for the rest.) Remove with a spider skimmer or slotted spoon and drain on paper towel for at least 1 minute. Leave on a rack to cool. Once cool to the touch, the crullers can be glazed.
Alternatively, you can bake the crullers. They will have slightly firmer crusts than fried ones. Preheat the oven to 450 degrees F. Line a baking sheet with parchment paper and pipe the crullers onto it, at least 2 inches apart from one another. Bake for 5 minutes, then reduce the heat to 350 degrees F and bake for another 15 minutes. Turn off the heat, open the oven door slightly and let the crullers sit in the cooling oven for 5 to 10 minutes. Remove, dip in glaze, and cool on a rack until the glaze has set.
Makes 10-15 doughnuts.
Tips for using a pastry bag. To fill the bag, first fit the bag with the tip and then tuck some of the bag into the wide end of the tip. This will prevent whatever you're filling the bag with from running out the tip as you fill. Second, roll down the sides of the bag a bit so that when you transfer your filling to the bag, it doesn't end up all near the wide opening where your hands will be. You'll just make a mess trying to squeeze its contents towards the tip. If you're working alone, stand the empty bag up in a tall glass to keep it steady as you fill. Regardless, a tall glass can be helpful if you need to put the bag down at any point in the middle of piping. Finally, with the bag filled, twist the wide end of the bag shut and hold it there with one hand (use your other hand to support and guide the bag by holding the bag closer to the tip). With the bag twisted and held this way, you should be able to easily force the filling through the tip.
Honey Glaze
From Lara Ferroni's Doughnuts
150 g / 1 1/2 cups confectioners' sugar, sifted
1 tablespoon honey
3 to 4 tablespoons milk water
Place the sugar in a medium bowl and slowly stir in the honey and milk, a little at a time, to make a smooth, pourable glaze.