Good cookbooks are like good friends. You want to surround yourself with them. They're the ones who will see you through, the ones who inspire you, the ones with whom you can spend long hours musing, late into the night. And, most importantly, they're the ones you can always count on--to pull you out of a slump or be a voice of assurance or, in my case most recently, help you make a few dozen pastries worthy of the fine and discerning folks that would be at
No Dessert Left Behind.
So you can count
Bouchon Bakery a good
friend cookbook of mine...because we did it! ((I think.) If you snagged a piece of this tart at the bake sale, I would
love to know what you thought of it.) See, it was less than two weeks ago that I received an email asking me to contribute to this bake sale for
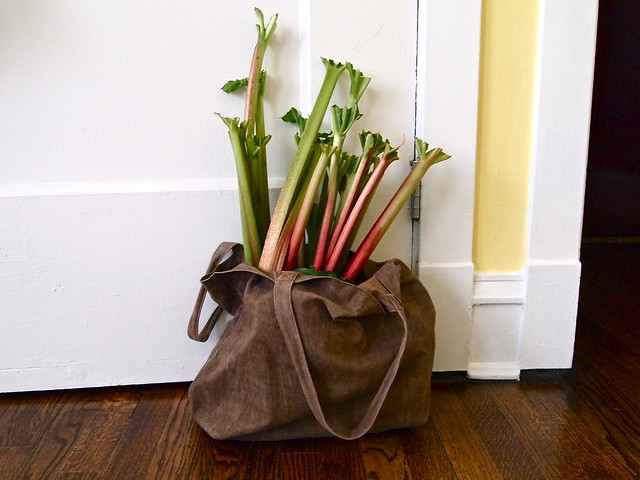
No Kid Hungry, and already I knew, it was not going to be just any bake sale. Most of the participants would be pastry chefs from around the city--talented people who make wonderful pastry everyday for a living. Big things were expected. But I didn't have the time to do any recipe testing (I had a big pile of final papers to grade), and nothing that I'd made in recent memory fit my requirements. Whatever I was going to make needed to be (a) something that I could easily portion and box to go, (b) eye-catching, preferably, and (c) would hold up for at least a good 24 hours (mostly so that I wouldn't have to start my baking at 2 am--I'm no professional). So I put my trust in Thomas Keller and Sebastien Rouxel and decided to make a half-sheet-sized
tarte à la rhubarbe et au beurre noisette.
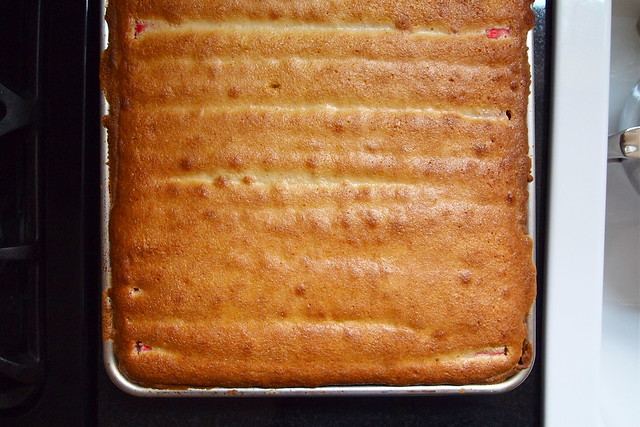
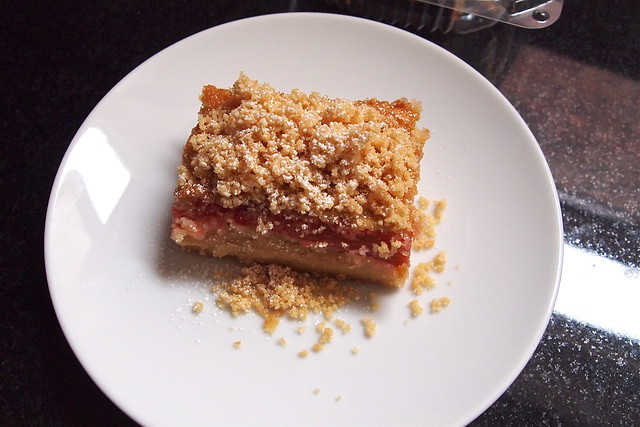
Even by my standards, making this tart was a monster of a project. In part, this was because I was doubling the recipe as written (at Bouchon, they do bake it in half-sheet pans, since, you know, it's a bakery, but the recipe for home bakers is scaled back to a quarter-sheet pan). I had twice as much rhubarb to trim and de-string. And rolling out enough pâte sucrée to fit an 18-x-13-inch pan and then getting it into that pan were not the easiest of feats. But these considerations aside, there was still a lot to do. Keller and Rouxel get you to cure your lengths of rhubarb--once trimmed and stripped of their tough outer layer--in sugar and grenadine for 24 hours. This process draws water from the rhubarb (the stalks are mostly just water) that would otherwise be released during baking, and the grenadine lends some extra colour to the stalks. There is also the pâte sucrée to pull together, a buttery, vanilla-specked dough that lines the bottom of the tart. Then there's the almond-brown-butter filling to make, some of which gets piped over the blind-baked pâte sucrée, the rest between and over the stalks of cured rhubarb. The assembled tart then gets baked to a deep, burnished gold. And finally, once cooled, it's cut up and mounded with crunchy almond streusel.
Like I said, it was a lot to do. And a lot to trust in too. I'd never made this tart before. And I didn't really have a back-up plan. There were definitely a couple of moments--like when my stand mixer was throwing up handfuls of flour onto the counter (the pâte sucrée doubled, quite frankly, is a bit too much for a standard stand mixer to handle) and when brown-butter filling (just a few drips, luckily) was baking over the edge of my half-sheet and onto oven floor--where I thought to myself, "This is going to be a disaster."
But it wasn't. The tart baked up beautifully. And with Octavian's help and that of a couple of other good-willed friends, I even got it portioned and packed up in time to make the Saturday evening drop-off at
Little Goat. (See, good cookbooks and good friends!)
I wish I could tell you more about how it tasted. But I didn't get a chance to buy back a piece (for most of the bake sale I was down on the first floor of the restaurant, directing people upstairs), and of the test square that I held back, well, Octavian did most of the testing. (He approved.) What I ate I did early Sunday morning still half-asleep. I remember it being deeply nutty and just sweet enough--the rhubarb was still emphatically tart. But maybe some of you out there are in a better position to say than me. (Speak up, please.)
To all of you in Chicago who came out on Sunday, thank you so much for your support! I hope you had a good time. And to
Vanessa and
Mike, who organized the bake sale, thank you so much for all of your hard work and for inviting me to bake. (And
Tim, thanks for thinking of me and passing my name along!) It got a little crazy, but I had a blast.
AN UPDATE - 2013-06-12: Oh, and I got word today--we made $6,252 at the bake sale! Way to go, guys! (And here are
some photos from the event.)
Tarte à la rhubarbe et au beurre noisette (Rhubarb Brown-Butter Tart)
From Thomas Keller and Sebastien Rouxel's Bouchon Bakery
NOTE: Timing. There are lots of steps to making this tart. You'll need to give yourself at least two days--the first to at least trim, de-string, and start curing the rhubarb, the second to bake and assemble the tart. I also pulled together the pâte sucrée on the first day. You could also make the streusel then too. I just didn't have the time.
Eggs. To measure out eggs for this recipe, first crack them open into a bowl and whisk them together. One large egg weighs about 50 grams or comes to about 1/3 cup in volume, so that should give you an idea of how many you need. Keller and Rouxel also have you push the whisked eggs through a fine-mesh strainer to remove any small bits of shell and the chalazae attaching the yolk to the white. (I find this step a little annoying to do for more than a couple of eggs. My feeling is that you could probably skip it.)
Grenadine. The book doesn't really say anything about how to shop for grenadine. The most commonly available brand in the US is mostly just high-fructose corn syrup and food colouring and also tastes like cough syrup, which is kind of annoying. Traditionally, grenadine was made with pomegranate juice, and fancier brands, like
this one, are returning to that practice. (It's also not difficult, I'm told, to make your own.) I debated a little bit about what to do here. Eventually, I found a grenadine at the grocery store that was at least made with sugar (though it also tasted like cough syrup), and given that the purpose of the grenadine here seems to be to colour the rhubarb, I'd say that you should keep the fancy stuff for imbibing. It doesn't noticeably affect the rhubarb's flavour, anyway.
Fraisage. Below, pulling together the tart dough requires a French technique called "fraisage." Here's a
video that might give you a better sense of what to do. The actual
fraisage starts around 2:05.
Scale. The measurements below correspond to those printed in the book. Like I said above, I scaled up to a half-sheet pan for the bake sale, but I assume that very few of you will need to feed 24-32 on any given occasion. But if for whatever reason you do find yourself in that situation, consider getting your hands on a good kitchen scale (I'm not sure that doubling the measurements here by volume will prove as reliable) and then follow the recipe as printed. It works! Just keep in mind that you will probably have to bake the tart shell, the assembled tart, and the streusel for a few extra minutes in each case, given that you've got more surface area and more volume to deal with. Use your judgement.
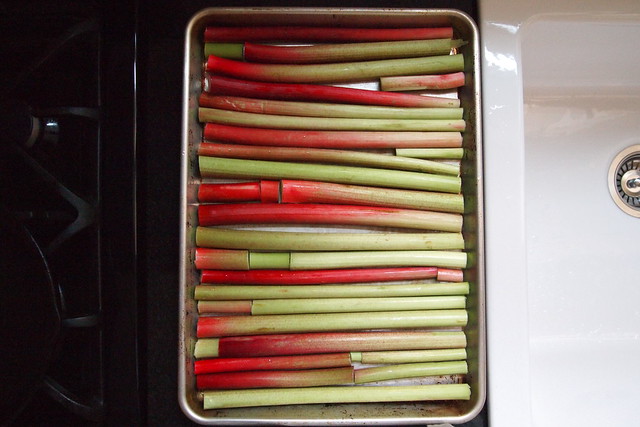
CURED RHUBARB
15 young stalks of rhubarb (about 2 pounds), preferably at least 13 inches long and about 1/2 inch wide
100 g / 1/2 cup granulated sugar
120 g / 1/4 + 2 tablespoons grenadine
PÂTE SUCRÉE
375 g / 2 2/3 cups all-purpose flour
46 g / 1/4 cup + 2 1/2 tablespoons + 94 g / 3/4 cup + 1 tablespoon powdered sugar
47 g / 1/4 cup + 3 tablespoons finely ground almonds
225 g / 8 oz unsalted butter, at room temperature
1/2 vanilla bean, split lengthwise
56 g / 3 1/2 tablespoons eggs (see note above)
BROWN-BUTTER FILLING
235 g / 8.25 oz unsalted butter
75 g / 1/2 cup + 3 tablespoons finely ground almonds
75 g / 1/2 cup + 1 1/2 teaspoons all-purpose flour
150 g / 1/2 cup + 1 1/2 tablespoons eggs (see note above)
210 g / 1 cup + 1 tablespoon granulated sugar
75 g / 1/4 cup + 2 teaspoons whole milk
75 g / 1/4 cup + 1 tablespoon heavy cream
TOASTED ALMOND STREUSEL
40 g / 1/4 + 2 teaspoons all-purpose flour
40 g / 1/3 cup + 1 teaspoon finely ground almonds
40 g / 3 tablespoons granulated sugar
Pinch of kosher salt
40 g / 1.4 oz cold, unsalted butter, cut into 1/4-inch pieces
Powdered sugar for dusting
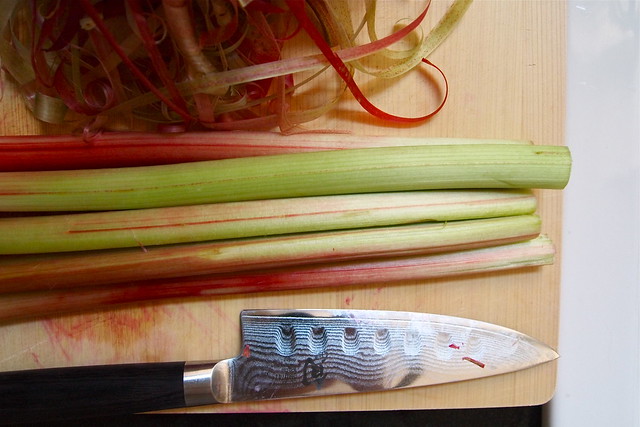
FOR THE CURED RHUBARB: Trim the rhubarb to fit the length of the quarter-sheet pan you'll be using for the assembled tart. Using a sharp paring knife (a vegetable peeler would remove too much), remove any tough strings and peel from the stalks. Do this by making just a few short cuts at one end to separate the peel from the stalk and then pulling it off the rest of the way with your fingers, following the length of the stalk. If any of the stalks are very young and green and don't peel easily, leave them unpeeled.
Arrange the rhubarb in a 9-x-13-inch baking dish. Sprinkle with it with the sugar and drizzle the grenadine over top. Cover the dish with plastic wrap and refrigerate for 24 hours, turning the rhubarb every 8 hours to coat it evenly.
Drain the rhubarb on paper towels, and discard the liquid remaining in the dish.
FOR THE TART SHELL: Place the all-purpose flour in a medium bowl. Sift the 46 g / 1/4 cup + 2 1/2 tablespoons powdered sugar and the almond flour into the bowl. Break up any lumps remaining in the sieve and add them to the bowl. Whisk to combine.
Place the butter in the bowl of a stand mixer fitted with the paddle attachment and cream on medium-low until the butter is the consistency of mayonnaise and holds a peak when the paddle is lifted. Sift in the remaining powdered sugar and pulse to begin incorporating it. Then increase the speed to medium-low and mix for about 1 minute, until the mixture is fluffy. Scrape down the sides and bottom of the bowl. Scrape the seeds from the vanilla bean into the butter mixture, and mix on low for about 30 seconds, just to disperse the seeds evenly.
Add the dry ingredients in two additions, mixing for just 15-30 seconds after each to combine. Scrape the bottom of the bowl. Add the eggs and mix on low until just combined, another 15-30 seconds.
Transfer the dough to a clean work surface, gathered in a mound close to you. Using the heel of your hand, smear the dough, a bit at a time, across the work surface. Gather the dough up again with a bench scraper and repeat until the dough is smooth and uniform. This technique, called fraisage, ensures a delicate and uniform crust. Pat the dough into a rectangle, about 3/4 inch thick. Wrap the dough in a double layer of plastic wrap and refrigerate until firm, about 2 hours, but preferably overnight. The dough can be refrigerated for up to 2 days or frozen for up to 1 month.
Butter the quarter-sheet pan or spray with non-stick spray. Line the bottom with parchment paper. Unwrap the dough and place between two sheets of parchment paper. With a rolling pin, pound the top of the dough, working from one side to the other, and then rotate 90 degrees and repeat. Roll out the dough in the parchment, from the center outward, rotating and flipping the dough as needed. Form a 12-by-16-inch rectangle, just less than 1/8 inch thick. Remove the top layer of parchment and carefully invert the dough onto the quarter-sheet pan, letting any excess hang over the edges. Run your hands over the parchment and smooth the dough and force out any air bubbles. Make sure that the dough at the corners of the pan is no thicker than elsewhere. Remove the parchment and run the rolling pin over the edges of the pan to remove any excess dough. Cover the dough with plastic wrap and chill for 30 minutes in the freezer or 1 hour in the fridge. Preheat the oven to 350 degrees F.
Line the dough with parchment paper and fill the pan with raw rice or beans. Bake for 15 minutes, then rotate the pan and bake for another 15 to 20 minutes, until the dough is set and no longer sticks to the parchment. Take the pan from the oven and remove the parchment and rice. Return the pan to the oven and bake for another 15 minutes, or until the dough is golden brown. (Don't worry if the edges of the tart have darkened further. They're unlikely to burn, and you can trim them away later anyway.) Set the pan on a cooling rack and cool completely.
FOR THE ALMOND STREUSEL: Whisk together the all-purpose flour, ground almonds, sugar, and salt in a bowl, breaking up any lumps. Add the butter pieces and toss to coat. Work the butter in with your fingertips, breaking the butter into pieces no larger than 1/8 inch. Cover the bowl with plastic wrap and chill for at least 2 hours, or up to 2 days, or freeze for up to 1 month.
Preheat the oven to 325 degrees F. Spread the streusel in an even layer on a parchment-lined sheet pan. Bake for 8-10 minutes, turning the streusel every few minutes, until it's golden brown and dry. Place the pan on a cooling rack and let cool completely.
Transfer the streusel to the bowl of a food processor and blitz to the consistency of brown sugar. The streusel can be stored in a covered container for up to 2 days.
FOR THE FILLING: Preheat the oven to 350 degrees F.
Line a fine-mesh strainer with a double layer of cheesecloth and set over a small bowl. In a small saucepan, melt the butter over medium heat. As soon as it has melted, whisk continuously to prevent the butter from separating. Once it boils, stop whisking and increase the heat to medium-high. Continue cooking the butter for a few minutes, whisking occasionally to keep the solids that settle at the bottom of the pan from burning. Check the color of the butter by lifting some out of the pan with a spoon. The butter is ready when it is the color of caramel. Remove the pan from heat and pour the butter into the strainer set over the bowl. Discard the cheesecloth and pour the browned butter into a heat-proof bowl, measuring out 165 g / 3/4 cup + 1 tablespoon. Set aside for a few minutes to cool. The butter should not have cooled completely when it is added to the almond filling--otherwise it will not incorporate--but it should not be hot off the stove either.
Whisk together the almond flour and all-purpose flour in a medium bowl, breaking up any lumps.
Add the eggs and sugar to the bowl of a stand mixer fitted with the whisk attachment and mix on medium speed for about 2 minutes, until increased in volume and thickened. With the mixer running on medium-low, slowly add the milk and cream. Add in the dry ingredients and mix on medium-low speed for just a few seconds to combine. With the mixer running on medium, add the browned butter in a slow, thin stream and mix until combined. Transfer the filling to a pastry bag fitted with a 1/2-inch tip.
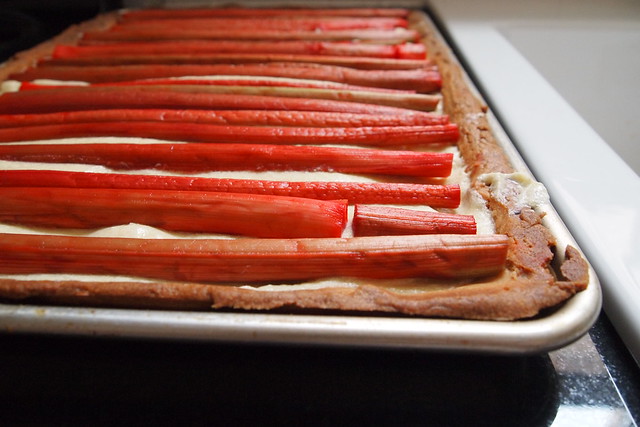
Pipe enough filling into the crust to cover the bottom with a 1/4-inch-thick layer and spread it evenly with an offset spatula. Arrange the rhubarb rounded-side-up on top of the filling, running lengthwise with the pan. If there are any pieces shorter than the pan, patch them up with a piece cut from another stalk. Pipe more filling around the rhubarb pieces, filling in any gaps. Then spread any remaining filling over the top of the rhubarb. There may not be quite enough filling to completely cover the stalks. That's okay.
Bake the assembled tart for 40 minutes. (Place another sheet pan on a lower rack in the oven to catch any drips. My filling overflowed just a little in the first few minutes of baking.) Rotate the pan, reduce the oven temperature to 325 degrees F, and bake for another 10 to 15 minutes, until the filling is set and deeply golden. Set the pan on a cooling rack and cool completely.
TO SERVE: Cut the tart into 12 pieces, dividing the tart in half along its width and then into six along its length. This way, each piece shows the long rhubarb stalks in profile. Trim the crust on the pieces, if desired. Mound some almond streusel onto each of the pieces and dust with powdered sugar.
SERVES 12.