Showing posts with label books. Show all posts

Friday, July 26, 2013

Something enduring

Cherry Preserves with Plums
I know, I know, another batch of preserves--what gives? I've been asking that of myself a lot lately, and I still don't have much of an answer. I've just found myself this summer making jam feverishly--and not only that but thinking a lot about it (also feverishly)--about what went well and what didn't with past batches, about how to squeeze in another session soon, about what to make next. It's all gotten, I admit, just a little bit obsessive. And before this, if you can believe it, jam wasn't something that really held my interest. Butter, I thought, is all a girl really needs. Why complicate matters?
Plums and cherries Macerating fruit Ready to cook
Why, indeed, complicate matters? That was, for a long time, my attitude towards summer fruit. Berries, peaches, and plums--why fuss with them when they're good as they are? On a sticky July day, you can't do much better for yourself than eating a cold plum over the kitchen sink, juices running down your arms. So why trouble yourself with more? But then twice last week I found myself in the kitchen sweating it out over a pot of bubbling fruit and sugar, glass jars close at hand waiting to be filled. So obviously, at some point, I'd undergone a change of mind.
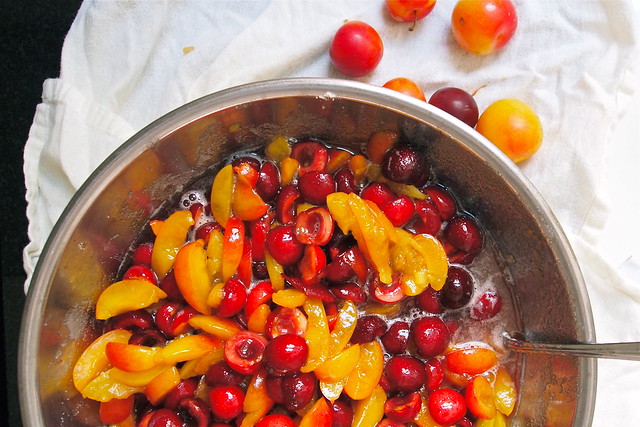
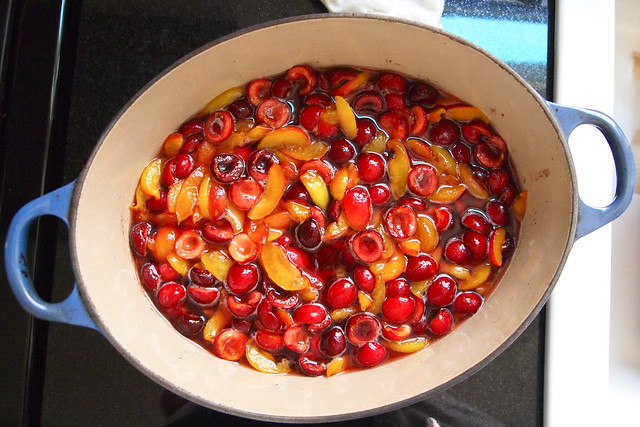
It had a lot to do with the process, I think. Making preserves is very physical, very absorbing--pulling apart cherries one by one and plucking out their pits or slicing up a mound of plums. You give more attention to the fruit than you might just sticking it in your mouth, and it feels good. And the transformation that takes place, because it happens in an open pan, and because you're there the whole time, stirring, stirring, stirring, is one you get to see all the way through. You get to see the fruit slump and soften. You get to see the sugar disappear into the juices, and the juices bubble up wildly and thicken. It's dramatic and beautiful. You get a different appreciation of the fruit. And you feel like you're tapping into something old, elemental, deeply human.
This, anyway, is the feeling I'm left with, having recently read and swooned over much of Kevin West's Saving the Season. The book is a bit unusual for a cookbook. West provides plenty of clear instruction and assurance on pickles, jams, jellies, and the like. But he also contextualizes preservation as a practice. Between recipes, he draws on a mixture of history, literature, and personal narrative to give us a better sense of the fruits, vegetables, and processes to follow. You get the feeling reading it that you're being given an heirloom, something enduring to hold on to. I'm pretty sure that I'll be turning to the book season after season, year after year, for a long time. (Before the book, West wrote a blog by the same name. I suggest you check on his post on quince, if you want to get the flavour of his work. It's heady.)
Preserves on toast
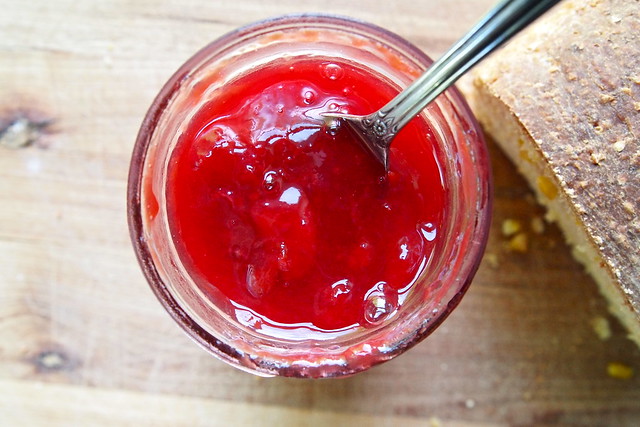
This latest batch is from the book, a mixture of early plums and sweet cherries, finished with a splash of bourbon. I didn't make it quite as intended. I was supposed to use inky-dark Bing cherries, but in a moment of absentmindedness at the market, I ended up with a brighter, less assertive variety. So my preserves don't quite have the depth and colour they're supposed to. But I don't really mind. Instead, they have a sort of all-round, stone-fruit sunniness to them, something I know I'll appreciate come January. My favourite spoonfuls are the ones that include a slice of plum. The fruit is velvety, yielding in the best way. And with the bourbon, it is made luxurious, buttery even.

Cherry Preserves with Plums
From Kevin West's Saving the Season
NOTE: Fruit obviously varies in sweetness. The measurements provided for both sugar and lemon juice are therefore guidelines only. West encourages you to taste your fruit at every stage of the process--out of hand, once macerated, and during reduction (after a minute on one of those chilled plates). Adjust with more sugar or lemon juice as you see fit. West also advises starting out with a little less (up to a 1/2 cup less) sugar, depending on the plum varieties available to you. You can always add more sugar towards the end, if you don't think the preserves are sweet enough.

2 pounds black cherries, such as Bing
2 pounds firm, yellow-fleshed plums, such as Red Beauty (the tarter, the better)
2 tablespoons freshly squeezed lemon juice
3 cups sugar
1/4 cup bourbon or brandy

Wash and drain the fruit. Pit the cherries. (West isn't one for cherry-pitters. His method is to grab each cherry, one thumb on either side of the stem, and pull it apart. It should split lengthwise along its seam. Then you can just dig out the pit. This works best, I've found, with soft, ripe cherries. It makes less of a mess than a pitter.) Slice the plums away from their pits in sections. Stir together the fruit, lemon juice, and sugar. Set aside to macerate for at least 15 minutes. (If you plan to macerate for longer, e.g. overnight, press a piece of parchment paper or plastic wrap close to the fruit to prevent oxidation.)
Set a few small plates in the freezer. Warm 5 clean half-pint jars and lids in the oven set at 200 degrees F.
Turn the fruit-sugar mixture into a preserving pan or other large, wide, heavy-bottomed pot. Reduce over high heat, stirring frequently. Once it comes to a full rolling boil, it should take 10-12 more minutes to fully reduce. Test the preserves. Turn off the heat and spoon about a teaspoon's worth onto one of the chilled plates. Return it to the freezer for 1 minute. If the surface wrinkles when you push your finger through it, it's ready. If not, continue reducing for a couple minutes more and test the consistency again. Once fully reduced, add the brandy or bourbon and continue to cook, stirring well, for 1 minute longer.
Ladle the hot preserves into the five half-pint jars, leaving 1/4-inch headspace. Wipe the jars' rims clean and put on their lids and bands (screwed only finger-tight).
Process in a boiling-water bath for 10 minutes (count 10 minutes from when the water returns to a boil). Remove the jars from the water and let cool. Check to see if a proper seal has formed by removing each jar's band and holding the jar by its lid. The lid should hold firm. If it doesn't, store the jar in the fridge and eat its contents promptly.
Makes about 5 1/2-pint jars

Tuesday, July 9, 2013

What was missing

Elderflowers
Awhile ago, I finally picked up Luisa Weiss' memoir, My Berlin Kitchen. And, friends, if you don't already know firsthand, it is lovely through and through. Most of us at some point, I think, find ourselves struggling to figure out where it is we really belong, and Luisa gives clear and heartfelt expression to this in telling her story--the pull of your roots, your history can be hard, but it takes serious courage to leave one life for another, to really listen to yourself for once. 
The bits of the book that I like best are by far the ones that take place in Berlin. These for the most part are little vignettes of everyday life--birthday parties, dinners with old friends, summer picnics--but they sparkle in a certain way. You can really tell that this is where Luisa feels most at home. And you get glimpses of Berlin that you can't just by visiting. I was there for a bit last summer and tried to take in as much as I could. I walked and walked and ate and ate, and though I loved almost every bit of it, I never really felt as though I quite got what Berlin was about. And maybe it's just that I wasn't there for long enough, that I didn't see quite enough of it, but my guess now is that what was missing from it all was a kitchen to cook in. You really get the sense from Luisa that Berlin's soul is in its kitchens, with its women and men tending to bubbling pots and deep bowls. How better, after all, could you get to know a city than by taking a trip to an overgrown orchard at its outskirts--probably given up during the Cold War--and picking plums for Pflaumenmus? Or by gathering up bunches of white asparagus at its markets and making sharp, bright salads? Or by snipping the sprays of elderflowers that bloom in its parks and bringing them home to make syrup? I can't really think of any.
Snipped elderflowers Flowers steeping Elderflower cordial
In Chicago, you definitely can't expect to find elderflowers just anywhere. (And even if you do happen upon some in the city, I wouldn't advise cooking with them. Some of the soil around here is pretty seriously lead-laced. This NPR article on lead and urban gardening advises against eating roots and greens growing in contaminated soil but suggests that fruit and flowers might be safe to eat. Maybe you can just harvest elderflowers if you find them in your neighbourhood after all? I don't know. I'd have to do more research.) But Luisa's description of her first drink of elderflower syrup--a couple of fingers' worth poured in a glass filled with cold water, evocative of Berlin's spring and all that was missing in her life at the time--was enough to send me looking for some blooms around here. And I happened to be in luck. Elderflowers' short season in the Midwest falls between late June and early July. So, I was able to arrange with Seedling Farm to have some sprays ready for pick-up at the market. (The blooms are too delicate to survive much shuttling back and forth, so you have to contact the farm ahead of time.) Finding elderflowers is definitely the most troublesome part of making this syrup. The rest is just a matter of snipping the blooms from their stems and steeping them in a sugar syrup, along with a little lemon and citric acid. In a few days' time, the golden syrup is ready for bottling and drinking.
So far, my friends and I have been enjoying it mixed with sparkling water and lemon, sometimes a little good gin too. Yesterday, I tried adding a bit of muddled basil, which I quite liked. Luisa recommends a mix of Prosecco, muddled mint, sparkling water, and lemon. She also says that elderflower, while refreshing in the summer, is an entirely different thing in the dark of winter, that it really tastes of spring and even joy then. I am doing my best to save a little, but I can already tell that it's going to be hard.

Elderflower Syrup
From Luisa Weiss' My Berlin Kitchen
NOTE: You can find citric acid at Indian grocery stores, where it is labelled as "lemon salt" or "sour salt." As usual, I found mine at the Spice House.
UPDATE, 2013-12-09: A couple of months in, I noticed that my syrup had started fermenting a little. When I opened the bottle, there was a noticeable pop. I am not sure what to attribute this to. Perhaps I was not as thorough as I could have been with cleaning out my bottles. In any case, I didn't think too much of it until today when I opened my fridge to find that the fermentation had caused the glass bottle to explode (I hadn't opened it for awhile, and the bottle was stoppered with a wire-bail mechanism, so it was too secure to let any gas escape). Anyway, take this as a lesson--mind your fermentation.

20 to 25 large elderflower sprays
3 to 4 organic lemons, washed and sliced paper-thin, seeds removed
3 1/2 tablespoons citric acid
3 pounds and 6 ounces sugar

Clean and dry an opaque vessel large enough to hold about 5 quarts.
Hold each elderflower spray over the vessel and snip the tiny blossoms away from the stem and let them fall into the crock, taking care not to lose any of the pale yellow pollen. (Keep an eye out for tiny insects in among the blossoms. One or two are probably unavoidable. I found an itty bitty caterpillar. Shake them out or nudge them along towards the stem so that they don't end up in your syrup.) Add the sliced lemons to the vessel and sprinkle in the citric acid.
In a medium pot over medium heat, combine the sugar and 1 1/2 quarts of water. Stirring occasionally, melt the sugar and bring the mixture to a boil. Then remove it from heat and let the syrup sit until lukewarm.
Pour the syrup over the lemon and elderflowers and mix well. Cover the vessel with plastic wrap and let it stand in a cool corner of your home for 3 days, stirring once a day.
On the final day, uncover the crock and pour the liquid through a fine-mesh strainer into clean glass bottles. Discard the lemon slices and elderflowers. Store in the refrigerator or in a cool, dark cellar for up to a year.
Makes about 2 litres.

Monday, February 4, 2013

This is it

Parsley and barley salad
If in the past year or so there was a cookbook that I reached for most, one whose pages caught the spatter of sauce and oil and cream more than any other, it was definitely Nigel Slater's Tender. I cooked from it a lot, and we ate really well, all year long. But this year, it's my feeling that things will be a little different. This, I think, might just be the year of Jerusalem. And, as I'm sure you've already heard, this cookbook is one that dazzles, one that overflows with colour and stories and bold, brilliant flavours. So I won't say much more about it. I'll just say this--I cooked from it all weekend, and, friends, this is a cookbook rich in small splendours. It is one hard to pull away from. I can't wait to cook from it again.
Parsley to be chopped The rest Salad again
The dish from this past weekend that I want to share with you is one, I think, that between dishes like roasted chicken with clementines and arak and burnt eggplant with garlic, lemon, and pomegranate seeds is easy to overlook. Parsley and barley salad. It sounds about as uninteresting as can be. But it isn't. This salad is bright, bold, and vibrant. The parsley, with its peppery, anise notes, definitely leads, but then there's the creamy za'atar-marinated feta, the crunchy bits of sweet green pepper, the delicate barley, the crushed, roasted cashews, the sharp scallion. I don't know about you, but come February, I'm starved for clean, bright, simple foods. I need something to counter the inevitable heaviness of winter, the rich stews, the parade of roasted root vegetables. I need something that will wake me up. This salad is it. Confetti for the parade. Let it fall on your plate, and you'll see.
I've made this salad a couple of times now and have eaten it just on its own as a late dinner and alongside a number of other things. I think it went particularly well with roasted, cumin-spiced cauliflower. But it's pretty versatile. Think of it as a sort-of wintery tabbouleh, (for those months when tomatoes are just unthinkable).

Parsley and Barley Salad
Adapted from Yotam Ottolenghi and Sami Tamimi's Jerusalem
Note: About the barley. This salad is all about the parsley. Even so, I do like to add a little more barley than is called for, but do what you will. About the za'atar. Za'atar is a blend of dried thyme, sumac, and roasted sesame seeds. The blend I bought also has oregano and hyssop in it, which I'm not sure I'm all that crazy about, but it's easy enough to make your own at home. About the feta. It's really important to get a good, creamy feta for this salad. It serves as a counterpoint to the sharpness of the salad's other ingredients. None of this insipid, watery stuff.

40-55 g / scant 1/4 - 1/3 cup pearl barley (see above)
150 g / 5 oz good, creamy feta cheese
5 1/2 tablespoons olive oil
1 teaspoon za'atar
1/2 teaspoon coriander seeds, lightly toasted and crushed
1/4 teaspoon ground cumin
80 g / scant 3 oz flat-leaf parsley (2-3 bunches), leaves and fine stems
4 green onions, finely chopped
2 garlic cloves, crushed
40 g / 1/3 cup cashews, lightly toasted and coarsely crushed
1 green pepper, seeded and cut into 3/8-inch dice
1/2 teaspoon ground allspice
2 tablespoons freshly squeezed lemon juice
Salt and pepper to taste

Place the pearl barley in a small saucepan, cover with plenty of water, and boil for 30-35 minutes, until tender but with a bite. Pour into a fine sieve, shake to remove all the water, and transfer to a large bowl.
Break the feta into rough pieces, about 3/4 inch / 2 cm in size, and mix in a small bowl with 1 1/2 tablespoons of the olive oil, the za'atar, the coriander seeds, and the cumin. Gently mic together and leave to marinate while you prepare the rest of the salad.
Chop the parsley finely and place in the bowl with the green onions, garlic, cashew nuts, pepper, allspice, lemon juice, the remaining olive oil, and the cooked barley. Mix together well and season to taste. To serve, divide the salad among four plates and top with the marinated feta.
Serves 4.

Sunday, November 6, 2011

It brought me right back

Momofuku Milk Bar Peanut Butter Cookies
Bakers don't get enough respect for what they do. I've heard it from people who don't cook at all. I've heard it from people who've worked in professional kitchens. It seems to be a pervasive attitude in some circles. You've heard them. They're disdainful of bakers and baking. They say things like: "Baking is what your grandmother does," or "Pastry chefs aren't hardcore enough." Well, try telling that to Christina Tosi. She's the amazing woman behind Momofuku Milk Bar, the outpost of all things good and sweet in the Momofuku empire. She's let loose such weird, wild, and delightful things on New York City as Crack Pie™, Cereal Milk™, and cake truffles. She is a one-woman force of nature, and she doesn't bake like your grandmother (which is not to say that you shouldn't love what grandmothers bake). In David Chang's words: "Don't let her nice demeanour and southern charm fool you; underneath she is a ruthless killer...just like her recipes [...] where simple flavours and ingredients combine in ways that make grown men whimper. Resistance to her sugar manifesto is futile." If anyone can take on that totally unwarranted disdain for bakers and baking, it's Christina Tosi. Let her at them.
Between the Milk Bars and the pastry programs at the other Momofukus, Tosi's reach has been limited mostly to those lucky enough to live or work in Manhattan. But as of last week, the game has changed. The Momofuku Milk Bar cookbook is out! Now we can all taste a bit of Tosi's sugary genius.
Peanut brittle
Peanut brittle shards
I got my copy about a week ago, and I've been giddy ever since. I've barely been able to put the book down. Chocolate-chip layer cake? Red-velvet ice cream? Cinnamon-bun pie?  Liquid cheesecake? It doesn't get any better than this. Christina Tosi taps into our childhood memories with her desserts and re-imagines the things we loved in strange and wonderful ways. Their flavours evoke the familiar and the comforting, the simple and sinful pleasures of childhood eating. (Tosi was one of those kids that snuck more than a spoonful of cookie dough when someone's back was turned.) In making and eating Tosi's desserts, you will be transported to simpler days--to the days in which you didn't pooh-pooh birthday cake from a box, in which it was okay to eat as much ice cream as you wanted, in which eating a handful of pretzels followed by a handful of chocolate chips was just the right thing to do. Tosi has no pretensions. She makes it okay for us to love these things again. She indulges us. She gives us her favourite birthday cake from a box, re-engineered by her and her team from scratch. What a woman.
Because Tosi's desserts are Momofuku-grade productions, most will be a bit of a project for us at home. The layer cakes, for example, typically involve five or six separate components to be made--but they totally look worth it (I have a feeling that birthdays this year are going to be especially fun). It helps that each of the recipes is derived from one of the Milk Bar's "mother" recipes. Once you're practiced at making Cereal Milk™, for example, a range of ice creams and pies calling for it or a variation on it will be at your fingertips. And you shouldn't worry about any leftovers you might end up with (though, I don't really see why you'd ever end up with leftovers). Tosi encourages the use of scraps and leftovers in subsequent baked goods. Cake truffles just are leftovers--scraps from layer cakes, whatever sort of leftover curd or cake filling there is lying around, and chocolate plus something crunchy to coat. How awesome is that?
Liquid glucose
Cookie dough!
For my first crack at the book, I opted for something far less elaborate--Milk Bar's peanut butter cookie. It only calls for two components, a peanut brittle and a cookie dough, and it's amazing. It might just be my favourite cookie ever. It has that perfect ratio of crisp edge to dense, chewy interior. And it's wonderfully balanced--when you make the recipe, it will strike you that you're adding what seems like an awful lot of salt for a cookie, but when you taste the dough (Tosi encourages it!) or take your first bite of cookie, you'll understand. The salt makes a difference--think salted-butter caramel and the difference the salt makes there. But best of all, maybe, is the peanut brittle. Tosi has you smash it up into little pieces and add it to the dough right at the end. In the cookie, these wind up as little toffee-like pockets of sweetness and chew. Beautiful, just beautiful.
Peanut butter cookies awaiting the oven
I'm not usually one for eating cookie dough. I was an obedient child and took salmonella very seriously. But I couldn't help but eat more than a little while making these. It's that good. My favourite part of making the cookies, though, was opening the jar of Skippy Peanut Butter and spooning it out for the dough. I hadn't had Skippy in years. I'd forgotten how good it smelled. It brought me right back. There were days when I didn't care what was in my peanut butter or how many cookies I'd eaten. It was nice to have a little of that again.

Peanut Butter Cookies
Adapted from the Momofuku Milk Bar Cookbook
Note: About the brittle. I don't recommend grinding it down in the food processor. The team at Milk Bar does, but I found that (a) it's easier to control what size your brittle pieces end up being when you break them with a rolling pin and (b) the brittle, because it's just sugar peanuts, is very hard--the brittle flying around at high speeds in my food processor actually scratched up the bowl a fair bit. Bread flour. The Milk Bar team found that they liked using King Arthur Bread Flour best for their cookies, and I always have a few pounds of it on hand, so that's what I used. Just listen to the recipe and don't overwork your dough. Liquid glucose. The liquid glucose has a role in the texture of the cookie--remember those fudgy centers and crisp edges I was talking about? In a pinch, you can substitute 2 tablespoons (35 g) of light corn syrup for it, but the corn syrup will add more sweetness to the cookies than you really want. I bought my liquid glucose here for a reasonable price. About the cookie scoop. Milk Bar specifically recommends this 2 3/4-oz ice cream scoop specifically, and I can understand how it would be handy if you were making a lot of Milk Bar cookies, but for one batch, you can probably manage without. Baking times. It is crucial that you don't overbake this cookie. If you do, you won't get that perfect fudgy center, and you'll shrug the cookie off and wonder what the big deal is. That's what happened with the first few that I baked. Don't do it!

170 g / 12 tablespoons (1 1/2 sticks) butter, at room temperature
300 g / 1 1/2 cups sugar
100 g / 1/4 cup glucose
260 g / 1 cup Skippy creamy peanut butter
2 eggs
0.5 g / 1/8 teaspoon vanilla extract
225 g / 1 1/3 cups bread flour
2 g / 1/2 teaspoon baking powder
1 g / 1/8 teaspoon baking soda
9 g / 2 1/4 teaspoons sea salt
1/2 recipe Peanut Brittle (recipe below)

Place the brittle in a large zip-top bag and break it into small pieces with a meat pounder or a rolling pin. The pieces should be about the size of short-grain rice.
Combine the butter, sugar, and glucose in the bowl of a stand mixer fitted with the paddle attachment and cream together on medium-high  for 2 to 3 minutes. Scrape down the sides of the bowl. Paddle in the peanut butter, then add the eggs (one at a time, incorporating completely before adding the next) and vanilla and beat for 30 seconds on medium-high speed. Scrape down the sides of the bowl, then beat on medium-high speed for 3 minutes. During this time the sugar granules will dissolve and the creamed mixture will double in size.
Reduce the mixer speed to low and add the flour, baking powder, baking soda, and salt. Mix just until the dough comes together, no longer than 1 minute. (Do not walk away from the machine during this step, or you will risk overmixing the dough.) Scrape down the sides of the bowl.
Still on low speed, mix in the peanut brittle pieces until incorporated, no more than 30 seconds.
Using a 2 3/4-ounce ice-cream scoop (or a 1/3-cup measure), portion out the dough onto a parchment-lined sheet pan. Pat the tops of the cookie domes flat. Wrap the sheet pan tightly in plastic wrap and refrigerate for at least 1 hour, or for up to 1 week. Do not bake your cookies from room temperature--they will not bake properly.
Heat the oven to 375 degrees F.
Arrange the chilled dough a minimum of 4 inches apart on parchment- or Silpat-lined sheet pans (seriously, these cookies sprrreeaad--you probably shouldn't bake more than 4-6 at a time on a standard-sized half-sheet). Bake for 17-18 minutes. The cookies will puff, crackle, and spread. After 17 or 18 minutes, they should be tan with auburn specks throughout. Give them an extra minute or so if that's not the case.
Cool the cookies completely on the sheet pans before transferring to a plate or an airtight container for storage. At room temp, cookies will keep fresh for 5 days; in the freezer, they will keep for a month.
Makes 15-20 cookies.

Peanut Brittle
From the Momofuku Milk Bar Cookbook
Note: I'm still terrified of making caramel on the stove, especially dry caramel, even though I've been making quite a bit recently. If you're new to the process, David Lebovitz has some very helpful tips  here--his photos are a good guide for the colour your caramel should be. If you have a tendency to panic and overstir the sugar like I do--creating annoying shards of sugar that refuse to melt--stop panicking, turn down the heat to low, and keep cooking the caramel. Break the shards up with your spatula, and they will melt. Continue as instructed.

1 cup / 6.8 oz sugar
1/2 cup / 2.95 oz blanched, unsalted peanuts

Line a sheet pan with a Silpat (parchment will not work here).
Make a dry caramel: Heat the sugar in a small heavy-bottomed saucepan over medium-high heat. As soon as the sugar starts to melt, use a heatproof spatula to move it constantly around the pan--you want it all to melt and caramelize evenly. Cook and stir, cook and stir, until the caramel is a deep, dark amber, 3 to 5 minutes.
Once the caramel has reached the target colour, remove the pan from the heat and, with the heatproof spatula, stir in the nuts. Make sure the nuts are coated in caramel, then dumb the contents of the pan out onto the prepared sheet pan. Spread out as thin and evenly as possible. The caramel will set into a hard-to-move-around brittle mass in less than a minute, so work quickly. Let the brittle cool completely.
Eat or cook with it at will. Store your brittle in an airtight container, and try to use it up within a month.

Saturday, October 22, 2011

Cake was a must

Brown-butter financier sans quenelle
Two nights ago, we had over our first dinner guests since the move to the new place. It felt good to finally have a proper dinner party, drinks, dessert, and all. Our guests were a couple I've mentioned before--the two who stayed with us in March for the philosophy department's prospectives' week and who came back to the new place day after day late this summer to help with painting. They've become good friends--loving food as much as we do probably didn't hurt. Between that first week in March when they showed up on our doorstep and now, we've shared a lot of food together--everything from cold lentils shovelled down between coats of paint to the best bacon ever (where else but at the Publican). They're always up for pretty much anything, especially if there's something delicious involved. We get one another out of our sleepy neighbourhood and into the city. They're good friends to have. So it was only appropriate that they were our first dinner guests.
Dinner was a warm, stewy collard cobbler, which you can read all about over here--perfect for the end of a wet and blustery day like the one we had, straight-up comfort food. Dessert was pretty much the opposite. You'll have to forgive me. I don't get nearly as many excuses (or have as much time) as I'd like to play with dessert, okay? And besides, this happened to be a belated-birthday dinner too. Cake was a must, the fancier, the better.
Hazelnuts, skin off
Ground almonds, toasted
I went with something from a cookbook I've been meaning to talk about for a while now, Mission Street Food. Now, most cookbooks are not good reads, not even the good cookbooks. I don't mean this as a complaint--they are cookbooks, after all. But MSF is a great read. There's a pretty wild story behind the food (think: Bar Tartine cook and his grad-student girlfriend serving gourmet eats out of a borrowed taco truck and then, when that doesn't work out, out of a borrowed Chinese restaurant one night a week while the restaurant is still doing take-out), and the writing is hilarious. But, maybe, what I like best about it is how no-nonsense and matter-of-fact it is. Anthony Myint and Karen Leibowitz are not out to warm your heart. They tell it like it is, and often, it just happens to be funny. Even the instructive bits of the book make for good reading. Take this bit about sauces: "Armed with a powerful blender, you can make a lot of the components that separate fine-dining from Schmapplebee's or SchmeeGIFriday's. [...] If you start on a setting that's too high, your contents will splash and you'll have to wipe down the edges of the pitcher with a spatula, so be cool, but not too cool, because you're on the clock and there's no point in blending on Medium-Low for eight seconds while you build up the courage to shift to Max. After all, it's called the Vita-Prep 3, not Prince Wuss-o-Matic the Third." See, instructive and entertaining.
One more thing: MSF is not an everyday sort of cookbook--though Myint and Leibowitz were not exactly working in ideal conditions, the MSF team cooked serious restaurant food. They were practically minded (they even list an approximate cost for every recipe in the book) and couldn't quite do everything the "right" way, but they still managed to do some wild stuff. Peking duck, anyone? Mozzarella mousse? Triple-fried potatoes? A little out of my league for the moment, which was why I stuck with dessert.
Oh right, dessert--I made MSF's brown-butter financiers and served them with a rosemary-infused chocolate ganache and hazelnut-brittle pebbles. Sound complicated? Let me let you in on a little secret: it isn't really. There are three parts to it, none of which are particularly technically challenging. Block your time properly, have a little patience, and soon you'll find yourself left with just the plating to do. Make it pretty.
Financier cut-outs
First component, the financier--if you've never had one before, a financier is a delicate but intensely nutty French cake. With all of the egg whites in it, it's kind of like sponge cake. You start by browning a good amount of butter over the stove. Meanwhile, you toast some almond flour. Two kinds of nutty goodness! Then it's just a matter of those egg whites, some cake flour, and some powdered sugar. Bake all of that in a 9 x 13 inch pan for a half hour, and you're set. Grab your favourite biscuit cutters and stamp out pretty shapes to your heart's delight. (If you eat the scraps while you're working, I won't tell.) By the way, Mission Street Food estimates that the financiers will run you about $8 for all the ingredients.
Hazelnut brittle
Second component, the hazelnut-brittle pebbles--making brittle is a pretty quick and painless process. You just need a bit of nerve (boiling sugar always scares me a little) and a candy thermometer. Have your ingredients measured and ready at hand to add to the mix--toasted hazelnuts (skins off, as best you can manage) and baking soda (for texture)--and don't walk away from the stove. The sugar can get hot fast. If you manage not to drop your wooden spoon on the floor and splatter bits of hot candy all over the place, you'll have done better than I did. Pour the brittle over a half-sheet, wait for it to cool, and break it into cute, bite-sized pieces. You'll have a lot of extra to snack on. Treat yourself.
Brown-butter financier
Final component, the rosemary ganache--this one is really easy. When you're just about ready to impress your guests, drop a modest sprig of rosemary into a saucepan with some heavy cream, bring it to a boil, pour it over your best finely chopped chocolate, and stir. The ganache should be luxuriantly smooth and shiny. Don't forget to pick out the rosemary. Grab an angled spatula and smooth the ganache over your financiers.
Financiers? Check. Hazelnut brittle? Check. Rosemary-infused ganache? Check. Now, arrange all of it prettily on some clean plates and finish them off with some vanilla ice cream. And, if you want, you can get really fancy and make quenelles out of the ice cream. All you need are two spoons and some practice (there's a good instructive video here--one thing that it doesn't mention is that dipping your spoon in hot water really helps. If you're really good, like this guy, you don't even need two spoons.). And there you have it, delicious, fancy-pants dessert. Lick the ganache off your fingers and pat yourself on the back.

Brown-Butter Financiers
Adapted from Mission Street Food: Recipes and Ideas from an Improbable Restaurant
Note: About the almond flour. I blanched and ground my own raw almonds for the batter, and the cake turned out fine. I suspect, however, that it would have had an even more delicate crumb with proper almond flour. Grinding almonds into flour at home is always a bit tricky--you don't want to end up with almond butter. But if you can't be bothered with buying almond flour, blanch your raw almonds in boiling water for 1-2 minutes and drain. The skins will slide right off after that. Just give the almonds a squeeze. Let them air dry or pop them in the oven for a few minutes, then grind them as fine as you can manage in a food processor. Make ahead. As MSF says, the cake batter will keep just fine in the fridge for a couple of days. Leftover cake will be good for a day or so, tightly wrapped at room temperature.

2 sticks / 8 oz unsalted butter
1 1/4 cups / 5 oz almond flour (alternatively, try hazelnut or chestnut flour)
3/4 cup / 3.15 oz cake flour
2 1/4 cups / 9.75 oz powdered sugar
8 egg whites

Heat the butter in a saucepan over medium heat until it turns brown and nutty, stirring frequently. Set aside.
Place the almond flour on a parchment-lined tray and bake at 350 degrees F until golden, about 12 minutes.
Grease a 9 inch by 13 inch pan with butter and line with parchment.
Sift the cake flour and combine with the toasted almond flour.
Mix in a stand mixer with the whisk attachment for 30 seconds.
Add the egg whites and mix for a few minutes, until thoroughly incorporated.
Add the butter (including browned bits) and mix thoroughly. Then add the powdered sugar.
Once the sugar is incorporated, pour the batter into the lined baking pan.
Bake for about 30 minutes at 350 degrees F. The cake is done when it has developed a golden and pleasingly crusty exterior. A toothpick inserted in the middle should come out clean. Let cool.

Hazelnut Brittle
Adapted from Tina Ujlaki at Food & Wine
Note: If you're starting with raw hazelnuts, toast them at 340 degrees F for 15 minutes on a half-sheet. Then, collect them into a large sieve and, using a clean dish towel, roll them against the surface of the sieve to remove their skins. This never works perfectly, so don't obsess about it.

1 cup / 6.85 oz sugar
1/4 / 2 oz cup water
4 tablespoons / 2 oz unsalted butter
2 tablespoons + 2 teaspoons / 2 oz light corn syrup
1/4 teaspoon baking soda
1 1/4 cups / 6 oz toasted hazelnuts, skins removed, roughly chopped
Fleur de sel or crushed Maldon sea salt

Generously butter a half-sheet.
In a large saucepan, combine the sugar, water, butter and corn syrup and bring to a boil. Cook over moderately high heat, stirring occasionally, until the caramel is light brown and registers 300° on a candy thermometer, about 10 minutes.
Remove from the heat and carefully stir in the baking soda. The mixture will bubble. Stir in the nuts, then immediately scrape the brittle onto the buttered half-sheet. Using the back of a silicone spatula, spread the brittle into a thin, even layer. Sprinkle with salt.
Let cool completely, about 30 minutes. Break the brittle into large shards. Stored in an airtight container at room temperature, the brittle will keep for a month.

Rosemary Dark-Chocolate Ganache
Note: Make the ganache at the very last minute before you need it. If for whatever reason you do find yourself with leftover ganache, you can keep it covered in the fridge and reheat it the next day. Gently melt in a heat-proof bowl over simmering water. If the ganache starts breaking, you've applied too much heat--but don't worry, just whisk it vigorously, and it should come back together.

3 oz good bittersweet chocolate, finely chopped
2.75 oz heavy cream
1 modest sprig of rosemary

Place the chocolate in a medium heat-proof bowl.
Bring the rosemary and cream to a boil in a small saucepan over medium heat. Pour the cream over the chocolate and stir until the ganache is smooth and glossy. Remove the rosemary sprig.

Final Notes on Assembly, Etc. Cake. Cut the cake however you'd like. I thought concentric discs would be fun, so I took out my biscuit cutters. Think of it as sculpture. Stack your financiers. Lean them against one another. You've got a lot of cake, so go crazy. MSF says that you can get 12 servings out of the cake, but I think it really depends on how you want to present it. I'd say that you can probably get six 8-inch discs out of it, plus an assortment of smaller ones. Save the scraps for snacking on. They're tasty. Brittle. Make the brittle ahead of time and feel good about yourself. It will keep for up to a month. For plating, break it into small, bite-size pieces and scatter those. Ganache. Spread a thin layer of ganache on some of the financiers before serving, just enough to cover them. You don't want to overwhelm everything with chocolate.
Finish with a few rosemary needles as garnish. Serve with vanilla ice cream. Make quenelles, if you like.
Variations: MSF notes that the financiers play well with most things, especially fruit. They, for example, suggest blueberries, pine-nut brittle, mint leaves, and mint ice cream. I think vanilla poached pears would do it for me at this time of the year. This cake is versatile.

Tuesday, August 16, 2011

Counting the days

Lantern
When I asked my mother to teach me to cook a dish or two, she said it was not worth my time, that she had to do these things, I did not. This worked hard against me, not only when I found myself alone, but when I was a divorced father with a three-year-old daughter. Still, while I remained unable to cook for myself, Rachel and I in effect taught ourselves to do some cooking together--to cook for someone you care about is quite compatible with not wanting to take care of yourself--messy sometimes, but excellent ingredients and the best of intentions getting through. --Stanley Cavell, Little Did I Know (p. 49) 
It seems as though the last thing I've had time to do this summer is cook. I certainly didn't plan things this way--July and August were going to be dedicated to leisurely trips to farmers' markets on the North Side and long afternoons of pastry-making and berry-eating. I'm not quite sure what's happened to this summer. It probably has something to do with the new apartment needing renovation and the school work from the spring I only finished just yesterday (hooray, now I'm actually on holiday). 
And now, while my boyfriend is attending a short but intense philosophy seminar with some very cool people in the Research Triangle, I'm in Chapel Hill, NC, without a thing to do but stroll around in the sun, stopping occasionally only to browse book collections or to eat with my constant dining companion, Stanley Cavell's autobiography, Little Did I Know. (Sadly, I don't have access to a kitchen. This chair at the Inn, however, is incredible. What possessed someone to mix green toile with intensely red walls and a checkered floor, I don't know.)
Between my visit to Auburn, Alabama earlier in the spring and my stay in Chapel Hill, I am developing a serious crush on the American South. There is something lovely about big, old trees and the hum of insects in the evening, about expansive porches and unsweetened iced tea, about having trees in the backyard heavy with summer fruit. I think I could live in a place like this.
Another porch picnic
On Saturday morning, a few of us walked into the neighbouring town of Carrboro to the farmers' market. (I am missing some of the best weeks of summer produce!) We came back to the hotel with potato-studded bread, a soft, barely ripened cheese from the Chapel Hill Creamery, two kinds of tomatoes, fresh Turkish figs, and half a lemon pound cake. We laid out our spread on one of the tables on the hotel porch (the hotel staff even obliged us with plates, napkins, and tea) and had ourselves a little picnic, while gushing about our favourite passages from Cavell's writings, of course.
But without a kitchen here, I'm just about ready to go home. I don't think I've gone quite this long without a home-cooked meal since my first year in undergrad on the mandatory meal plan. Not that I haven't had some great dining experiences here. Check out Lantern, if you ever find yourself in the area. The chef, Andrea Reusing, marries Asian flavours and techniques with traditional, locally sourced North Carolinian ingredients. The results are pretty spectacular. A few nights ago, I had a fantastic seafood hotpot chock-full of shrimp, halibut, squid, and mussels, all steeped in a wonderfully rich and lemony shrimp broth. The rest of the table split themselves between plates of whole fried flounder and pork chops. I think everyone was pretty pleased. 
Still, I'm counting the days until we're home. There will be lots of painting to do, but if I can just squeeze in a trip to the farmers' market, I know exactly what I'm going to share with you.

Friday, May 13, 2011

Lucky Peach Sneak Peeks

My boyfriend and I started watching No Reservations one summer while visiting with his parents. There's not much to do out there but read, watch for the occasional deer poking around in the backyard, or sit in front of the TV. After the painfully long academic year, we opted for lots of TV. I caught the end of the `San Francisco' episode, where Bourdain is biting into a bloody burger and remarks with relish "Tastes like it died screaming." Not particularly put off by the humour (which, by the way, is typical of Bourdain, defying the likes of Alice Waters and shunning places like Chez Panisse to eat greasy diner meat), I kicked up my feet for the next episode and called for my boyfriend to join me. We were immediately smitten with Bourdain--his snark, his appreciation for local life and perspectives (street meat and all), his often cutting insight into the state of things. Tony Bourdain is a man whose hand I'd like to shake. And No Reservations is still our go-to when we want to wind down in front of the TV. So, I can't wait to see what Bourdain, David Chang, and their fellow editors have gotten up to with Lucky Peach, McSweeney's new culinary quarterly. The first issue is due June 14, and its theme is ramen. 
McSweeney's sent out this little excerpt of a grim conversation between Bourdain, Chang, and Wylie Dufresne yesterday, which will appear in the first issue. It's classic Bourdain (which is to say, it's sharp, bleak, and full of expletives--be warned). Find more teasers like the one above here, at McSweeney's.
Scene: Café de la Concha, 1 Mira Concha, San Sebastián, Spain.
It is nighttime, and DAVID CHANG, TONY BOURDAIN, and WYLIE DUFRESNE are gathered around a table. A January storm rages outside and keeps the café nearly empty. The three Americans—in town to speak at a conference—are catching up over hard cider and pintxos, and talking, at CHANG's behest, about culinary mediocrity back in their homeland.
TONY: So what about all these kids rolling out of culinary school now, with their $80,000 in debt? They're totally jacked there.
DAVID: We're all their fucking problem. We're sort of a catalyst for them.
TONY: We're inspiring generations of kids to go to culinary school.
DAVID: Could you have achieved your career without having gone to culinary school?
WYLIE: Sure. Of course I could have. I went to college, too.
DAVID: But now, what percentage of kids going to culinary school are actually going to contribute to a real kitchen? Like a two-Michelin-star, one-Michelin-star, whatever, a real fucking kitchen. Zero.
TONY: Man, that's such a dark worldview. I just spoke to a kid today who came up to me and said, "You came up to the Culinary Institute of America five years ago and gave a commencement address." I have no recollection of meeting this person. She asked me then, "What should I do after school?" And I said, "Do what I didn't do. Acknowledge the fact that you're not going to make any money at all, you're not going to get paid for two years, and go work for the best. I would suggest Spain, some place like Mugaritz." She's at Mugaritz now. Come on, man, that's a fucking awesome start.
DAVID: And if you didn't talk to her, she'd probably—
TONY: Oh no, don't do that. My point is that there are actually people who come rolling out of culinary school—maybe it's a tiny, tiny number, but probably proportionally more than during my time—who don't see the Hilton as a fantastic gig, or a cruise ship or a country club, and understand that if they wanna be great, if they want to be really good, then they have to start looking at places like Mugaritz or Arzak.
WYLIE: I disagree with that. I think unfortunately there is more of a mediocritizing of the average culinary-school graduate now than there was way back when. I think to a certain extent schools are selling them a bill of goods. "Come to culinary school, go through our program, and in six to eight months you could be the chef of this or that." Not "Come to our schools and we'll give you the absolute basics so you can go out into the world and work for pennies." But that's the truth. Today it's, "You could end up on TV."
TONY: Fuck, you're right. So we're part of the problem.
DAVID: We're part of the problem.
TONY: We suck. We are destroying what we love.
WYLIE: You more than me.
 Well, there goes my back-up, back-up plan.

Friday, May 6, 2011

The pursuit

Country loaf
Everyone--drop your wooden spoons and get yourself a copy of Chad Robertson's Tartine Bread. This man will instruct you in the making of some seriously magnificent wild-yeast loaves. Think blistered, burnished, and crackling crust. Think lush, open, and irregular crumb. I had never baked loaves quite so lovely (okay, my scoring needs work, serious work), and now there's no turning back.
If you're like me, baking bread for you isn't just a matter of putting food on the table. It's about nourishing the people who sit with you at that table and about carrying on a tradition as old as any. And just for those reasons, it's something you do in pursuit of the perfect loaf. You have a vision of what bread should be like, of what breaking bread with those around you should be like, and you constantly look for ways to get that much closer to it. Well, Tartine Bread might just be the thing you've been looking for. You get to drink deeply of Robertson's particular vision-- bread "with an old soul"--and to understand what goes into the loaves at Tartine, his bakery in San Francisco. And this, I must say, goes a long way.
More Tartine
One of the things I like best about the book is what you're to take from it--not just a recipe or two but a more immersive approach to baking. You're encouraged to bake with your senses--to smell your starter to gauge its maturity, to feel your dough's readiness for its first shaping, to recognise by its shape that you've developed its tensile strength adequately. Throughout, Robertson's voice is instructive and reassuring, but he leaves you to make and, therein, learn to make the right calls. It takes attentiveness and sometimes even a bit of courage, but, in the end, you're a better baker for it.
As with any such use of wild yeast, baking bread by Robertson's methods takes some dedication. There's the starter to maintain (though, I've been getting away with feeding mine about once a week since I only bake about that often), and proofing from start to finish takes a good 6-8 hours. But the bread is outstanding.
Open crumb
Robertson's method combines a lot of familiar home-baking wisdom, but I've never seen it all come together in one place and so beautifully. It goes something like this: (1) start with young leaven, that is, leaven still in a sweet-smelling and relatively immature stage of its development, (2) mix a very wet dough, at least 75 percent of the flour's weight, (3) to help along the dough's development, turn it in its bowl every half-hour during the initial proofing (much easier than conventional counter-top kneading), (4) shape the dough twice before its final proofing for better tensioning and oven-spring, (5) bake the bread in a pre-heated cast-iron dutch oven, which mimics a professional oven and gives the loaf the steamy environment it needs for its first 20 minutes.
French toast
And if you ever find yourself with leftover bread, there is a trove of gorgeous-looking recipes that call for day-old bread at the end of the book. The porchetta is certainly off-limits for me is crazy good (I've had a change of heart regarding meat-eating since having written this post), but the French toast? Custardy, caramelised, and buttery as it should be.

Baked French Toast
Adapted from Tartine Bread
Robertson suggests that you serve this with a very ripe Hachiya persimmon spread on top and maple bacon on the side, but blueberries and maple syrup are fine by me. I suspect that if you returned the skillet to the stove after baking and flipped the toast and let it caramelise for a minute or two, it would be even better. All the better to soak up more of that buttery goodness in the bottom of the skillet and get more crunch. I'll try this next time around.

3 eggs
1 oz / 2 tablespoons sugar
Zest of 1 lemon
1/2 teaspoon vanilla extract
0.5 oz / 1 tablespoon armagnac (optional)
1/4 teaspoon sea salt
8 oz / 1 cup milk
2 slices day-old country bread, each about 1 1/2 inches thick
1 oz / 2 tablespoons butter, salted if you like

To make the custard base, in a bowl, stir together the eggs, sugar, lemon zest, vanilla, armagnac, salt, and milk.
Place the bread slices in the custard base and let stand until the bread is saturated, about 1 hour.
Preheat the oven to 350 degrees F.
Heat a skillet over medium-low heat. Melt the butter to coat the bottom of the pan. Lift each bread slice from the custard base and place in the pan. Cook the slices for about 3 minutes, occasionally pressing them against the bottom of the pan with a spatula so the bottoms cook evenly. This step seals the bottoms of the slices by cooking the outer layer of the custard base. It also prepares the bread for receiving more custard base.
Spoon or ladle more custard base into the center of each bread slice. If the liquid leaks out of the bread and onto the skillet, the bread slices are not quite sealed. Continue cooking for 1 minute, pressing the slices slightly to seal. When the slices are full of custard base, carefully transfer the skillet to the middle rack of the oven. Do not turn the toast.
Bake the slices for 12 to 15 minutes and then gently shake the pan. If the custard base is still liquid, continue baking and check again. Depending on the thickness of the slices, the custard may take up to 20 minutes to cook all the way through. The French toast is done when the custard seems solid and each slice appears inflated, as the custard souffles when fully cooked.
Using the spatula, remove the French toast from the skillet and place them, caramelized-side up onto plates. The skillet side should be caramelized and crisp.
Serves 2.

Monday, February 28, 2011

On the lookout for a book

Having been overtaken by a pretty serious case of macaron fever recently, I've looked into getting what appears to be the book of all macaron books, Pierre Hermé's Macaron. How is it that a book that is (a) not out of print, and (b) a trifling 30 EUR (that's roughly 41 USD) at Hermé's Paris boutique, available in the US for typically no less than $200? That is unbelievable. If you, dear reader, live in Paris and understand culinary obsession, I kindly ask that you get in touch with yours truly.