
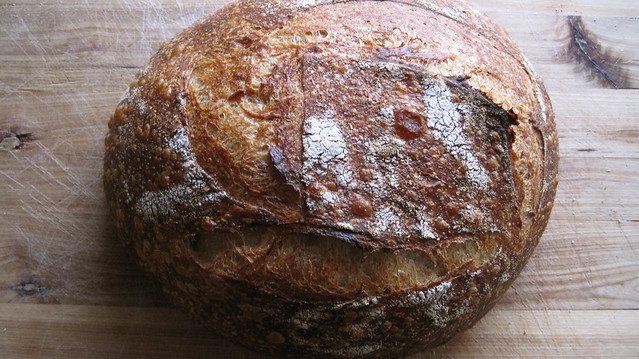
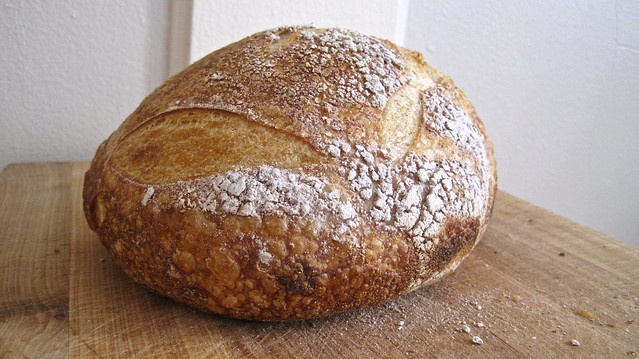
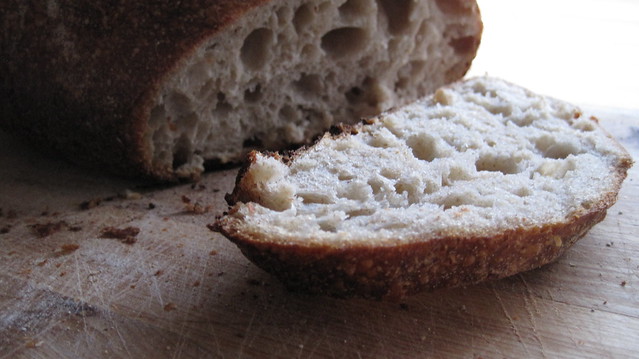
Everyone--drop your wooden spoons and get yourself a copy of Chad Robertson's Tartine Bread. This man will instruct you in the making of some seriously magnificent wild-yeast loaves. Think blistered, burnished, and crackling crust. Think lush, open, and irregular crumb. I had never baked loaves quite so lovely (okay, my scoring needs work, serious work), and now there's no turning back.
If you're like me, baking bread for you isn't just a matter of putting food on the table. It's about nourishing the people who sit with you at that table and about carrying on a tradition as old as any. And just for those reasons, it's something you do in pursuit of the perfect loaf. You have a vision of what bread should be like, of what breaking bread with those around you should be like, and you constantly look for ways to get that much closer to it. Well, Tartine Bread might just be the thing you've been looking for. You get to drink deeply of Robertson's particular vision-- bread "with an old soul"--and to understand what goes into the loaves at Tartine, his bakery in San Francisco. And this, I must say, goes a long way.
One of the things I like best about the book is what you're to take from it--not just a recipe or two but a more immersive approach to baking. You're encouraged to bake with your senses--to smell your starter to gauge its maturity, to feel your dough's readiness for its first shaping, to recognise by its shape that you've developed its tensile strength adequately. Throughout, Robertson's voice is instructive and reassuring, but he leaves you to make and, therein, learn to make the right calls. It takes attentiveness and sometimes even a bit of courage, but, in the end, you're a better baker for it.
As with any such use of wild yeast, baking bread by Robertson's methods takes some dedication. There's the starter to maintain (though, I've been getting away with feeding mine about once a week since I only bake about that often), and proofing from start to finish takes a good 6-8 hours. But the bread is outstanding.
Robertson's method combines a lot of familiar home-baking wisdom, but I've never seen it all come together in one place and so beautifully. It goes something like this: (1) start with young leaven, that is, leaven still in a sweet-smelling and relatively immature stage of its development, (2) mix a very wet dough, at least 75 percent of the flour's weight, (3) to help along the dough's development, turn it in its bowl every half-hour during the initial proofing (much easier than conventional counter-top kneading), (4) shape the dough twice before its final proofing for better tensioning and oven-spring, (5) bake the bread in a pre-heated cast-iron dutch oven, which mimics a professional oven and gives the loaf the steamy environment it needs for its first 20 minutes.

And if you ever find yourself with leftover bread, there is a trove of gorgeous-looking recipes that call for day-old bread at the end of the book. The porchetta is certainly off-limits for me is crazy good (I've had a change of heart regarding meat-eating since having written this post), but the French toast? Custardy, caramelised, and buttery as it should be.
Baked French Toast
Adapted from Tartine Bread
Adapted from Tartine Bread
Robertson suggests that you serve this with a very ripe Hachiya persimmon spread on top and maple bacon on the side, but blueberries and maple syrup are fine by me. I suspect that if you returned the skillet to the stove after baking and flipped the toast and let it caramelise for a minute or two, it would be even better. All the better to soak up more of that buttery goodness in the bottom of the skillet and get more crunch. I'll try this next time around.
3 eggs
1 oz / 2 tablespoons sugar
Zest of 1 lemon
1/2 teaspoon vanilla extract
0.5 oz / 1 tablespoon armagnac (optional)
1/4 teaspoon sea salt
8 oz / 1 cup milk
2 slices day-old country bread, each about 1 1/2 inches thick
1 oz / 2 tablespoons butter, salted if you like
1 oz / 2 tablespoons sugar
Zest of 1 lemon
1/2 teaspoon vanilla extract
0.5 oz / 1 tablespoon armagnac (optional)
1/4 teaspoon sea salt
8 oz / 1 cup milk
2 slices day-old country bread, each about 1 1/2 inches thick
1 oz / 2 tablespoons butter, salted if you like
To make the custard base, in a bowl, stir together the eggs, sugar, lemon zest, vanilla, armagnac, salt, and milk.
Place the bread slices in the custard base and let stand until the bread is saturated, about 1 hour.
Preheat the oven to 350 degrees F.
Heat a skillet over medium-low heat. Melt the butter to coat the bottom of the pan. Lift each bread slice from the custard base and place in the pan. Cook the slices for about 3 minutes, occasionally pressing them against the bottom of the pan with a spatula so the bottoms cook evenly. This step seals the bottoms of the slices by cooking the outer layer of the custard base. It also prepares the bread for receiving more custard base.
Spoon or ladle more custard base into the center of each bread slice. If the liquid leaks out of the bread and onto the skillet, the bread slices are not quite sealed. Continue cooking for 1 minute, pressing the slices slightly to seal. When the slices are full of custard base, carefully transfer the skillet to the middle rack of the oven. Do not turn the toast.
Bake the slices for 12 to 15 minutes and then gently shake the pan. If the custard base is still liquid, continue baking and check again. Depending on the thickness of the slices, the custard may take up to 20 minutes to cook all the way through. The French toast is done when the custard seems solid and each slice appears inflated, as the custard souffles when fully cooked.
Using the spatula, remove the French toast from the skillet and place them, caramelized-side up onto plates. The skillet side should be caramelized and crisp.
Serves 2.
carb heaven :) that bread looks amazing. I like JUST bought some bread and cheese from a bakery here in beijing. I wish I could bake my own bread... i just never had the guts to. I'll have to wait to give it a chance when I'm back in the states.
ReplyDeleteEnjoying your blog. all the photos make me hungry :) all looks so yummy
Thanks, Angel. You really should give bread-baking a try when you get the chance. It's not very difficult at all to make good bread. You should check out Peter Reinhart's `The Bread Baker's Apprentice'. It's very detailed and well written--a good place to start if you want to understand the basics. And, most importantly, it has a ton of great recipes, almost anything yeasted that you'd ever want to bake, from pumpernickel to brioche. What's the bread like in Beijing anyway? I was still a kid the last time I was there, busy stuffing myself with steamed dumplings and watermelon.
ReplyDeleteI love to bake bread. It makes me feel human. May I ask, how do you start and maintain a starter?
ReplyDeleteOana - the starter that I use came from a friend, but the basic idea is this. You start by making a thick paste of bread flour (the fresher, the better) and water, which your leave covered out on the counter for two or three days. The wild yeast that live on the flour then have a chance to thrive--the mixture will become very bubbly and smell strongly acidic. After that initial period, to make it into a strong, reliable starter, you feed it every 24 hours--that is, you discard about 80 percent of the mixture and then add enough fresh flour and to make a thick batter again. At some point, your starter will stabilise--it will rise and collapse on a predictable schedule, sweet-smelling and bubbly for the first 2-4 hours and then vinegar-y and falling by the 8 hour mark. I'm not sure how long this adjustment period usually is, but the point of all this regular feeding is to encourage the right balance of yeast and other bacteria. At that point, you're ready to make bread with it!
ReplyDeleteMaintaining the starter is just a continuation of feeding it--discarding some of it and then adding equal amounts of fresh flour and water. If you bake every day, you can just leave your starter out on the counter and feed it at the same time every day. But since I only bake about once a week, I leave it in the fridge most of the week, and take it out the day or the day before I plan to bake and then feed it once or twice. I try to keep a very minimal amount of starter around since the Tartine recipes only call for a very small amount and because it keeps feeding a little more cost-effective.
When I baked from Peter Reinhart's Bread Baker's Apprentice, I wasn't such a stickler about discarding starter--as long as you doubled the weight of the starter when you fed it, it didn't really matter. But Robertson emphasizes the importance of having sweet-smelling, fresh starter, so that the bread doesn't end up being overly sour.
I'm not sure how helpful this reply has been. The sourdough process often just sounds intimidating in print, but it's really not. You should check out the BBA or Tartine Bread and consider trying it out. Reinhart and Robertson do a much better job than me of explaining things...
Thanks Katie. You did great. I think I'll try it.
ReplyDeleteBe sure to let me know how it goes!
ReplyDeleteI just stumbled on your blog - as it seems to happen in blogland - and I found this post and my heart did a little pitter patter. I bought Tartine Bread two months ago and eagerly flipped the pages and dreamed about fresh baked bread and then I must have panicked or lost faith in my ability to love a starter (might be the dead basil plants lurking outside on the window sill). Anyway your post has inspired me to get start in on the task. Looks beautiful. Did you use a straight up dutch oven, like one with a lid, or a cast iron combo cooker like they recommend in the book?
ReplyDeleteTalley, have confidence! Sourdough starter is a very forgiving thing. I haven't baked for at least a month with the heat wave and having been away on a trip, but I just made sure to keep my starter in the fridge and feed it every couple of weeks. Now it's back to its bubbly, sweet-smelling self again. You can always keep back-up starter in the freezer. It keeps much longer in there, so if you ever kill your primary starter by accident...
ReplyDeleteI've been using my straight-up dutch oven, but I plan to get a cast-iron combo cooker one of these days. The high sides of the dutch oven make the bread difficult to score nicely, and turning the dough out into it is always a little scary, since it has to drop from a bit of a height. These are minor issues, though.
I hope you do give this a try. Best of luck, if you do!