Two springs ago, when I put my first seeds in the ground, I had no idea just how much this little patch would come to mean to me. These were the beginning days of my modest kitchen garden, set to sprout from one of the three 10-x-4-foot raised beds my more capable neighbours had constructed behind our building. Back then, I thought of the space and the work to come only as something that might lead to better eating, to more varied and vibrant plates at our table. I didn't give much thought to the growing itself. A row of collards, at the time, seemed an unlikely place to cultivate affections.
But I've since changed my mind--because once you've put those seeds in the ground, I've found, it's hard not to get drawn into the lives of your plants, to be utterly captivated by them. Your heart leaps when you see the first seedlings poking out from the soil. Sometimes you catch them mid-stretch, just as they're emerging--still pale, partly curled, their first leaves yet to completely unfurl. They look a little sleepy. You are struck by their vulnerability. You want to do whatever you can to see that they thrive. So you find yourself in the midst of an unfolding drama. Your plants are the unlikely heroines, weathering the assault of pests, the elements. You do what you can to help them.
And, of course, the plants you grow most attached to are the ones that really struggle, the ones that seem to need you most. For me, this year, it was my fava beans. Favas aren't really meant to be cultivated here in the Midwest. They are slow to grow. It takes them 70-90 days to go from seed to filling their fat pods, and the cool, damp weather that they love is too short-lived here. By the time they flower and begin to set pods, the first of summer's scorching days have already arrived, and so they struggle to produce. Mine also happened to attract the attention of hungry aphids. So for awhile I was afraid they wouldn't produce at all.
But they did. Pathetically, but they did. After a month's worth of harvesting, de-podding, blanching, and freezing--usually just a handful of pods at a time--I was just shy of half a pound of beans. Thinking back on it now, I wonder if it would have been better just to have eaten them as they came in and not worried so much about how few they were. The ones I tried straight from the blanching pot were, after all, incredible--delicate, sweet, vegetal--by far the best tasting thing I've been able to grow. But after all the trouble they'd given me, I wanted to do something special with them. So I ended up making Thomas Keller's fava bean agnolotti.
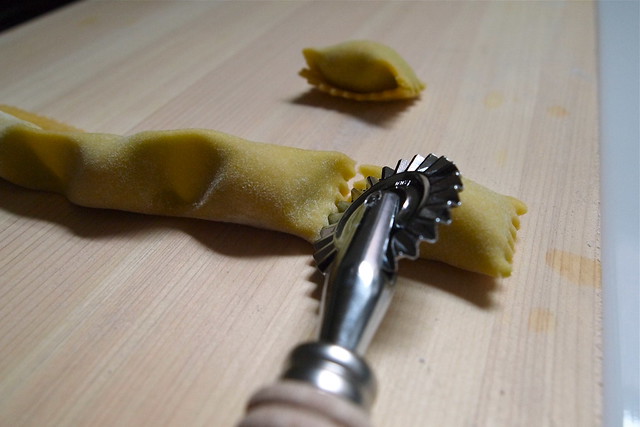
Making any sort of filled pasta takes a bit of time and practice. But it feels rewarding to get your hands dirty and tackle something new. You make agnolotti from long, narrow sheets of pasta. You pipe a single line of filling along each sheet and then bring bottom of the sheet over the filling, folding and pressing to form a tube. Then, using both your thumbs and forefingers, you work your way down the tube, pinching out individual agnolotti. There is something especially satisfying about this part, seeing an agnolotto plump up between your fingers, feeling the filling squish. And once you've cut them apart from each other, what you end up with are gorgeously plump little dumplings. They are so darling that you just want to pinch their cheeks.
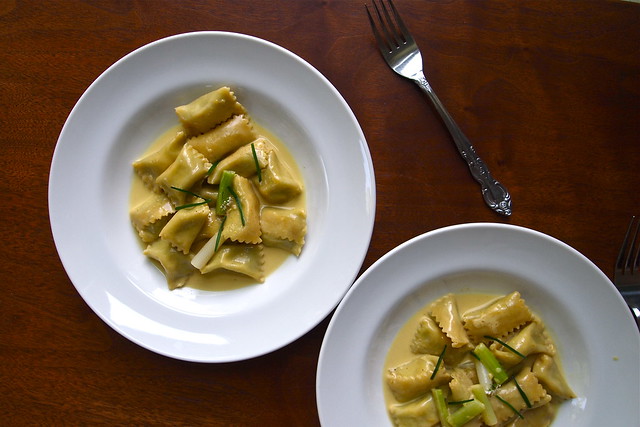
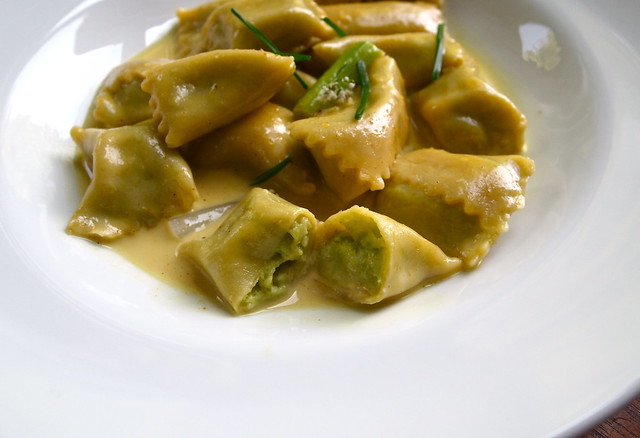
Fat with a filling of fava bean purée, mascarpone, and breadcrumbs, these particular agnolotti were especially lovely--luxuriously textured and delicately vegetal. The puddle of warm spices, butter, stock, and cream in which they sat only helped. On a whim, I garnished each serving with a cluster or two of tiny cilantro flowers snipped from my neighbours' plot. These added a brazen citrusy pop to some bites, which I quite liked. Though the season for fava beans stretches from late spring into early summer, I feel as though these agnolotti are what I'd want to throw together on one of the chilly days just about to creep up on us. They have a soothing, velvety warmth to them that would perfect to cozy up with. And I would do just that, if there were anymore agnolotti in the freezer. But my plants weathered a lot, and I barely had beans enough for this one batch. But maybe favas fare better wherever you are.
Fava Bean Agnolotti with Curry Emulsion
Adapted from Thomas Keller's The French Laundry Cookbook
NOTE: This recipe is a long one, but don't be intimidated. You can break up this recipe over weeks if you want (which is in fact what I did). You can shell and blanch the fava beans one day and then just tuck them into the freezer. Then, when you have more time on your hands, you can make the pasta dough and the filling (thaw your favas first). Shortly after that, or on the same day, you can fill and shape your agnolotti. Finally, when you want to enjoy your agnolotti, all you have to do is cook them and put together the curry emulsion. Shaping agnolotti. It took me a few tries to really understand how to get the shape right (which is not to say that my agnolotti are at all perfect). I think that written instructions can only help so much. At some point, things just clicked for me. But you might want to take a look at the Kitchn's step-by-step agnolotti-making tutorial. Curry emulsion. If, like me, you happen to find yourself with more emulsion than the agnolotti look like they can really handle, just pour off what remains in the pan and stick it in the fridge. Drizzle some on your scrambled eggs or some roasted asparagus the next day. Trust me. Portioning. Keller intends these agnolotti as a starter for six. In my case, they made a modest lunch for three.
PASTA
200 g / 1 2/3 cup all-purpose flour
6 large egg yolks
1 large egg
1 1/2 teaspoons olive oil
1 tablespoon milk
FAVA BEAN FILLING
2-3 lb fava beans (225 g / 1/2 cups shelled)
65 g / 3/4 cup fresh bread crumbs
55 g / 1/4 cup + 1/2 tablespoon mascarpone
Salt to taste
CURRY EMULSION
2 teaspoons curry powder
2 tablespoons chopped scallions
3/4 cup + 2 tablespoons vegetable stock or water
1/4 cup heavy cream
1/4 cup crème fraîche
8 tablespoons unsalted butter, cut into chunks
Salt and fresh ground pepper to taste
18 one-inch-long pieces ramps or scallions, blanched for 1 minute, then chilled and pat dry
TO SERVE
18 one-inch-long pieces garlic sprouts or garlic chives
6 sprigs cilantro flowers (optional)
TO MAKE THE PASTA DOUGH
Mound the flour on a clean work surface and make a well in the centre, pushing the flour to all sides to make a ring with sides about 1-inch wide. Make sure that the well is wide enough to hold all the eggs without spilling.
Pour the egg yolks, egg, oil, and milk into the well. Use your fingers to break the eggs up. Still using your fingers, begin turning the eggs in a circular motion, keeping them within the well and not allowing them to spill over the sides. This circular motion allows the eggs to gradually pull in flour from the sides of the well: it is important that the flour not be incorporated too rapidly, or your dough will be lumpy. Keep moving the eggs while slowly incorporating the flour. Using a pastry scraper, occasionally push the flour towards the eggs; the flour should be moved only enough to maintain the gradual incorporation of the flour, and the eggs should continue to be contained in the well. The mixture will thicken and eventually get too tight to keep turning with your fingers.
When the dough begins thickening and starts lifting itself up from the work surface, begin incorporating the remaining flour with the pastry scraper by lifting the flour up and over the dough that's beginning to form and cutting it into the dough. When the remaining flour from the sides of the well has been cut into the dough, the dough will still look shaggy. Bring the dough together in the palms of your hands and form it into a ball. It will look flaky but hold together.
Knead the dough by pressing it, bit by bit, in a forward motion with the hells of your hands rather than folding it over on itself as you would with a bread dough. Re-form the dough into a ball and repeat the process several times. The dough should feel moist but not sticky. Let the dough rest for a few minutes while you clean the work surface.
Dust the clean work surface with a little flour. Knead the dough by pushing against it in a forward motion with the heels of your hands. Form the dough into a ball again and knead it again. Keep kneading in this forward motion until the dough becomes silky smooth. The dough is ready when you can pull your finger through it and the dough wants to snap back into place. The kneading process can take anywhere from 10 to 15 minutes. It is important to work the dough long enough to pass the pull test; otherwise when it rests, it will collapse.
Double wrap the dough in plastic wrap to ensure that it does not dry out. Let the dough rest for at least 30 minutes and up to 1 hour before rolling it through a pasta machine. The dough can be made ahead, wrapped, and refrigerated: bring to room temperature before proceeding.
TO MAKE THE FAVA BEAN FILLING
Shell the fava beans and then peel the skins from the beans. Starting a small slit in the skin with a sharp paring knife makes the peeling easier. Remove the small germ at the side of each bean. You need 1 1/2 cups of beans for the filling; reserve any extra beans for another use. Blanch the beans in generously salted water for 5 minutes, or until tender, and immediately transfer to ice water to chill. When they are cold, drain the beans and spread on paper towels to drain thoroughly.
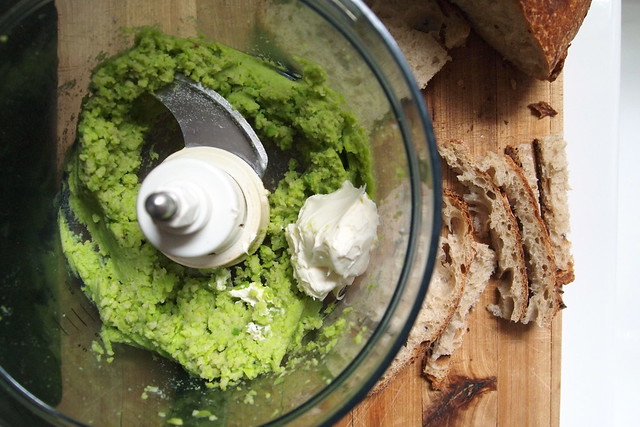
Place the beans in a food processor with the bread crumbs. Blend until they come together and form a ball. Add the mascarpone and process again until the mixture is smooth. Season to taste with salt. You will have 1-1 1/4 cups of filling. Refrigerate the mixture until it is cool, or for up to 2 days.
TO FORM THE PASTA SHEETS
Divide the dough into three or four pieces (you will have a little extra that you can cut into spaghetti or fettuccine and freeze for later use). Work with one piece at a time and keep the others covered so that they don't dry out. Set the rollers of your pasta machine to the widest setting. Flatten the first piece out with your hands into a long rectangle and feed it through the machine. Fold it over onto itself as you would a letter and flatten it with your hands again. Rotate it a quarter turn and feed it through the machine. Repeat this procedure 2 or 3 more times. Use flour as necessary to keep the pasta from sticking. You shouldn't need to use much at all.
Set the rollers down one notch and feed the pasta through. Do not fold it over. Run the sheet through on the same setting 2 more times. Then, adjust the rollers again and repeat this procedure, adjusting the rollers as you go, until the pasta is thin enough to see your fingers through it but not so thin that it's translucent. (On my machine, this means rolling it multiple times through the second-last setting.) Repeat with the remaining pieces of dough.
TO FILL THE AGNOLOTTI
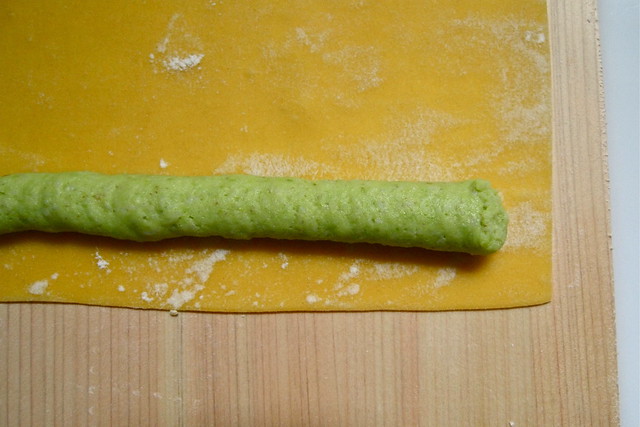
Work with one sheet of pasta at a time, keeping the others covered. Lay the sheet on a lightly-floured work surface with the long side facing you. Trim the edges so that they are straight. Place the agnolotti filling in a pastry bag fitted with a 1/2-inch plain tip. Pipe a line of filling across the bottom of the sheet, leaving a 3/4 inch border of pasta along the left, right, and bottom edges.
Pull the bottom edge of the pasta up and over the filling. Seal the agnolotti by carefully molding the pasta over the filling and pressing lightly with your index finger to seal the edge of the dough to the pasta sheet; don't drag your finger along the dough to seal, or your risk ripping the dough. When it it sealed, there should be about a 1/2-inch of excess dough visible above the tube of filling (where you sealed it). Be certain that you are sealing tightly while pressing out any pockets of air. Seal the left and right ends of the dough.
TO SHAPE THE AGNOLOTTI
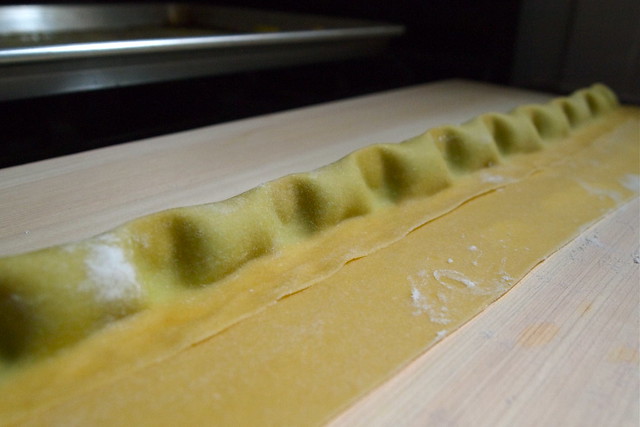
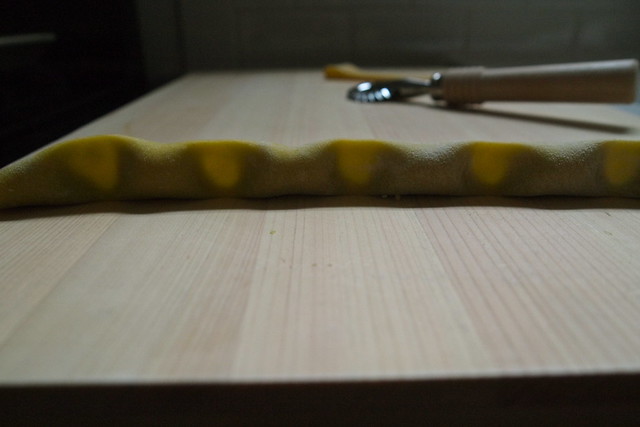
Starting at one end, place the thumb and forefinger of each hand together as if you were going to pinch something, and leaving about 1 inch of space between your hands and holding your fingers vertically, pinch the filling firmly in 1-inch increments, making about 3/4 inch of pinched area between each pocket of filling. It is important to leave this much pinched area between the agnolotti, or when the agnolotti are separated, they may come unsealed.
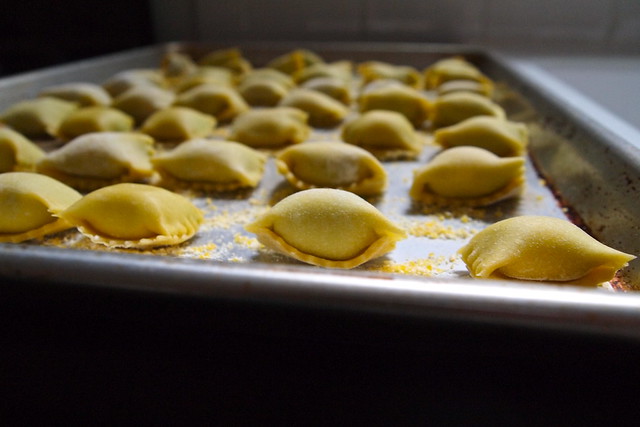
Run a crimped pastry wheel along the top edge of the folded-over dough, separating the strip of filling pockets from the remainder of the pasta sheet. Don't cut too close to the filling, or you risk breaking the seal. Separate the individual agnolotti by cutting through the center of each pinched area, rolling the pastry wheel away from your and leaning the tube of filling away from you and into the work surface as you cut. The leaning helps form the agnolotti's characteristic pocket-shape. Working quickly, place the agnolotti on a baking sheet dusted with a thin layer of cornmeal, which will prevent sticking. Don't let the agnolotti touch sac other, or they may stick together. Repeat the same procedure with the remaining pasta sheets.
At this point, you can either cook the agnolotti in boiling water immediately or freeze them on the baking sheet. Once the agnolotti are frozen, place them in airtight freezer bags and keep them frozen for up to several weeks. Cook the agnolotti while still frozen.
TO COMPLETE
For the curry emulsion, toast the curry powder in a small saucepan over medium heat until it is fragrant. Stir in the scallions and heat for another minute. Add the 3/4 cup stock, the cream, and the crème fraîche, bring to a simmer, and cook until the liquid is reduced to a half cup. Swirl in the butter. When the butter is melted, add the remaining 2 tablespoons of stock and blend for 30 seconds with an immersion blender to emulsify the mixture (alternatively, transfer to a conventional blender and emulsify). Season the mixture with salt and pepper and strain into a wide pan.
Meanwhile, cook the agnolotti in a large pot of lightly salted boiling water until cooked through, 4-5 minutes.
Drain the agnolotti, add the agnolotti and ramps to the curry emulsion, and toss over low heat to coat with sauce. Divide the agnolotti and ramps among three serving dishes and garnish the top of each with 6 garlic sprouts and 2 flower sprigs, if using. Serve immediately.
Makes 48 agnolotti.


I was hoping those instagramed pictures of this pasta wouldn't go unposted! They are stunning-- you definitely did a thomas keller recipe justice. ;) I'm sure the taste was so much the better from all the months of work and effort and encouragement of the little beans to get to this point. And I think it's nice you dedicated such a nice, labor-intensive dish for them... it's like an ode to your garden, and the season in general.
ReplyDeleteDo you think you'll grow fava beans again, next time?
I actually cooked the agnolotti about a month ago and started writing the post then. I just didn't have the time to finish it off until now. I can't really even think of making homemade pasta right now...too busy!
DeleteHaha, yeah I'm not sure that homegrown favas make that much of a difference in a dish like this. Sure, you could probably pick out the homegrown ones in a side-by-side taste test, but I don't know if you could once they're whirled into this filling. (How the beans taste also depends on when they're picked. The ones that I tried right away were fairly young, but most of the ones that went into the agnolotti were older, so less sweet and also starchier. Perhaps using only young favas would make for better agnolotti filling, but I didn't have that luxury. If I'd picked all my beans young, I wouldn't have had enough for the filling!) So this just makes me want to try this pasta with frozen favas from the store...
I don't know if I'll grow fava beans again while I'm living in Chicago. I'm going to have to think about it. Given my limited garden space, it's a big deal to give up 2 wide rows for 2-3 months to plants that only yield a literal handful collectively! I might just have to rely on the farmers' market. I saw fava beans once in July.
this looks absolutely gorgeous! and i'm so impressed with the amount of work you've put in - the results certainly look worth it :) i can't wait to have a little garden so i can start planting things & reaping the rewards. lovely post :)
ReplyDeleteThanks, Holly. Growing vegetables has been a total joy over the past couple of years. There is something wildly uplifting about tending to living things. I hope you get your garden soon!
DeleteThese look amazing Katie! I want to make them now with my nifty new pasta maker (we ended up adding it to our registry and someone actually bought one for us -- whee!). It amazes me just how many types of pasta there are. I recently found Linda Pugliese's (she's a photographer) pasta blog, Fatta in Casa, and it's the first time I realized how many pastas can be made at home. I'm inspired by your agnolotti!
ReplyDeleteAnd I love how hard you fought for your favas. Like Amy said, they are truly deserving of a Thomas Keller recipe. :)
Whoa, I just checked out Fatta in Casa. What beautiful pasta! Now I'm inspired to try some different shapes too! I'm glad someone got you the pasta maker. I hope you get to try it out soon. By the way, there's an agnolotti recipe in TFL for every season. The fall agnolotti is sweet potato and bacon. You should Google it.
DeleteWow! -- I have never seen a fava pod look so green and beautiful. Here in Oregon our fava season in the very early parts of summer -- June, just after the end of spring. They arrive at the farmer's markets in blackened, dried pods, but I love them so much, even if they are a lot of work to shell and peel. I might try these with frozen peas or maybe I can find frozen favas -- I love making pasta and it's been too long since I was inspired with a wonderful filling! You make these so pretty and I love the way you described watching your garden grow. Great post. Can't wait to try!
ReplyDeleteThanks, Sophie. If you do end up trying the agnolotti, I'd love to hear how they turn out, especially if you use peas! I know that one reason Keller uses fava beans is that they're on the starchy side and make for a creamier filling. Maybe it'd be better to use a mix of peas and favas? If you wanted to make a more seasonal agnolotti, there's also a sweet potato bacon agnolotti recipe in TFL, which is also really good. I'm sure it's floating around on the internet too.
DeleteGreat advice! Good things to consider -- sweet potato and bacon in pasta sounds WONderful :) I will be happy to report back!
DeleteThey are almost too pretty to eat. I am always impressed by the projects you take on. You create edible art, perfectly crafted, and I imagine lovingly savored. I love hearing about your garden and the little struggling seedlings. Will you try fava beans again next year? or perhaps another type of bean not quite so ill fated in the midwest climate.
ReplyDeleteThat's sweet of you, Talley. I don't know if I'll try for favas again next year. They are lovely but take up too much space in the garden for too long! I'm thinking about growing a bunch of tomatoes instead.
DeleteThis looks beautiful! I wish I could find favas here in Germany but sadly I think that ship has sailed. Maybe I could try it with something else.....!
ReplyDeleteI am late to the party, but my lord are these ever BEAUTIFUL. I may have never seen such beautiful pasta. I can only imagine how delicious they taste. You certainly have the touch for adorable pasta.
ReplyDeleteI loved your thoughts on the garden too. It's true -- we tend to dote over the struggling plants. This year, my carrots were doing quite well, but when I pulled them out of the ground, they tasted incredibly bitter. Unsalvageable so. How bizarre! Well, we always have next year to try again. I wonder if you start the favas inside in April, if they'll get to full size by June, before the real heat comes.
Ha! You're nuts! I mean, I am completely in awe of what you have done here, and would love to eat it. At my house, favas are the easiest of many easy crops, and we can hardly eat them all. http://igrewit.blogspot.com/2012/06/favas-year-of.html Fastest preparation that I've found is to oil and salt the pods, grill them, and bring them to the table piled on paper for the hungry to shell.
ReplyDeleteSalivating! Bravo!
ReplyDelete