Sunday, November 27, 2011

Traditions to stand by

Tartine Porchetta
The only thing traditional about Thanksgiving around here this year was the mashed potatoes. You'll have to excuse me. This was the first year in which I was in charge of everything, and I just didn't feel wedded to tradition. Maybe it has something to do with the fact that while growing up, my grandmother did it all--a twenty-pound bird, stuffing, mashed potatoes, three pies, the works. I didn't start contributing to holiday dinners until a few years ago, when I was a vegetarian. And back then, I put some decidedly non-traditional fare on the table alongside the turkey and sweet potatoes (French lentils with ricotta dumplings, this cauliflower cake). So, I guess the precedent was already set.
I envisioned a meal that would be a fun challenge for me to prepare, that would raise a few eyebrows around the table, and that would leave everyone full and happy at the end of the night. So, Thanksgiving for four went something like this:
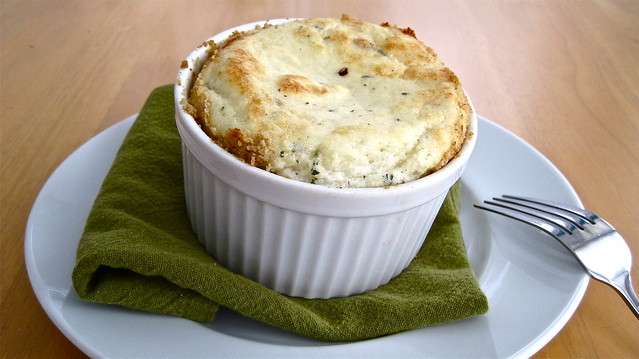
  • roasted vegetable soup: delicata squash and fennel roasted with shallots, garlic, sage and rosemary, puréed with chicken stock and a touch of cream
  • Momofuku Ssäm Bar's brussels sprouts (which you can find here with Talley)
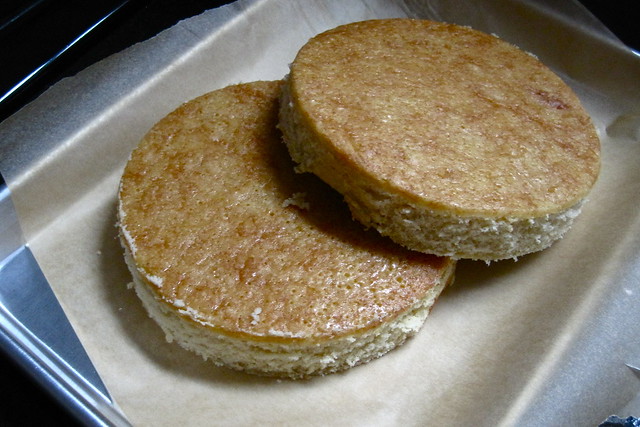
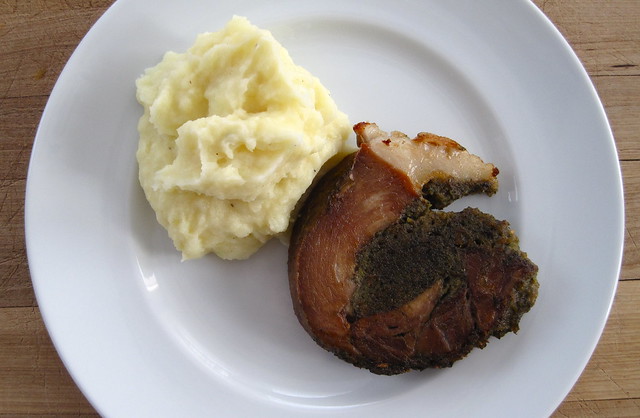
  • Thomas Keller's mashed potatoes (found here)
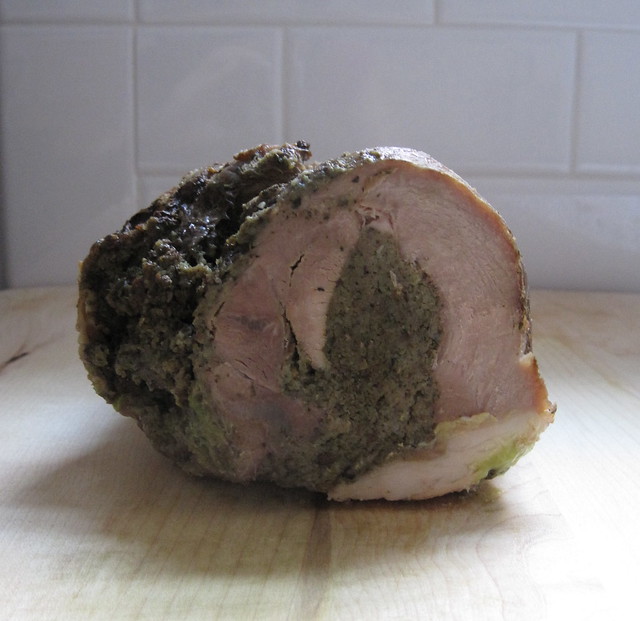
  • herb-stuffed porchetta from Tartine Bread
  • blue cheese and honey ice cream, thanks to The Perfect Scoop and a shiny new ice-cream maker (Yay! Also, here is a variation on the ice cream--not quite what's in the book)
A bit of an eclectic menu, I know, and rather pungent too--but it was great. We all ate more than we should have. We groaned getting up from the table. I may not be wedded to tradition when it comes to what we eat, but eating well, maybe too well, on Thanksgiving--now that's a tradition I stand by.
Leftovers are another of those things that make Thanksgiving what it is. For me as a kid, that meant a few days' worth of hot turkey sandwiches smothered in gravy and some stuffing on the side. This year, though, it's porchetta galore.
Let me explain. When I found out that I'd be hosting Thanksgiving, I was pretty convinced at the outset that I didn't want to do a turkey. A quick flip through Tartine Bread settled it. We were going to make the Tartine porchetta! Here's what you need to know. Slow-roasted pork shoulder. Butterflied and stuffed with sourdough breadcrumbs and a veritable bouquet of aromatics. Rolled up and trussed. Roasted for a solid eight hours, basting in its own fat and juices until unbelievably tender and fragrant. Sliced and pan-seared right before serving. Brilliant. Unfussy. As the book says, "...a regal way to cook a pork shoulder."
We went to The Butcher & Larder Wednesday afternoon and came home with our prized shoulder, fresh off a hog just delivered that day. We trimmed and stuffed and rolled, then let it roast into the night. My kitchen has never smelled so good at four in the morning.
Porchetta
I'm convinced. Holiday feasts and porchetta were made for one another. Roast your porchetta the night before, ease yourself into sweet, pork-filled dreams, wake up and tuck your roast into the fridge to rest, and you won't have to worry about it for the rest of the day. The oven will be free for whatever else you've got up your sleeve. When the time comes, give yourself a few minutes for slicing and a quick pan-sear, then call everyone to the table. Dig into some seriously good pork.
And then there's my favourite part. Unless you've got a crowd of 8 or 10 over, there will be leftovers in abundance. Think about the sandwiches. I can assure you. This porchetta, cold, thinly sliced, will be exactly what you want when you're all cooked-out in the aftermath.
Porchetta cross-cut
Porchetta
Adapted, just a little, from Tartine Bread
Note: Wrapping. It's important to wrap your porchetta in foil well to keep in the juices and fat. I didn't do quite as good a job as I should have, so the roast had a few dry spots. Don't let it happen to you! Make ahead. I think you can get away with roasting the porchetta 24-36 hours in advance. It will keep splendidly in the refrigerator on the sheet pan you baked it on, once cooled. Because of the long cooking time and the required resting period in the refrigerator, it would be very difficult to do everything day-of. The folks at Tartine recommend roasting it overnight, and that's more or less what I did. Stuffing. All of those herbs do wonders for the pork shoulder, but I found the stuffing itself a little too herbaceous. I'd consider adding some sautéed shallot or maybe even some grated apple to the mix next time.

5 pounds boneless pork shoulder
1 teaspoon sea salt

1 bunch flat-leaf parsley, stems removed
12 fresh sage leaves
1 tablespoon fresh rosemary leaves
2 tablespoons fresh thyme leaves
1 cup fennel fronds, chopped
1/4 teaspoon red pepper flakes
1 tablespoon fennel seeds
5 cloves garlic
2 teaspoons salt
4 slices day-old rustic sourdough, each about 1-inch thick, torn into small chunks
3-5 tablespoons olive oil

Have your butcher butterfly the pork shoulder to an even thickness of about 1 inch. You should have a long sheet of meat roughly 9 by 14 inches. Lay the pork shoulder out flat on a cutting board. Season with 1 teaspoon salt.
Preheat the oven to 220 degrees F.
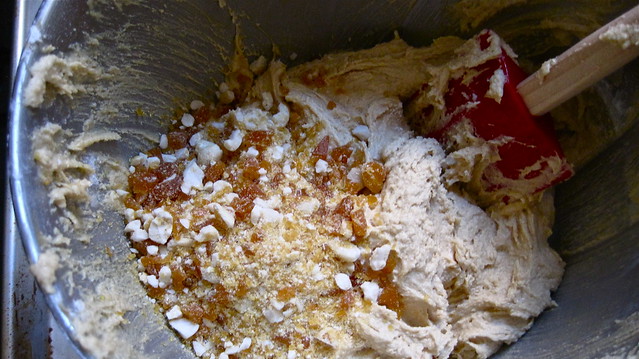
To make the stuffing, in a food processor, combine the parsley, sage, rosemary, thyme, fennel fronds, red pepper flakes, fennel seeds, garlic, and salt, and pulse to chop. Add the bread and 3 tablespoons olive oil and pulse to combine. If the stuffing still looks a little dry still--the consistency should be almost spreadable and paste-like--add more olive oil and pulse again.
Spread the stuffing evenly over the surface of the meat. Beginning on one side, roll the meat up tight and secure with butcher's twine.
Place the roll on a sheet of aluminium foil. Fold the sides of the foil up and around both ends of the roast and then roll the roast to enclose it in foil. This helps retain the moisture and fat while the roast is cooking. Place the roast on a baking sheet and bake until the meat is very tender, 8 to 10 hours.
Leave the aluminium foil on the roast while it cools. Refrigerate for at least 2 hours to allow the roast to firm up and hold its shape.
Remove the roast from the foil and cut off the twine. Cut the roast crosswise into slices about 1-inch thick. Heat a heavy skillet over medium heat. When the skillet is hot, add enough olive oil to cover the bottom of the pan, and add as many slices of porchetta as will fit in the pan. Cook the slices until brown, 3 to 5 minutes. Turn and cook until browned on the second side and heated through, 2 to 4 minutes. Serve.
Serves 8-10.

Wednesday, November 23, 2011

We couldn't resist

Apple-pie Layer Cake
This cake, Christina Tosi's apple-pie layer cake, was going to be the dessert at our Thanksgiving table on Thursday. I had it all planned out. There was a schedule, and I stuck to it. I made one of its five components every day starting last Wednesday. I assembled everything on Sunday afternoon. It was beautiful. It couldn't have gone better. I put it in the freezer to set. It could sit there tucked away until Thursday. I would just have to thaw it out early in the day. But on Monday afternoon, we couldn't resist. My boyfriend's parents were going to arrive from New York just in time for dinner. Wasn't that occasion enough to enjoy some cake? We could just whip up a quick apple tarte tatin for Thursday, we reasoned. So we held our breaths, popped the cake out of its metal ring, and peeled off the clear acetate that had been holding it all together.
It really was a thing of beauty. Three six-inch discs of barely brown butter cake stacked high with liquid cheesecake, buttery pie crumb, and apple-pie filling, all of it crowned with pie-crumb frosting and more pie crumb. Glorious. Certainly the most impressive-looking cake ever put together in my kitchen. See why we couldn't wait any longer?
Right after dinner, we dug in, and it was amazing. It was familiar tasting but not. It was like apple pie but not. It was everything you'd ever want in a cake--rich, moist, wildly flavourful, and delightfully unexpected. It was just about perfect. Every bit of it, down to the tiniest nub of pie crumb, was so good. If only it would last us until Thanksgiving dinner.
Cake ingredients
Barely brown butter cake
More ingredients
And it was just as fun to make as it was to eat. Though none of it was particularly challenging, it was eye-opening. Who knew, for example, that a little cream cheese, cornstarch, milk sugar, and egg barely baked would turn into something unmistakably cheesecake-like but totally spreadable? I know that I gushed about Christina Tosi and the Momofuku Milk Bar Cookbook just a few short weeks ago, but I'll do it again. This woman is a genius. Her desserts conjure up childhood in strange and wonderful ways. And all of it is put together with such care--every last little crumb. While making the components for the layer cake last week, I was in constant danger of eating up whatever I'd just made.
Crowning pie crumb
I don't think I can share the whole cake with you. I have to leave some of the Milk Bar cookbook for you to read and play with on your own. But I will give you the liquid cheesecake. I could definitely have just eaten the whole batch of it on my own the day I made it, spoonful after guilty spoonful.
Make the liquid cheesecake. Have it with carrot cake. Spread it on slices of vanilla pound cake. Share it with your friends (or not). Taste Tosi's genius and go out into the world for more.

Liquid Cheesecake
Adapted, barely, from the Momofuku Milk Bar Cookbook

225 g / 8 oz cream cheese
150 g / 3/4 cup sugar
6 g / 1 tablespoon cornstarch
2 g / 1/2 teaspoon sea salt
25 g / 2 tablespoons milk
1 egg

Heat oven to 300 F.
Put the cream cheese in the bowl of a stand mixer fitted with the paddle attachment and mix on low speed for 2 minutes. Scrape down the sides of the bowl with a spatula. Add the sugar and mix for 1-2 minutes, until the sugar has been completely incorporated. Scrape down the sides of the bowl.
Whisk together the cornstarch and salt in a medium bowl. Whisk in the milk in a slow, steady stream, then whisk in the egg until the slurry is homogenous.
With the mixer on medium-low, stream in the egg slurry. Paddle for 3-4 minutes until the mixture is smooth and loose. Scrape down the sides of the bowl.
Line the bottom and sides of a 6x6 inch baking pan with aluminium foil and/or parchment paper. Pour the cheesecake batter into the pan, put the pan in the oven, and bake for 15 minutes. Gently shake the pan. The cheesecake should be firmer and more set toward the outer boundaries of the baking pan but still be jiggly and loose in the dead center. If the cheesecake is jiggly all over, give it five minutes more. And 5 minutes more if it needs it. If the cheesecake rises more than a 1/4 inch or begins to brown, take it out of the oven immediately.
Cool the cheesecake completely, to finish the baking process and allow the cheesecake to set. The final product will resemble a cheesecake, but it will be pipeable and pliable enough to easily spread or smear, while still having body and volume. Once cool, the cheesecake can be stored in an airtight container in the fridge for up to 1 week.

Friday, November 11, 2011

An Ugly Duckling

Sunchoke
Meet my favourite root vegetable, the sunchoke. I know, set alongside the season's other abundances--the acorn squash, the honeycrisps, the sweet potatoes, even--he's not much to look at. In fact, you could say that he's a bit of an ugly duckling. But don't be put off by his strange, knobbly appearance. He's a good one to have around--mildly sweet and just a tad earthy, reminiscent of mushrooms and artichokes. I think he'd play well with other root vegetables, maybe roasted with coarse sea salt, thyme, and lots of olive oil. But I've never had the chance to attempt something like that. See, the thing is, sunchokes are hard to come by, at least in my experience. I used to get them from one particularly adventurous farmer at the market back home. She was always selling some weird and wonderful vegetable that I'd never heard of, and she convinced me to give her sunchokes a try one day. I was back for more the next week. I loved them. That was a couple of years ago. I've only seen them around a few times since.
So whenever I have gotten my hands on some sunchokes in the past year or so, I've done one of two things. The first is really the best way to have them if you're new to them. You'll get to see what they're all about. Once you've peeled them, just slice them into coins a quarter-inch thick and sauté them in a good amount of butter. They're ready when they've turned crisp and thoroughly golden and have sweet and creamy centres. This is the way to enjoy them when they're in season. Sometimes I fold them into omelettes this way.
The second is for the long haul, for those long months in which you won't see a single sunchoke anywhere. Simmer your sunchokes in lemony water until tender, then drain and purée in a food processor until smooth. Transfer your purée to a zip-top bag and tuck it in the freezer. Then, at your leisure--in a week, or even four or five months from now--you'll be able to make Yotam Ottolenghi's sunchoke soufflé.
Béchamel mixtureSunchoke Soufflé
This soufflé has been a favourite of mine for a while now. I've made it four or five times since early spring--basically, whenever I could find enough sunchokes for the purée. I always make more purée than the recipe calls for and divide it into batches (enough for two or four individual soufflés) for the freezer. You never know when you'll need to impress someone. This soufflé has you covered. It's luxurious on the tongue but without being heavy. Its flavours are fittingly delicate--wisps of lemon, sunchoke, thyme, and goat's cheese held aloft, as it were, in a creamy cloud-mass of egg white and béchamel. And with its pretty, puffed, golden cap, you'll almost hesitate to take your fork to it. But don't--dig up those soft, creamy mounds, those buttery, walnut-crusted edges. It'll be marvellous.
I'm not sure why soufflés have been made out to be so difficult to prepare. They're not--you just need to know a thing or two about beating egg whites. A lot of it is just preparation--make sure that your whites are at room temperature (they beat better this way) and that your bowl and tools are perfectly dry and clean (any fat will interfere with the process). The rest is a matter of care--start out slow to break down the protein bonds, increase your speed once the whites have turned bubbly and greyish, start checking your peaks when the whites have turned foamy, thick, and glossy. And finally, be gentle with your beaten egg whites when you fold them into the other ingredients. Using a broad, flexible spatula, turn the mixture over onto itself, give your bowl a quarter turn, fold again, and repeat, just until everything is combined. Let the oven do its magic. Your work is done.
A few things about sunchokes: sunchokes are also commonly known as Jerusalem artichokes, though the plant of which they are tubers is actually a species of sunflower native to North America. Sunchokes are typically available starting in October, but you can find them as late as March--farmers still dig them out of the ground in early spring. They seem to come in two basic varieties--the really knobbly ones, like those I found at the grocery store a couple of weeks ago, and the long, tapered ones that kind of look like parsnips. The difference doesn't go much further than that--the latter are just less of a pain to peel, so count yourself lucky if you can find that kind. Choose sunchokes that are firm, smooth, and unblemished. If they're pinkish in some spots, that's okay. It's an effect of the soil they grew in. If you live in the Chicago area, I've ordered sunchokes from this grocery delivery service. It hasn't offered them so far this season, but they were available for a few weeks last March.

Sunchoke Soufflé
Adapted from Yotam Ottolenghi's soufflé at The New Vegetarian
Note: About doneness. If the photo that accompanies the original recipe is any indication, your soufflés should have deeply golden caps when they're ready. I've always baked mine for the full 18 minutes, and they've always been just a touch golden. This might be due to the fact--I'm a little embarrassed to say--that I've completely overlooked the instructions about preheating the sheet pan and baking the soufflés in the top-third of the oven every time I've made them. I don't know how that happened, but I'll update these headnotes once I've followed the recipe properly. Update 01-06-12: I pre-heated a sheet pan as directed, and it made no difference to the appearance or doneness of the soufflés! About the goat's cheese. Ottolenghi doesn't specify what kind of cheese to use, only that it should be hard. I've stuck to goat's milk gouda, since that's what's most readily available in my neighbourhood, but feel free to experiment and tell me about it. The gouda, by the way, is pleasantly goat-y but milder than chèvre. About quantities. Call me obsessive, but I weighed my sunchokes before peeling and trimming, after peeling and trimming, and, finally, after simmering and puréeing, just to see whether your really needed to buy 300 g of sunchokes to get 130 g of purée. I don't think you do. I lost about 100 g of sunchoke to peeling and trimming (all those knobbly bits) or about 20% of their total weight (507 g), and I lost about another 75 g during cooking or about 18% of the remaining weight. So count on losing about 35% of the sunchokes you buy. That means, you should be able to scrape by with just 200 g of sunchokes to make four individual soufflés. About freezing. I try to get my sunchokes cooked and puréed as soon as I can after bringing them home from the store, so usually, they end up in the freezer. I've made soufflés with purée that had been frozen for about five months. The flavour and quality weren't noticeably different. Freeze your purée in freezer-safe zip-top bags and thaw it in the refrigerator the night before making the soufflés.
Grated zest and juice of half a lemon
300 g sunchokes (see headnotes)
30 g walnuts
60 g / 4 tablespoons unsalted butter
25 g / 2 tablespoons + 2 1/2 teaspoons all-purpose flour
1 cup milk
2 large eggs, separated (egg whites at room temperature)
1/4 teaspoon chilli flakes
1/2 tablespoon chopped thyme
120 g hard goat's cheese, grated (see headnotes)
1/4 teaspoon salt

Preheat the oven to 400 degrees F. Move an oven rack into the top-third of the oven and put a baking sheet on it; this will help the soufflés rise.
Pour the lemon juice into a medium saucepan and add enough water to half-fill the pan. Peel the sunchokes and immediately drop them in the water so that they don't discolour. Once they're all peeled, bring to a boil and simmer for 40 minutes, until soft. Drain and transfer to a small food processor bowl. Work to a purée, adding a little water, if needed, to bring it together. You will need exactly 130 g of purée.
Put four 10-ounce ramekins in the fridge to chill. Blitz the walnuts until powdery in a clean coffee mill. Melt half the butter and brush the insides of the ramekins. Spoon walnut powder into each ramekin and turn the dishes so it coats the base and sides. Tip out any excess powder.
Over moderate heat, melt the remaining butter in a medium pan. Stir in the flour, cook for a minute, then gradually add the milk, stirring, until the sauce is thick and bubbles appear on its surface.
In a large bowl, mix the 130 g of sunchoke purée, the egg yolks, chilli, thyme, cheese, lemon zest and salt. Add the sauce and stir until smooth. Set aside to cool down.
Put the egg whites in a large, clean copper or glass bowl and whisk until stiff but not dry. Add a little of the egg white mix to the sunchoke base and stir to loosen, then fold in the remaining egg whites with a large, flexible spatula, taking care to retain as much air as possible. Fill up each ramekin with the soufflé mix so it comes up 1.5 cm short of the top.
Place on the heated baking sheet, and bake for 12-18 minutes, until golden brown and risen well. Serve at once.
Serves four.

Sunday, November 6, 2011

It brought me right back

Momofuku Milk Bar Peanut Butter Cookies
Bakers don't get enough respect for what they do. I've heard it from people who don't cook at all. I've heard it from people who've worked in professional kitchens. It seems to be a pervasive attitude in some circles. You've heard them. They're disdainful of bakers and baking. They say things like: "Baking is what your grandmother does," or "Pastry chefs aren't hardcore enough." Well, try telling that to Christina Tosi. She's the amazing woman behind Momofuku Milk Bar, the outpost of all things good and sweet in the Momofuku empire. She's let loose such weird, wild, and delightful things on New York City as Crack Pie™, Cereal Milk™, and cake truffles. She is a one-woman force of nature, and she doesn't bake like your grandmother (which is not to say that you shouldn't love what grandmothers bake). In David Chang's words: "Don't let her nice demeanour and southern charm fool you; underneath she is a ruthless killer...just like her recipes [...] where simple flavours and ingredients combine in ways that make grown men whimper. Resistance to her sugar manifesto is futile." If anyone can take on that totally unwarranted disdain for bakers and baking, it's Christina Tosi. Let her at them.
Between the Milk Bars and the pastry programs at the other Momofukus, Tosi's reach has been limited mostly to those lucky enough to live or work in Manhattan. But as of last week, the game has changed. The Momofuku Milk Bar cookbook is out! Now we can all taste a bit of Tosi's sugary genius.
Peanut brittle
Peanut brittle shards
I got my copy about a week ago, and I've been giddy ever since. I've barely been able to put the book down. Chocolate-chip layer cake? Red-velvet ice cream? Cinnamon-bun pie?  Liquid cheesecake? It doesn't get any better than this. Christina Tosi taps into our childhood memories with her desserts and re-imagines the things we loved in strange and wonderful ways. Their flavours evoke the familiar and the comforting, the simple and sinful pleasures of childhood eating. (Tosi was one of those kids that snuck more than a spoonful of cookie dough when someone's back was turned.) In making and eating Tosi's desserts, you will be transported to simpler days--to the days in which you didn't pooh-pooh birthday cake from a box, in which it was okay to eat as much ice cream as you wanted, in which eating a handful of pretzels followed by a handful of chocolate chips was just the right thing to do. Tosi has no pretensions. She makes it okay for us to love these things again. She indulges us. She gives us her favourite birthday cake from a box, re-engineered by her and her team from scratch. What a woman.
Because Tosi's desserts are Momofuku-grade productions, most will be a bit of a project for us at home. The layer cakes, for example, typically involve five or six separate components to be made--but they totally look worth it (I have a feeling that birthdays this year are going to be especially fun). It helps that each of the recipes is derived from one of the Milk Bar's "mother" recipes. Once you're practiced at making Cereal Milk™, for example, a range of ice creams and pies calling for it or a variation on it will be at your fingertips. And you shouldn't worry about any leftovers you might end up with (though, I don't really see why you'd ever end up with leftovers). Tosi encourages the use of scraps and leftovers in subsequent baked goods. Cake truffles just are leftovers--scraps from layer cakes, whatever sort of leftover curd or cake filling there is lying around, and chocolate plus something crunchy to coat. How awesome is that?
Liquid glucose
Cookie dough!
For my first crack at the book, I opted for something far less elaborate--Milk Bar's peanut butter cookie. It only calls for two components, a peanut brittle and a cookie dough, and it's amazing. It might just be my favourite cookie ever. It has that perfect ratio of crisp edge to dense, chewy interior. And it's wonderfully balanced--when you make the recipe, it will strike you that you're adding what seems like an awful lot of salt for a cookie, but when you taste the dough (Tosi encourages it!) or take your first bite of cookie, you'll understand. The salt makes a difference--think salted-butter caramel and the difference the salt makes there. But best of all, maybe, is the peanut brittle. Tosi has you smash it up into little pieces and add it to the dough right at the end. In the cookie, these wind up as little toffee-like pockets of sweetness and chew. Beautiful, just beautiful.
Peanut butter cookies awaiting the oven
I'm not usually one for eating cookie dough. I was an obedient child and took salmonella very seriously. But I couldn't help but eat more than a little while making these. It's that good. My favourite part of making the cookies, though, was opening the jar of Skippy Peanut Butter and spooning it out for the dough. I hadn't had Skippy in years. I'd forgotten how good it smelled. It brought me right back. There were days when I didn't care what was in my peanut butter or how many cookies I'd eaten. It was nice to have a little of that again.

Peanut Butter Cookies
Adapted from the Momofuku Milk Bar Cookbook
Note: About the brittle. I don't recommend grinding it down in the food processor. The team at Milk Bar does, but I found that (a) it's easier to control what size your brittle pieces end up being when you break them with a rolling pin and (b) the brittle, because it's just sugar peanuts, is very hard--the brittle flying around at high speeds in my food processor actually scratched up the bowl a fair bit. Bread flour. The Milk Bar team found that they liked using King Arthur Bread Flour best for their cookies, and I always have a few pounds of it on hand, so that's what I used. Just listen to the recipe and don't overwork your dough. Liquid glucose. The liquid glucose has a role in the texture of the cookie--remember those fudgy centers and crisp edges I was talking about? In a pinch, you can substitute 2 tablespoons (35 g) of light corn syrup for it, but the corn syrup will add more sweetness to the cookies than you really want. I bought my liquid glucose here for a reasonable price. About the cookie scoop. Milk Bar specifically recommends this 2 3/4-oz ice cream scoop specifically, and I can understand how it would be handy if you were making a lot of Milk Bar cookies, but for one batch, you can probably manage without. Baking times. It is crucial that you don't overbake this cookie. If you do, you won't get that perfect fudgy center, and you'll shrug the cookie off and wonder what the big deal is. That's what happened with the first few that I baked. Don't do it!

170 g / 12 tablespoons (1 1/2 sticks) butter, at room temperature
300 g / 1 1/2 cups sugar
100 g / 1/4 cup glucose
260 g / 1 cup Skippy creamy peanut butter
2 eggs
0.5 g / 1/8 teaspoon vanilla extract
225 g / 1 1/3 cups bread flour
2 g / 1/2 teaspoon baking powder
1 g / 1/8 teaspoon baking soda
9 g / 2 1/4 teaspoons sea salt
1/2 recipe Peanut Brittle (recipe below)

Place the brittle in a large zip-top bag and break it into small pieces with a meat pounder or a rolling pin. The pieces should be about the size of short-grain rice.
Combine the butter, sugar, and glucose in the bowl of a stand mixer fitted with the paddle attachment and cream together on medium-high  for 2 to 3 minutes. Scrape down the sides of the bowl. Paddle in the peanut butter, then add the eggs (one at a time, incorporating completely before adding the next) and vanilla and beat for 30 seconds on medium-high speed. Scrape down the sides of the bowl, then beat on medium-high speed for 3 minutes. During this time the sugar granules will dissolve and the creamed mixture will double in size.
Reduce the mixer speed to low and add the flour, baking powder, baking soda, and salt. Mix just until the dough comes together, no longer than 1 minute. (Do not walk away from the machine during this step, or you will risk overmixing the dough.) Scrape down the sides of the bowl.
Still on low speed, mix in the peanut brittle pieces until incorporated, no more than 30 seconds.
Using a 2 3/4-ounce ice-cream scoop (or a 1/3-cup measure), portion out the dough onto a parchment-lined sheet pan. Pat the tops of the cookie domes flat. Wrap the sheet pan tightly in plastic wrap and refrigerate for at least 1 hour, or for up to 1 week. Do not bake your cookies from room temperature--they will not bake properly.
Heat the oven to 375 degrees F.
Arrange the chilled dough a minimum of 4 inches apart on parchment- or Silpat-lined sheet pans (seriously, these cookies sprrreeaad--you probably shouldn't bake more than 4-6 at a time on a standard-sized half-sheet). Bake for 17-18 minutes. The cookies will puff, crackle, and spread. After 17 or 18 minutes, they should be tan with auburn specks throughout. Give them an extra minute or so if that's not the case.
Cool the cookies completely on the sheet pans before transferring to a plate or an airtight container for storage. At room temp, cookies will keep fresh for 5 days; in the freezer, they will keep for a month.
Makes 15-20 cookies.

Peanut Brittle
From the Momofuku Milk Bar Cookbook
Note: I'm still terrified of making caramel on the stove, especially dry caramel, even though I've been making quite a bit recently. If you're new to the process, David Lebovitz has some very helpful tips  here--his photos are a good guide for the colour your caramel should be. If you have a tendency to panic and overstir the sugar like I do--creating annoying shards of sugar that refuse to melt--stop panicking, turn down the heat to low, and keep cooking the caramel. Break the shards up with your spatula, and they will melt. Continue as instructed.

1 cup / 6.8 oz sugar
1/2 cup / 2.95 oz blanched, unsalted peanuts

Line a sheet pan with a Silpat (parchment will not work here).
Make a dry caramel: Heat the sugar in a small heavy-bottomed saucepan over medium-high heat. As soon as the sugar starts to melt, use a heatproof spatula to move it constantly around the pan--you want it all to melt and caramelize evenly. Cook and stir, cook and stir, until the caramel is a deep, dark amber, 3 to 5 minutes.
Once the caramel has reached the target colour, remove the pan from the heat and, with the heatproof spatula, stir in the nuts. Make sure the nuts are coated in caramel, then dumb the contents of the pan out onto the prepared sheet pan. Spread out as thin and evenly as possible. The caramel will set into a hard-to-move-around brittle mass in less than a minute, so work quickly. Let the brittle cool completely.
Eat or cook with it at will. Store your brittle in an airtight container, and try to use it up within a month.